1. About this guide
This guide is intended for operational users. The name of the button is written exactly as it appears on the app. If your phone's screen is smaller, the panel's layout can move down, but the name and the order of work remain the same.
Owner / Administrator
Set up shop, cash register, products, stocks, prices, taxes, cash, reports, printers, and data backups.
The cashier
Log in, open the cash, accept orders, select members, apply discounts, accept payments, print the strokes, and close the cash.
Servant / Staff
Make table orders, record customer requests, manage reservations, and make absences as authorized.
The kitchen
Accept a kitchen printer or KDS ticket, change the status of the kitchen, and mark the order ready.
How to use this book
- Use the list of contents on the left to move the chapter.
- Type the word in the search box to filter the chapter.
- Press the button. Printed / PDF to save this book as a PDF.
- Follow the menu bar box, then do the numbered steps from top to bottom.
2. Preparation, Login and Log Out
Before the first day
- Make sure the date and time of the device is correct.
- Make sure the name, address, phone number, and logo of the restaurant are filled.
- Create a personal account for each cashier; don't share the admin account.
- Prepare the product, price, stock, tax, service fee, and payment method.
- Test the printer with one test print.
- Do one practice deal and then check the reports.
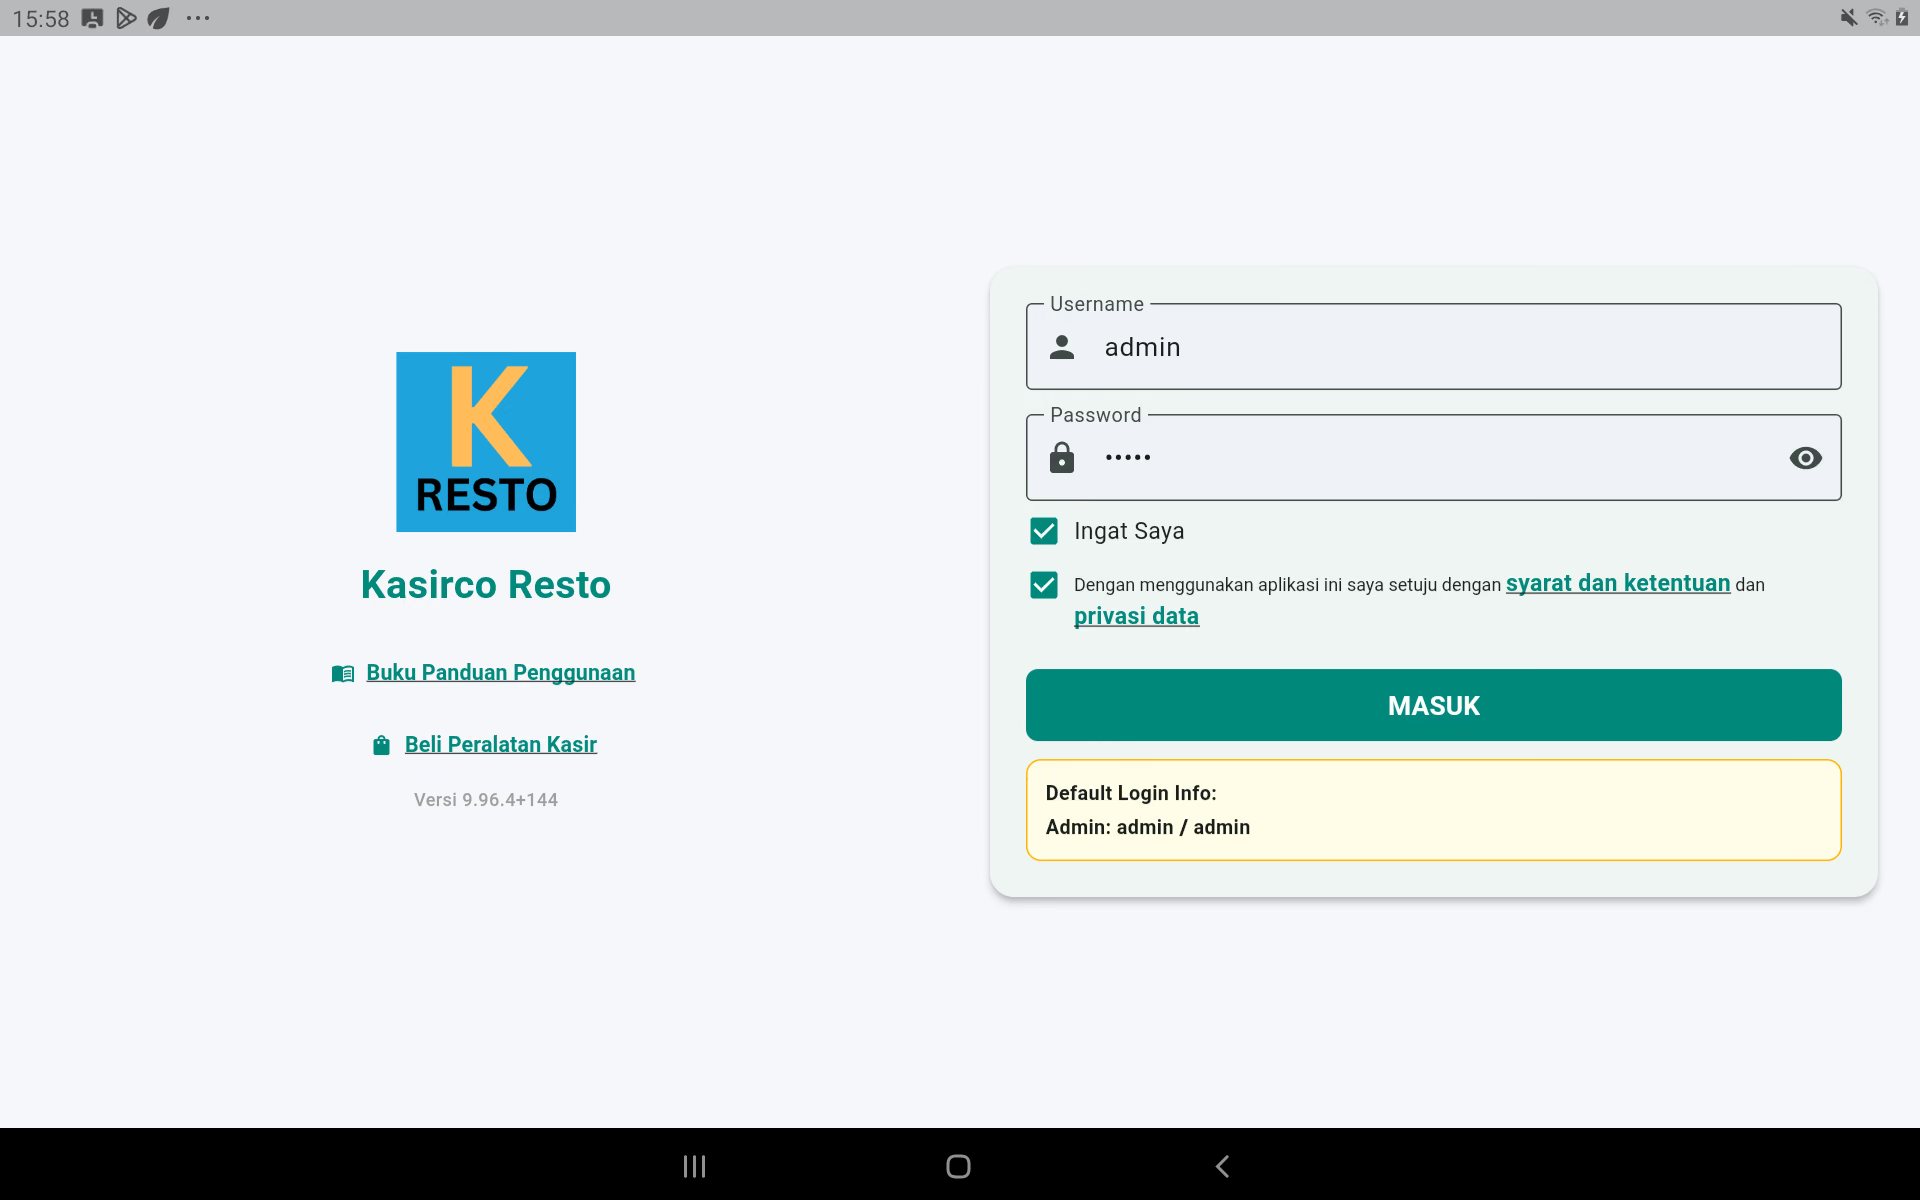
Log in to the site
- Open the app Kasirco Resto.
- Press the box Username, and then enter the username.
- Press the box Password, and then enter the password. The eye icon can be used to check the writing.
- The check. Remember me Only on the store's equipment.
- Make sure the terms and conditions are checked.
- Press the button. Get in there.. The cashier page will appear if the data is correct.
If the login fails
- Check the upper and lower case.
- Make sure there's no extra space.
- Have the admin check if the account is still active.
- Do not try to keep up if the account is temporarily locked; wait and contact the owner.
Sign up
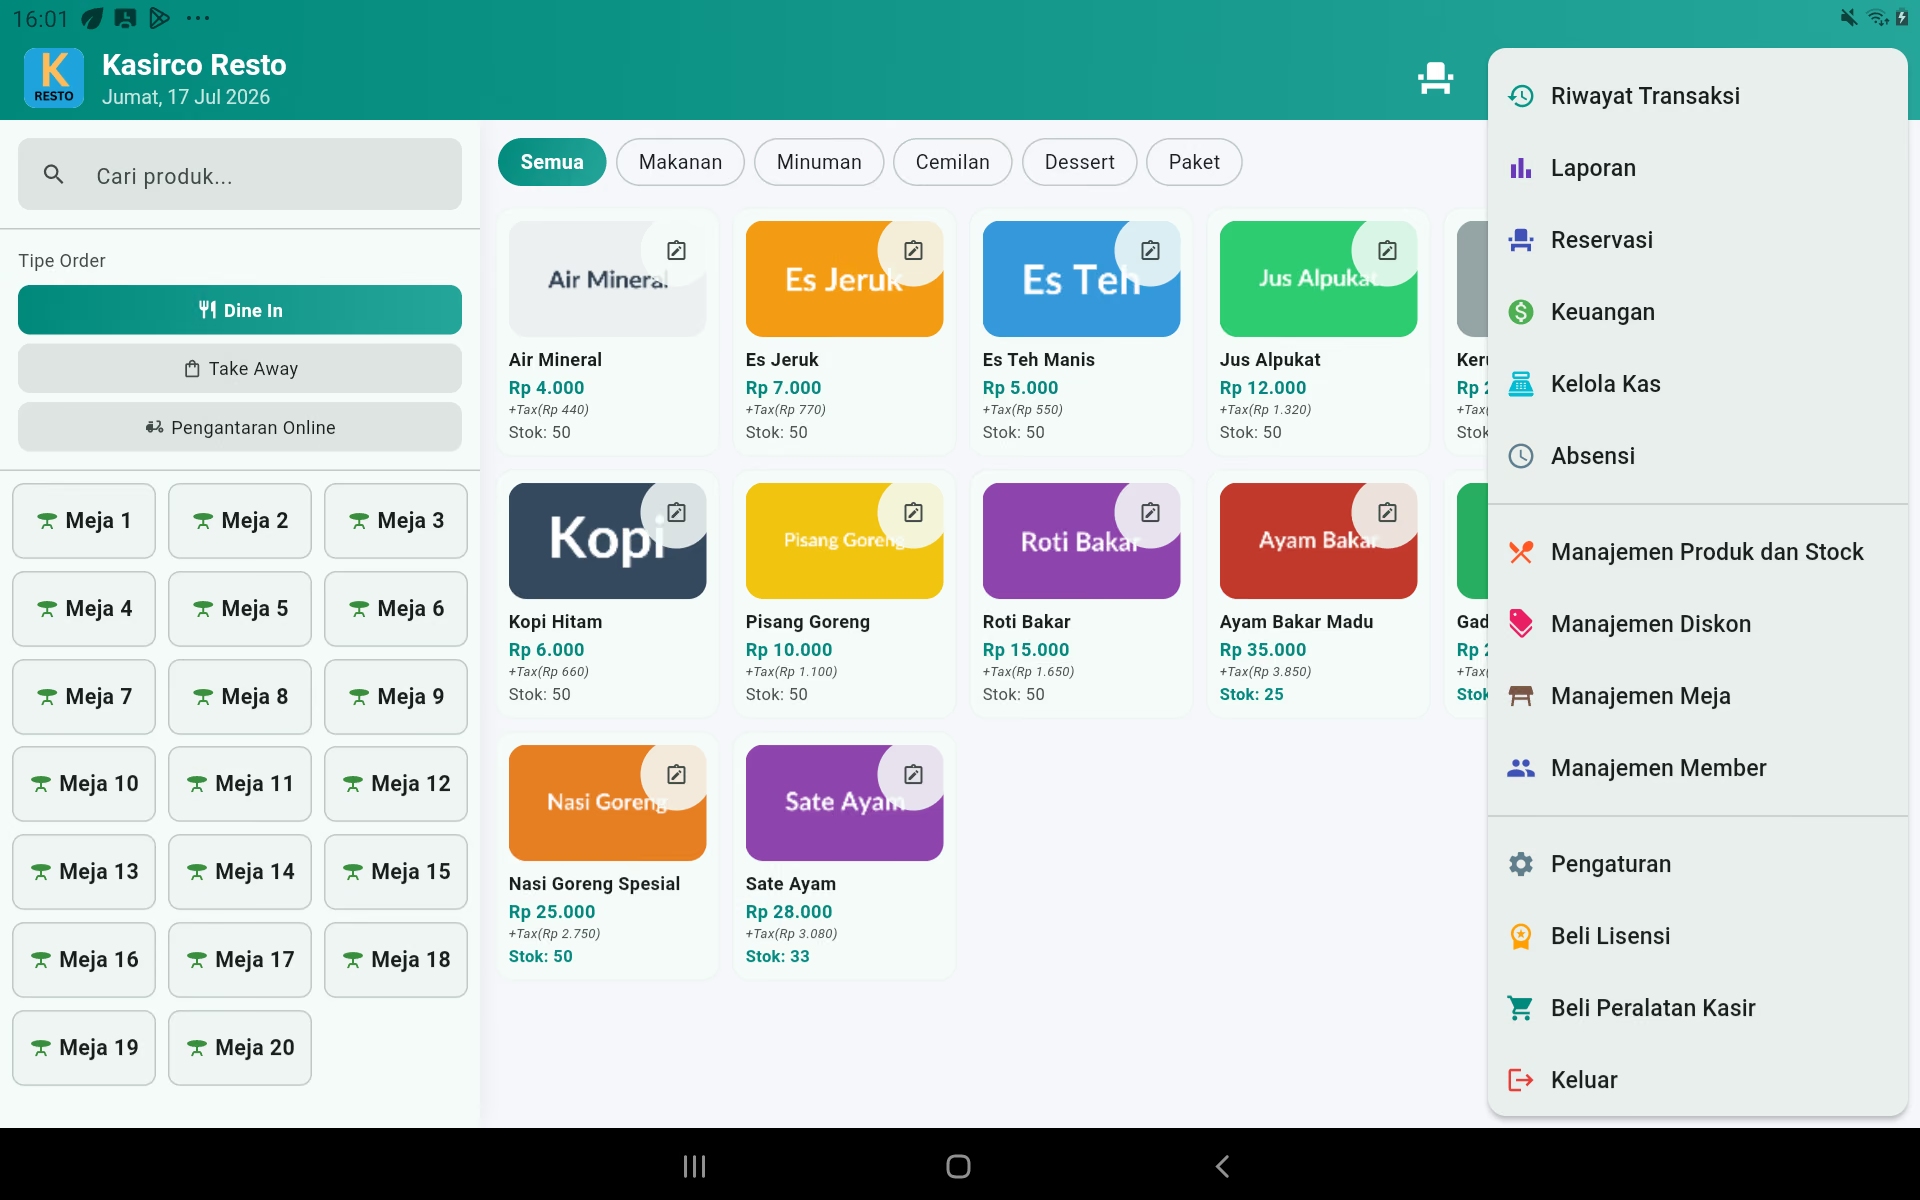
POS → top right three point → Exit
- Finish or keep an order open.
- Press the third point, then Get out of here..
- Confirm when asked.
- Make sure the login page appears before leaving the device.
3. Knowing the POS Page
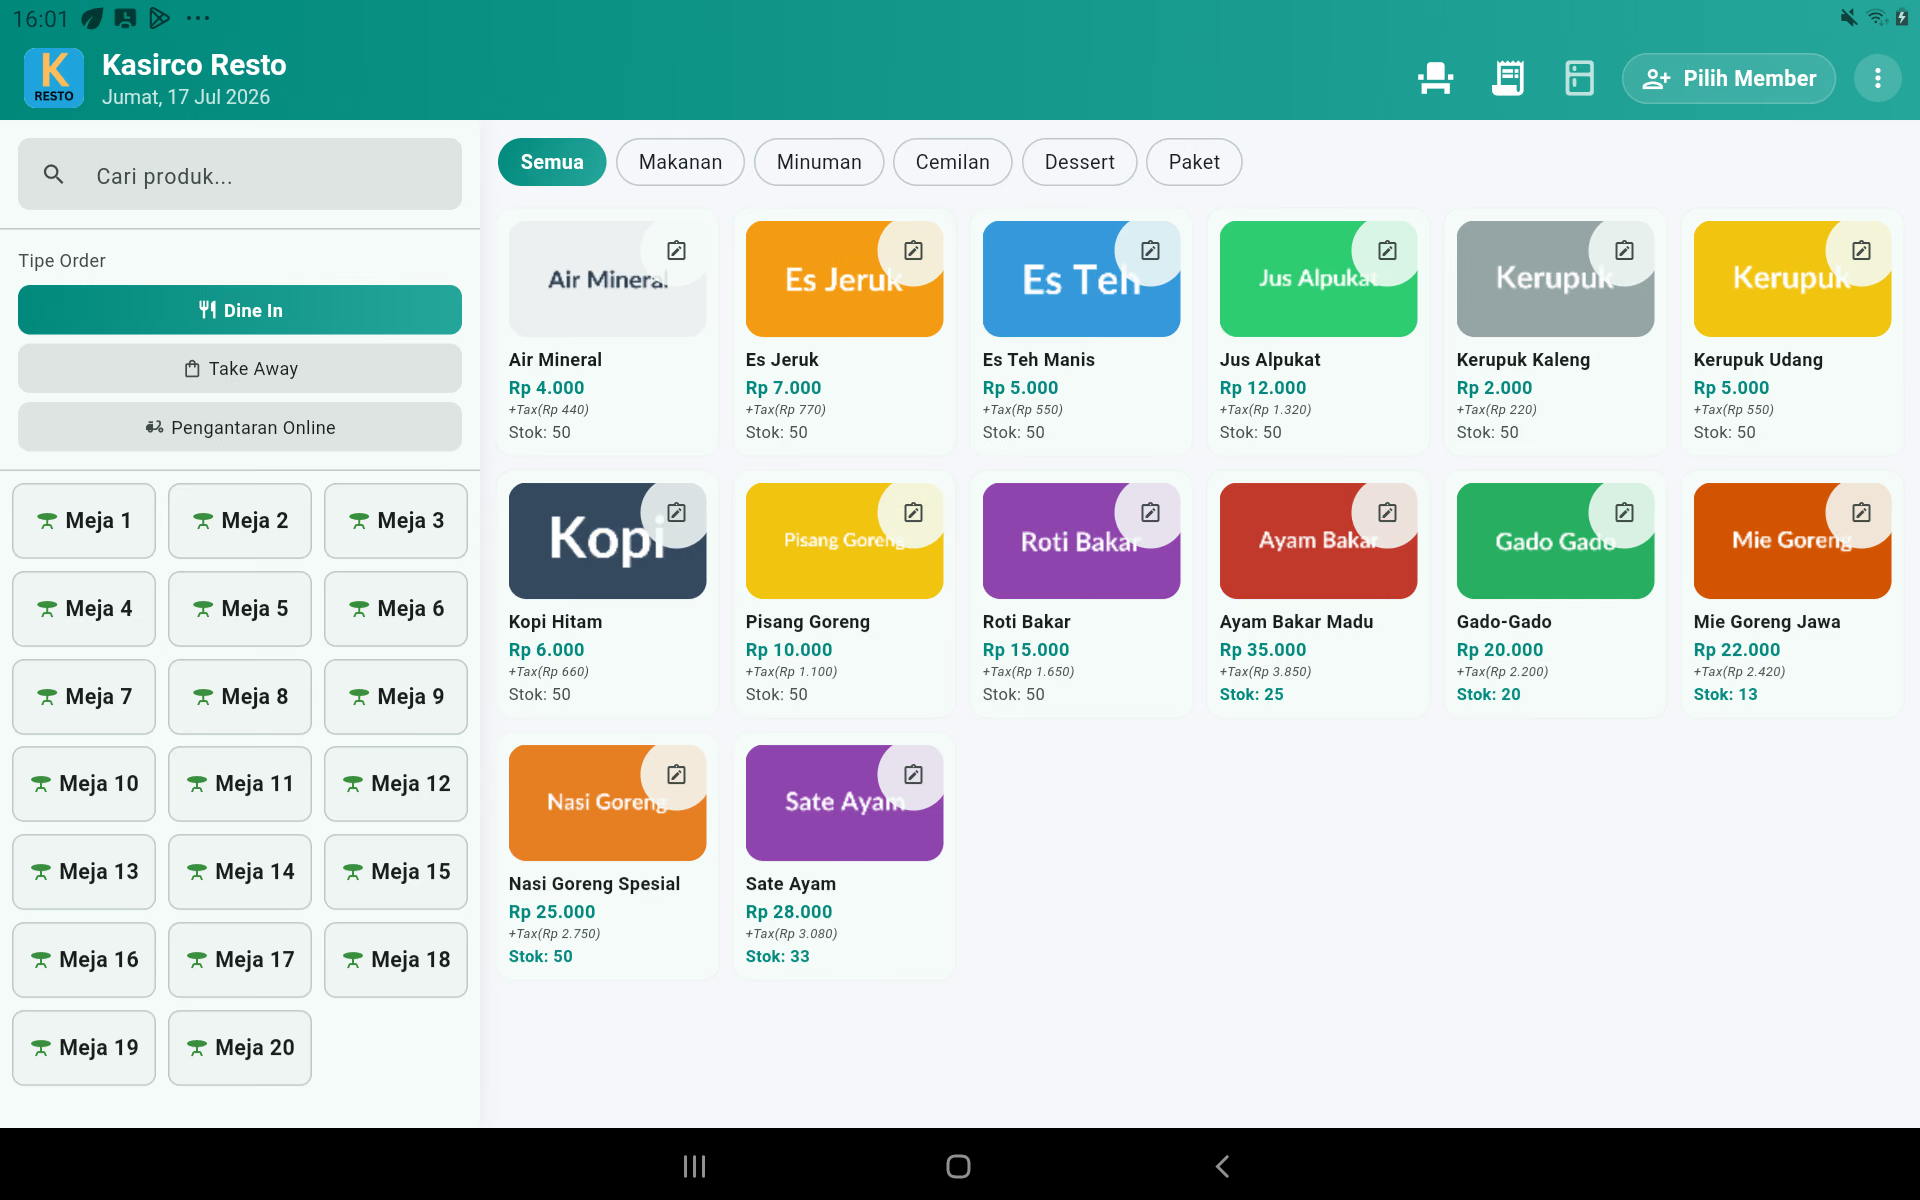
| The section | Useful |
|---|---|
| Look for the product | Filtering products by name. |
| Dine in | Orders are placed and a table is required. |
| Take it away | Order is taken home; fill in the customer's name when requested. |
| Delivery by Internet | Order from the online platform; select the platform name. |
| The table | Choose a customer's place or reopen a table order. |
| The category | Displaying products from a particular group. |
| Product card | Displays name, price, tax, stock, and quick edit buttons for authorized users. |
| Icon printer | Open the settings or printer status. |
| Order icon | See the order saved for payment later. |
| The KDS icon | See the order status of the kitchen. |
| Select a Member | Connecting the customer member to the transaction. |
Meaning of table color
Colors can adjust the theme, but generally the available table looks neutral or green, the table containing the order is marked with an active marker, and the reservation table has a special marker. Press the table to see the action available.
Find the product quickly
- Press categories such as Food Or Drinking.
- If the list is still long, press Look for the product.
- Type some names, for example nasi.
- Press the product card to add it.
4. Creating and Managing Transactions
Dine in
- Choose Dine in.
- Press the available table.
- Pick the product one by one.
- Pick an addon or topping if it appears.
- Set the numbers and notes on the basket.
- Press the button. I'll see you later. When an order needs to be sent to the kitchen but not yet paid, or press Pay it.
Take it away
- Choose Take it away.
- Fill out the customer's name and phone number when requested.
- Add the product.
- Check the take away price, the amount, and the records.
- Save it or pay it.
Delivery by Internet
- Choose Delivery by Internet.
- Choose a platform like Gojek, Grab, Shopee Food, or any other platform that you've already created.
- Add the product. The app uses the appropriate platform pricing.
- Check the customer's number/name on the record if necessary.
- Complete the order according to the payment method of the platform.
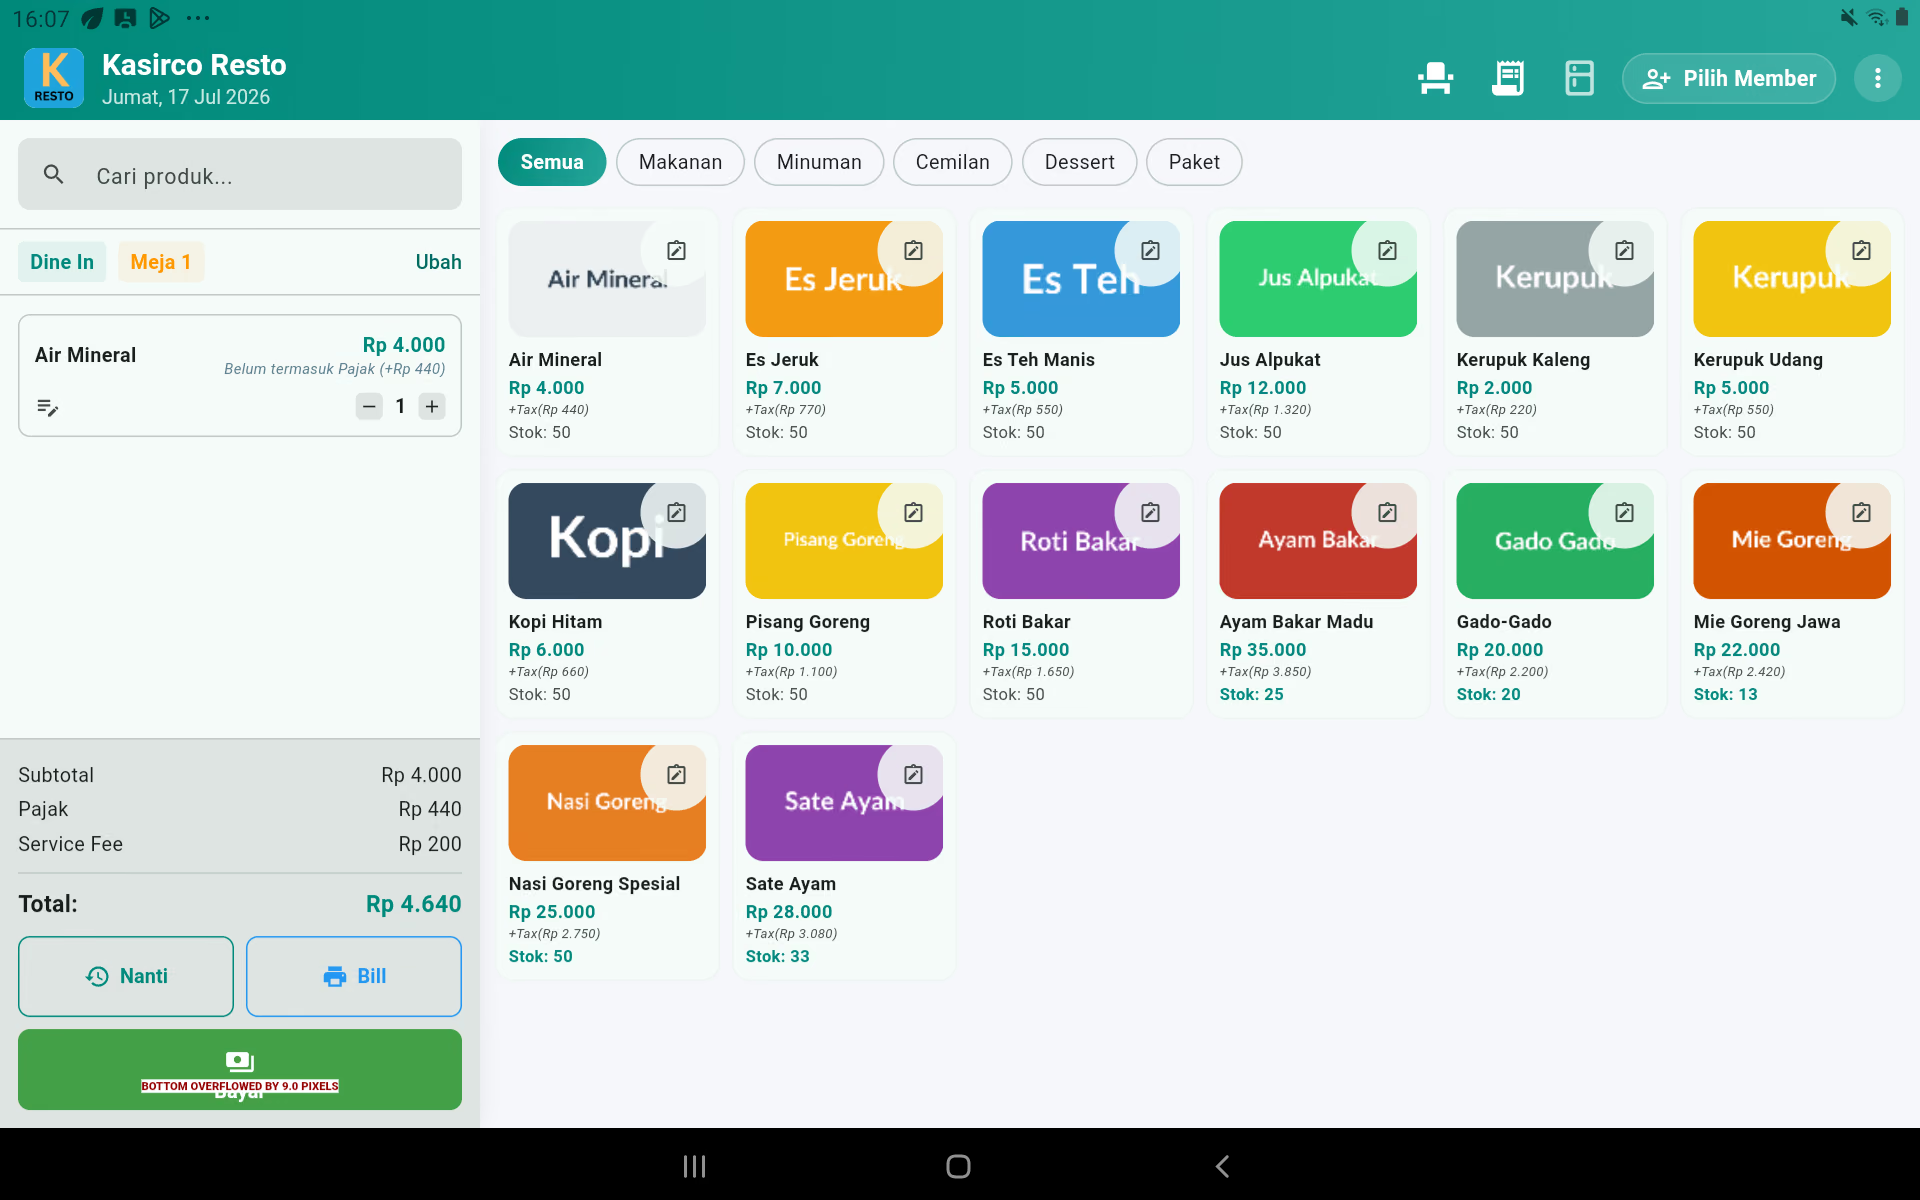
Changing the basket items
| The action | The way |
|---|---|
| Add the number | Press the plus sign on the item. |
| Reduce the number | Press the sign of the fall. If the number is zero, the item is deleted. |
| Special amount | Press the number number, then enter the desired number when available. |
| Notes | Press the note/pencil icon on the item, fill in for example not sharp, and save it. |
| Addon | Open the item or add it back with the correct topping option. |
| Get rid of all of it. | Use the cart-off icon and confirm. |
Table order: save and pay later
- Choose Dine in.
- Pick the table that's still available.
- Add the product, addon, quantity, and order record.
- Check the table and fill the order.
- Press the button. I'll see you later..
- Orders are kept as unpaid, tickets are sent directly to the kitchen/bar printer, and the immediate stock is reduced.
- The basket is empty. The table turns into a full and keeps the order.
Call back from the table.
- At the POS, choose Dine In.
- Press the marked table to fill it.
- On the message The table... It's full., choose Keep the order.
- Old orders with products, addons, notes, members, and order numbers loaded into the cart.
- Add or subtract items as needed.
- Press the button. I'll see you later. to keep it back, or Pay it to settle the payment.
Take Away order: save and pay later
- Choose Take it away.
- Add the product, add-ons, numbers, and notes.
- Press the button. I'll see you later..
- If there is no customer data, dialogue Order information It's coming up.
- The content Customer name Because it's a must. The phone number can be emptied.
- Press the button. Keep it.
- Orders are kept as unpaid, kitchen/bar tickets are shipped, and immediate stock is reduced.
Call back the Take Away
- Press the icon Order Not Paid It's a stucco-shaped box on top of the POS.
- The dialogue Unpaid order list It's showing the table order and Take Away.
- Match the customer's name, order number, time, and total.
- Press the button. Choose On the right order.
- The order is loaded into the basket.
- Change it when you need to, then press Later or Pay.
Call all unpaid orders from the icon
This method can be used for Dine In or Take Away. The icon displays the number of pending orders. The list doesn't show a queue number, so match it by table/client name, order number, hour, and total.
What happens when the pending order is changed?
- Old stock is restored, and then the stock is reduced to the new stock so that it is not cut twice.
- Additional products are printed as additional tickets to the kitchen/bar.
- The products that are reduced or removed are printed as cancellation tickets so that the kitchen does not process them.
- The order number and old queue numbers are still in use.
Print the bill temporarily
Press the button. Bill, what? to print out the details temporarily. Bill didn't close the order and it wasn't proof of payment.
Split bill
- Open the active order.
- Choose Split Bill When the button is available.
- Determine the item and amount paid in the first part.
- Finish the payment.
- Repeat for the remaining items until the entire bill is paid.
Move the table.
- Press the table that's holding the order.
- Choose action Move the table.
- Pick an empty destination table.
- Check that the order is now appearing on the new table.
5. Payments and Strokes
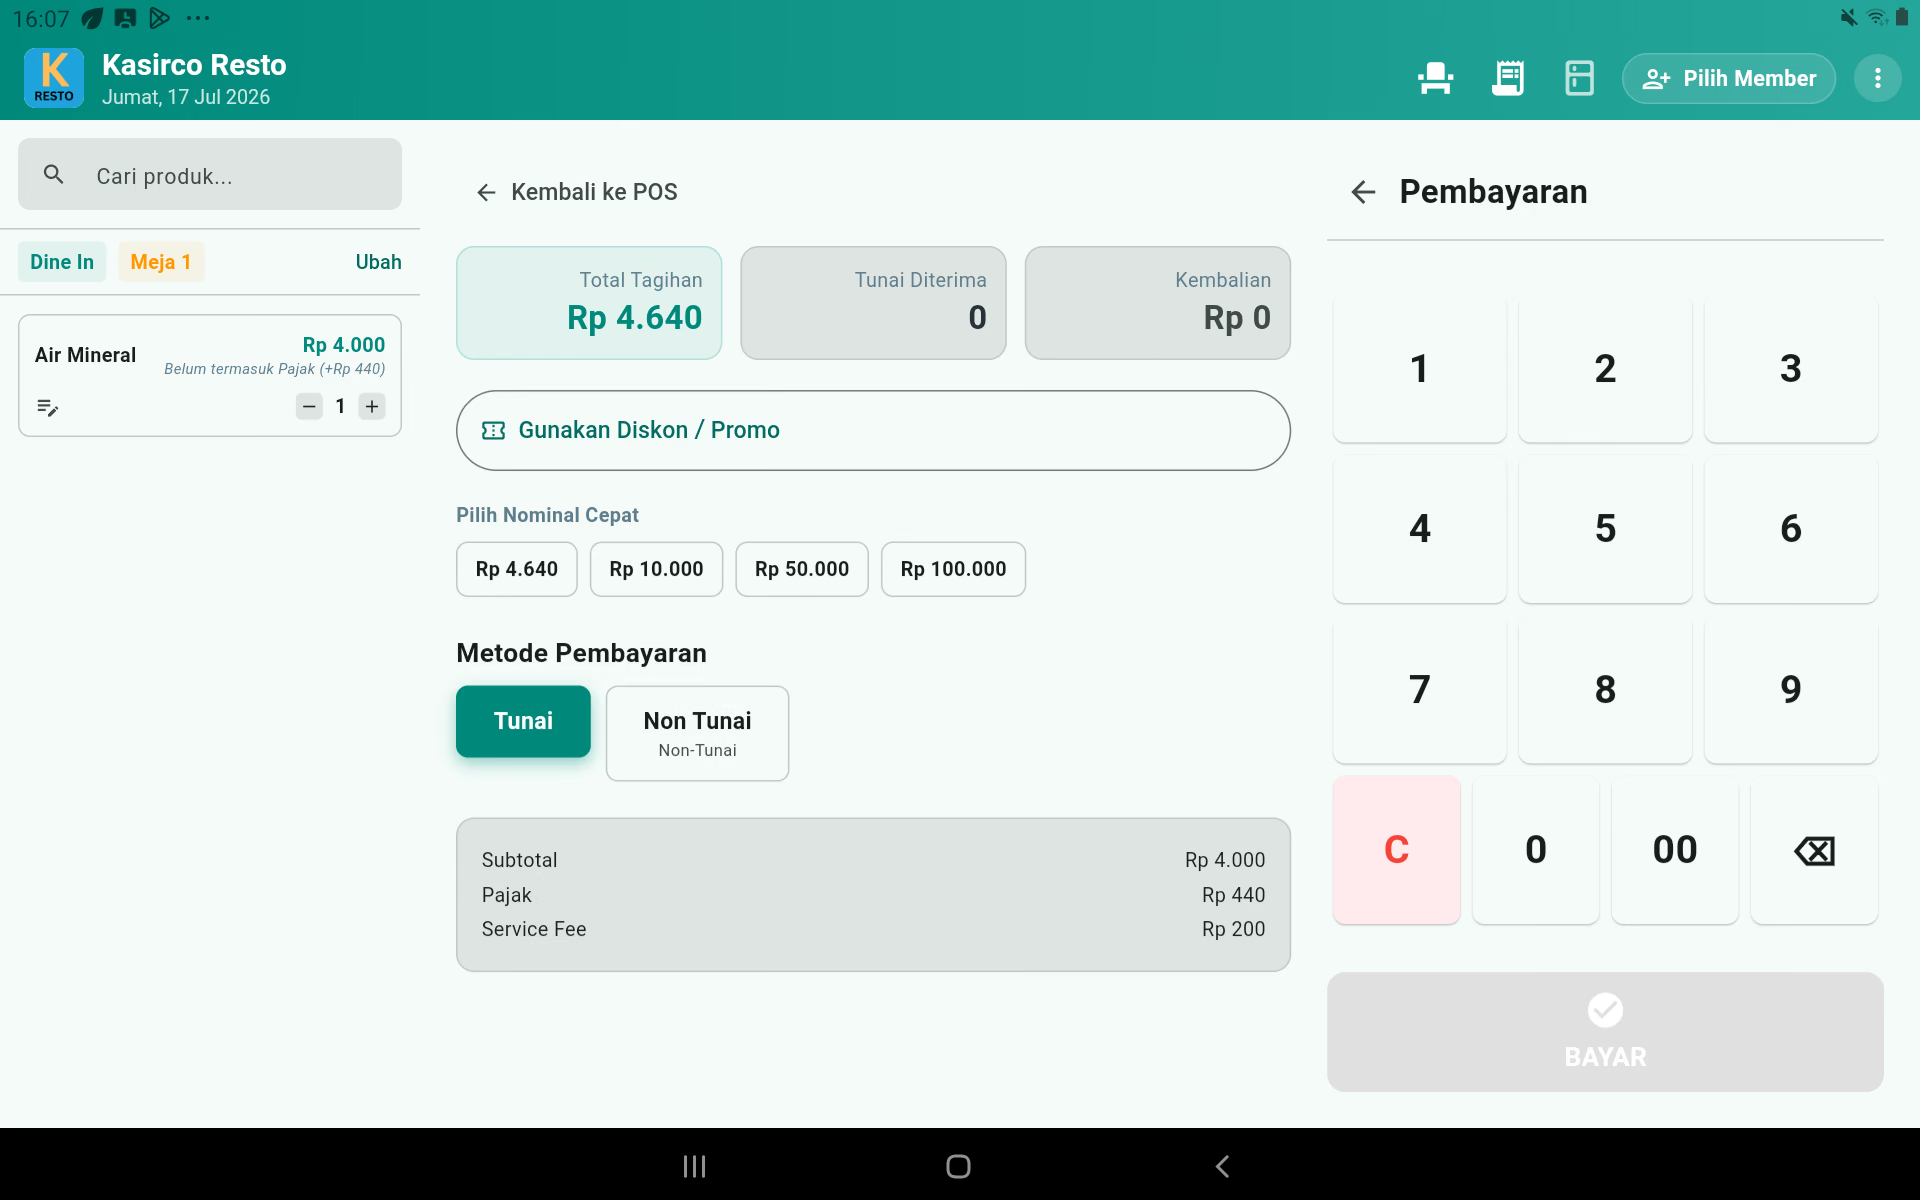
Cash payments
- Press the button. Pay it out of the basket.
- Choose the method Cash.
- Quickly press the nominal or enter the money received through the number plate.
- Check the score. The return.
- Press the button Payment It's active.
- Return the goods and the hulls to the customer.
Payment of the following
- Choose the appropriate monitoring method, for example QRIS Or a card.
- Make sure the nominal on the machine/QR is equal to the total application.
- Wait for proof of a successful payment from the payment provider.
- Press the button. Payment to complete a transaction if the application has not yet completed it automatically.
- Don't press Pay twice.
Midtrans or DOKU
- Select the Midtrans/DOKU method that the owner has already activated.
- Show the payment page or QR to the customer.
- Ask the customer to complete the payment.
- Wait for the status to work. Don't close the screen while you're waiting.
- If the status does not change but the customer balance is cut, check the provider's dashboard before making a new transaction.
Apply discount on payment
- Press the button. Use the discount..
- Choose a qualifying discount.
- Enter promo codes when requested.
- Check the new cut and total values.
- Keep paying.
Print and share the stubs
The strokes can be automatically printed if the printer is turned on. To re-print or send a digital draft, open The history of the transaction, select the transaction, then use Reprinted Or Share it.
6. History of transactions, reprints, and voids
POS → point three → Transaction history
Looking for a deal
- Choose the date period.
- Use status, order type, or payment method to narrow the list.
- Enter the order number or customer name when available.
- Press the transaction to open the details.
Reprinted
- Open up the details of the transaction.
- Check the order number and total.
- Press the button. Reprinted.
- Pick a printer when asked.
Void / Cancel the deal
- Make sure the cancellation is approved by the responsible.
- Open up the details of the transaction.
- Press the button. The VOID.
- Enter a clear reason, for example, the wrong payment method.
- Confirm the cancellation.
- Check the status changes to Void and the stock is returned as applicable.
- Make a refund to the customer according to the shop's rules.
8. Add, View, Change, and Remove Products
POS → point three → Product and Stock Management
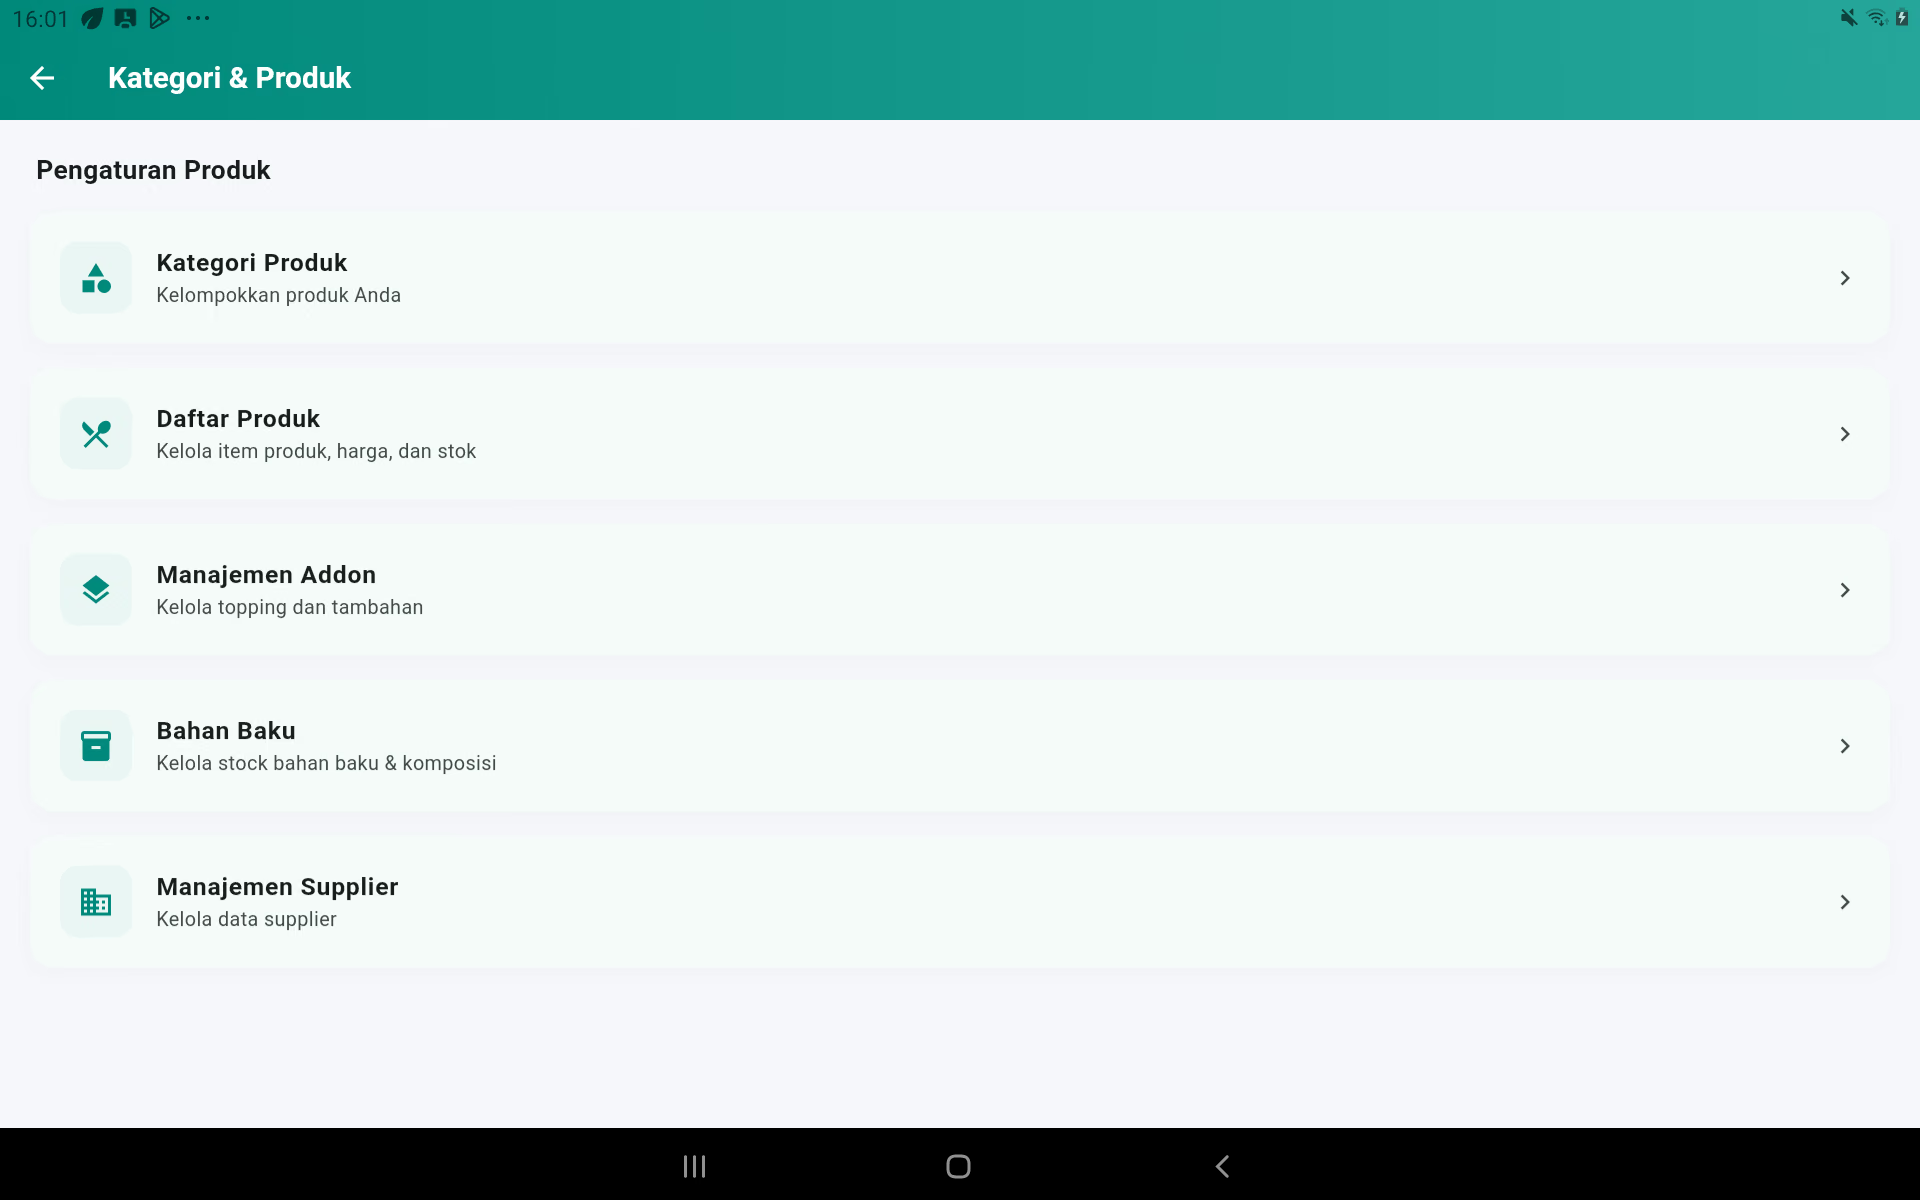
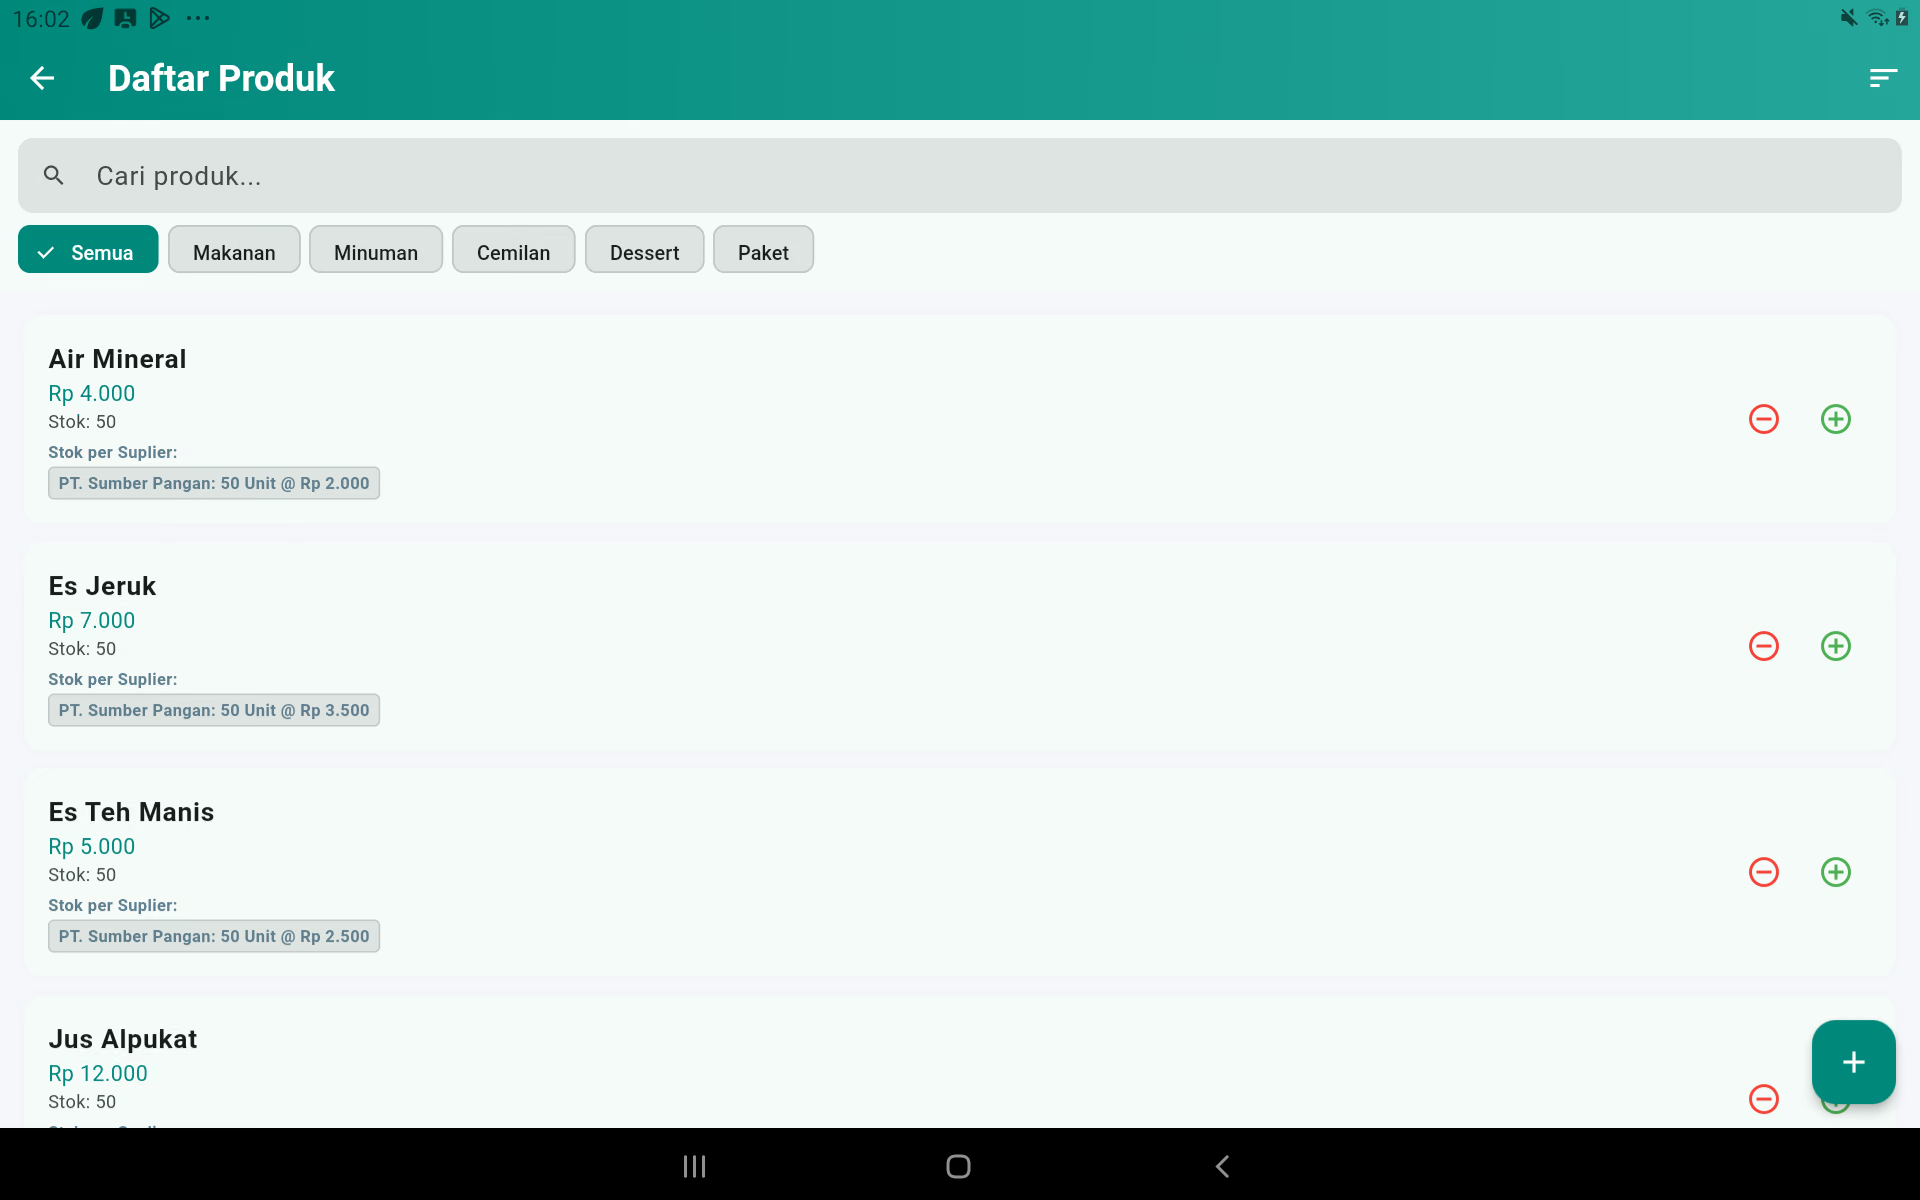
Adding products
- Open it up. List of products.
- Press the add button on the bottom right.
- Fill in the product name and select the category.
- Fill in the price according to order type: Dine In, Take Away, membership, and online platform when used.
- Fill in the capital price to make the profit and loss statement accurate.
- Select applicable taxes and service charges.
- Determine how to stock: direct product stock or raw material stock.
- Set a low stock limit and a block option when it runs out.
- Select the destination printer and send the option to KDS.
- Pick an addon that you can use.
- Add photos if necessary, then press Keep it.
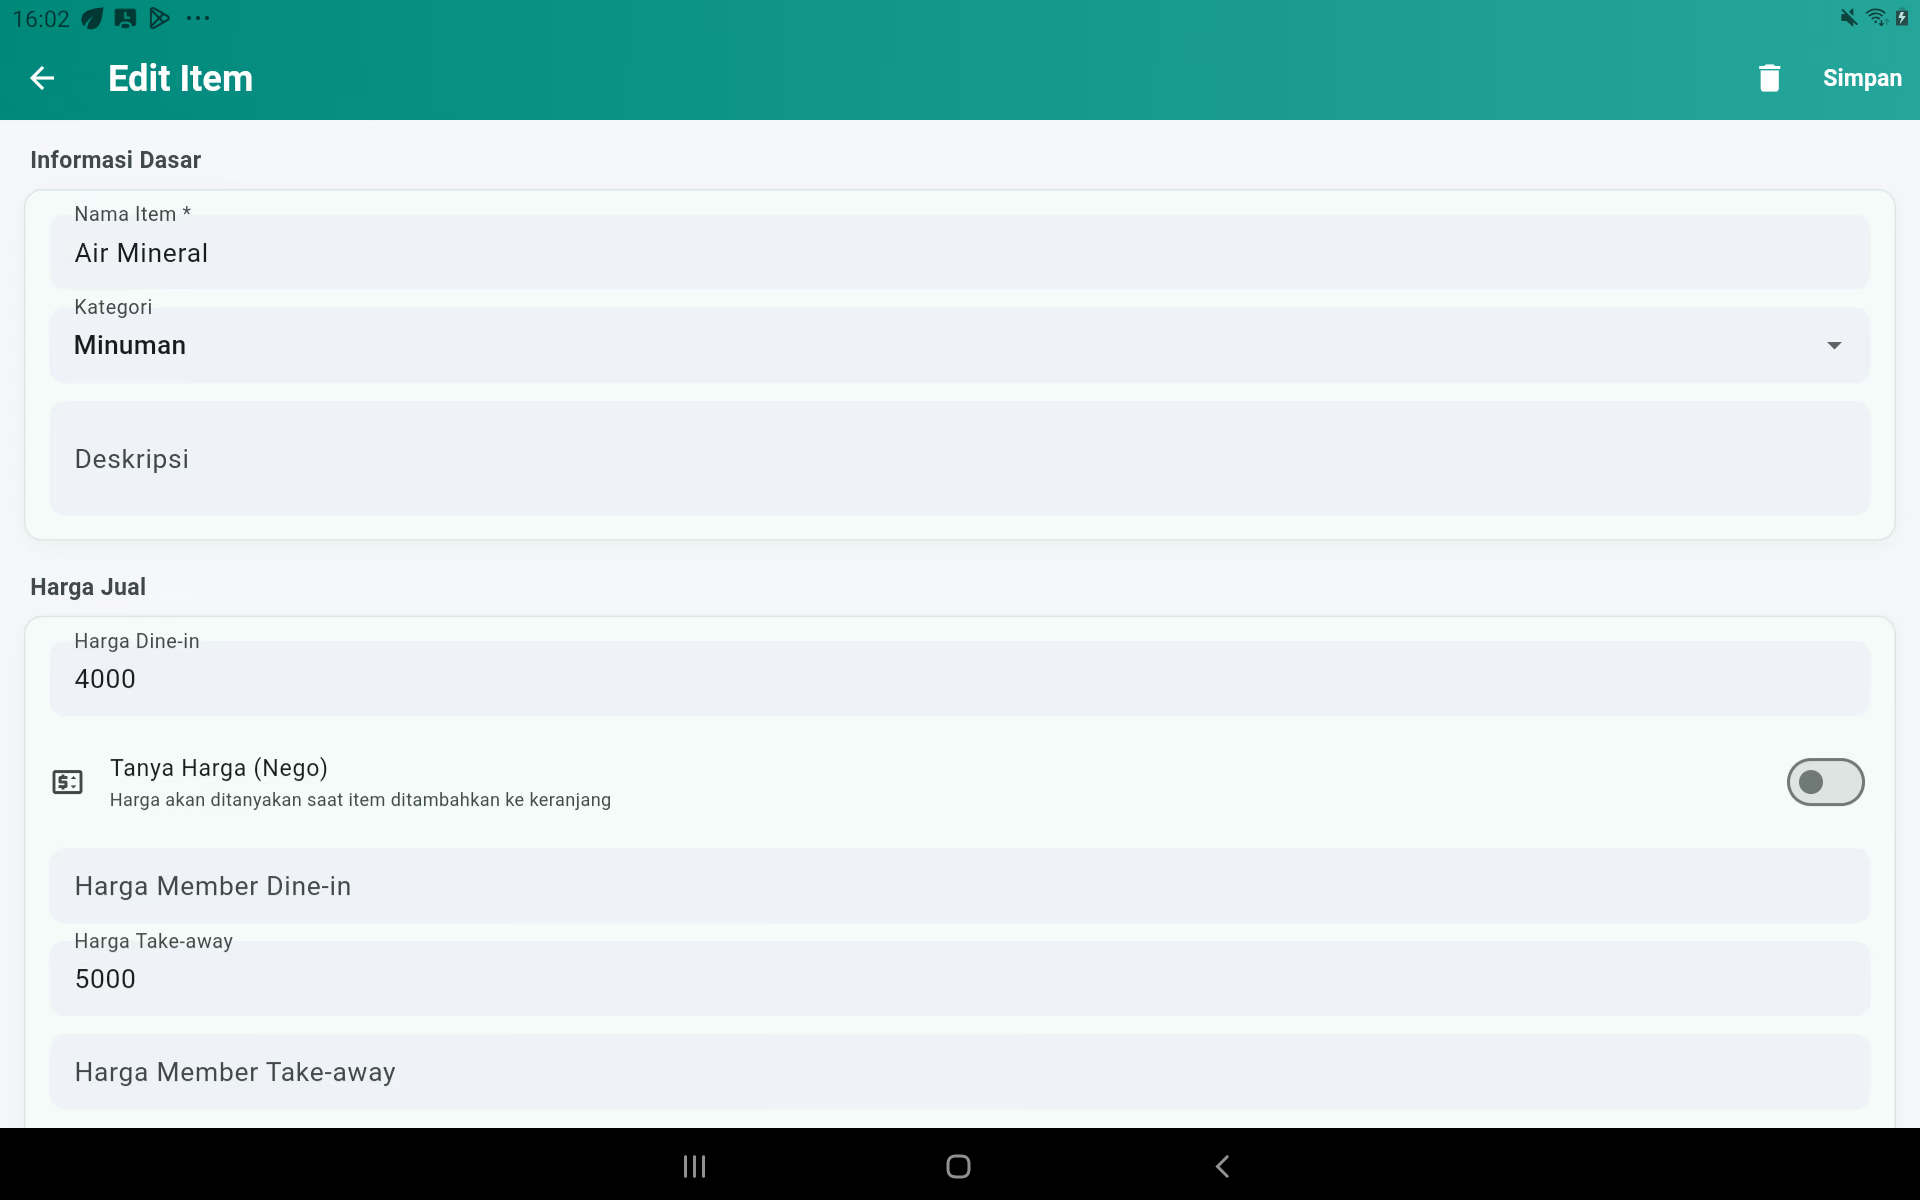
Editing the product
- Look for the product on the list.
- Press the product card.
- Change the data needed.
- Don't change the stock through the price box; use the stock button.
- Press the button. Keep it.
- Open the box and check the results.
Remove the product
- Open the product.
- Press the deleted icon.
- Read the product name on the confirmation.
- Confirm only if the product is no longer needed.
Product order
Use the sort button on the product list. In manual order, press and hold the product and slide to the desired position. Set up the best-selling product in the first section to make the cash register faster.
7. Add, View, Change, and Remove Categories
Product and stock management → Product categories
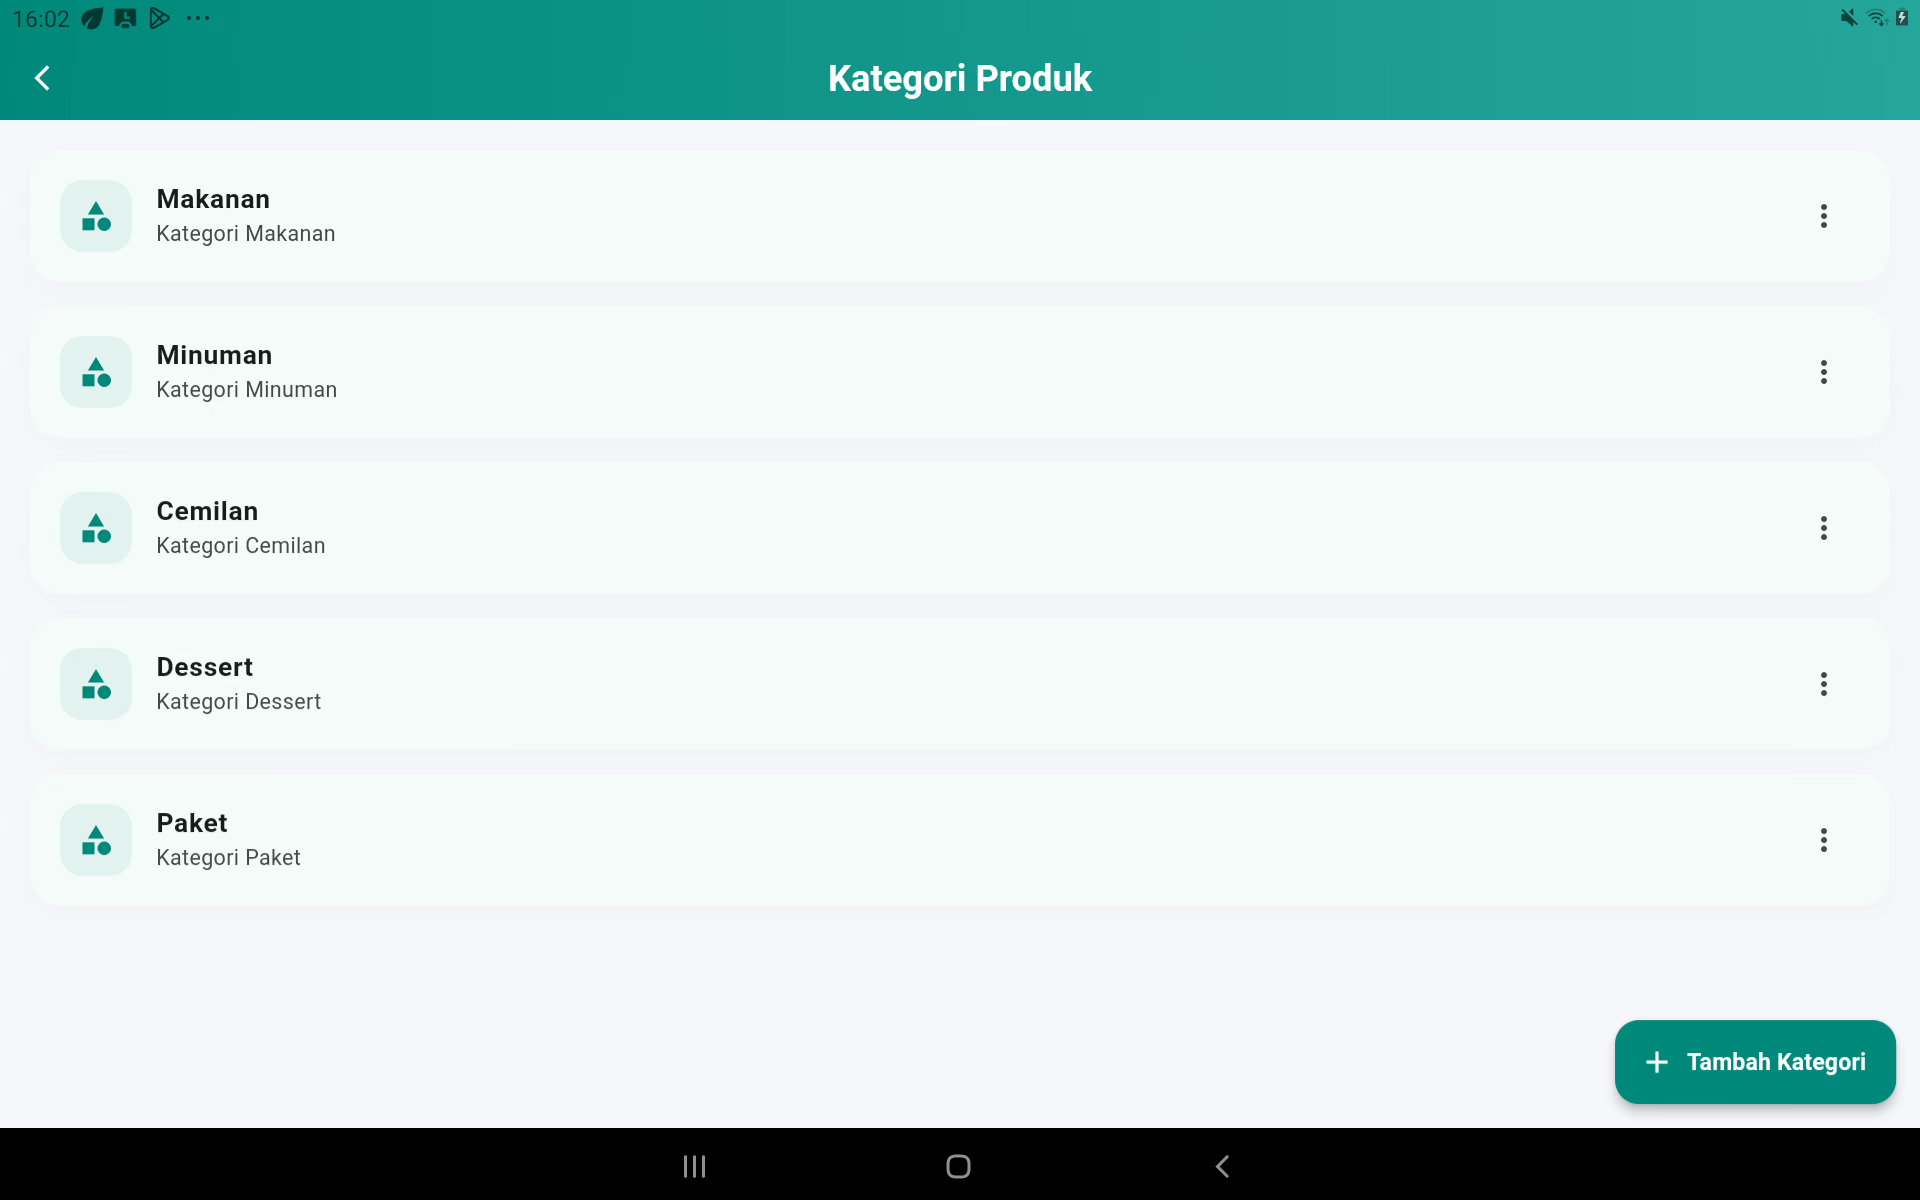
Add to it
- Press the add button.
- Fill in the short and easily recognizable category names of the cashier.
- Fill in the details if available.
- Keep it.
Edit the
- Press the category or pencil icon.
- Change the name.
- Save and check the category tab at the POS.
Set the order
Press and hold the category, then slide. Put the most commonly used category in front.
- It's all gone.
Make sure no active products still use that category. Then press delete and confirm.
9. Stocks, Purchases, and Prices of Capital
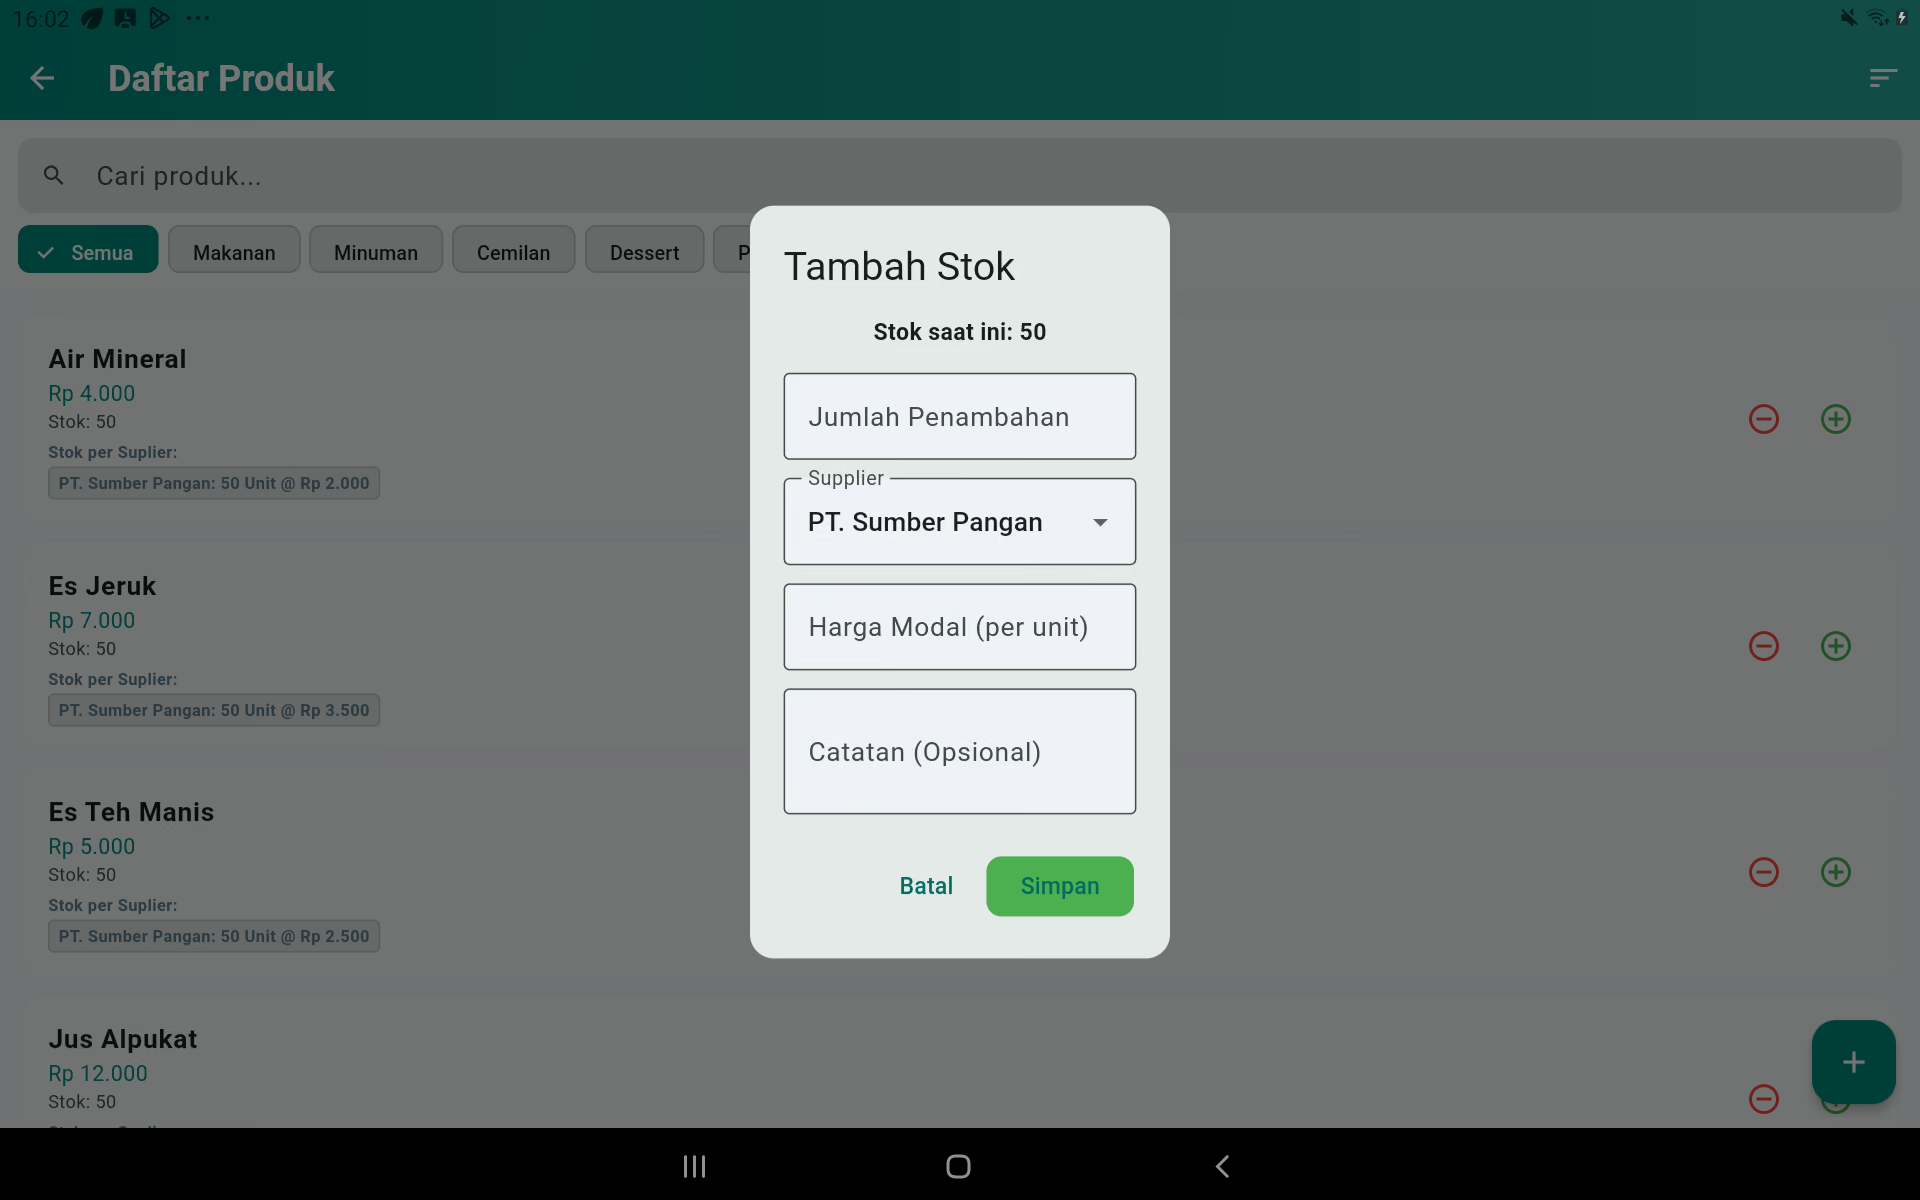
In this app, purchases of goods for inventory are recorded via Add more stock. Each addition can be attributed to the supplier and the capital price so that the stock per supplier and the value of the inventory can be traced.
Increasing product stock
- Open it up. List of products.
- Look for the product you bought.
- Press the green plus stock button.
- Enter the number you received.
- Choose the supplier.
- Enter the purchase price.
- Please fill in the notes when available.
- Press the button. Keep it.
- Check the total stock and stock per supplier on the product card.
Reducing manual stock
- Press the short-stock button.
- Enter the number.
- Choose a supplier source if requested.
- Fill in the reasons, such as a fault, expiration, or correction of the math.
- Keep it.
Automated stock at sale
Products in direct stock will be reduced according to the number sold. Products with composition will reduce their raw materials. Addons that have stock also decrease when selected on a transaction.
FIFO and supplier
If the same item is purchased multiple times, the app can track the stock layers based on the time of entry. Record the supplier and capital price of each purchase so that the stock expense follows the old stock order first and HPP is more reasonable.
Stock opname is simple
- Count the physical amount after the store closes.
- Compare it to the stock list of the app.
- Use more/less stock to differentiate.
- Write down the reasons for the stock option and a clear statement.
- Check the results in the stock report.
10. Raw Materials, Composition, and Additions
Raw materials
Product and Stock Management → Raw materials
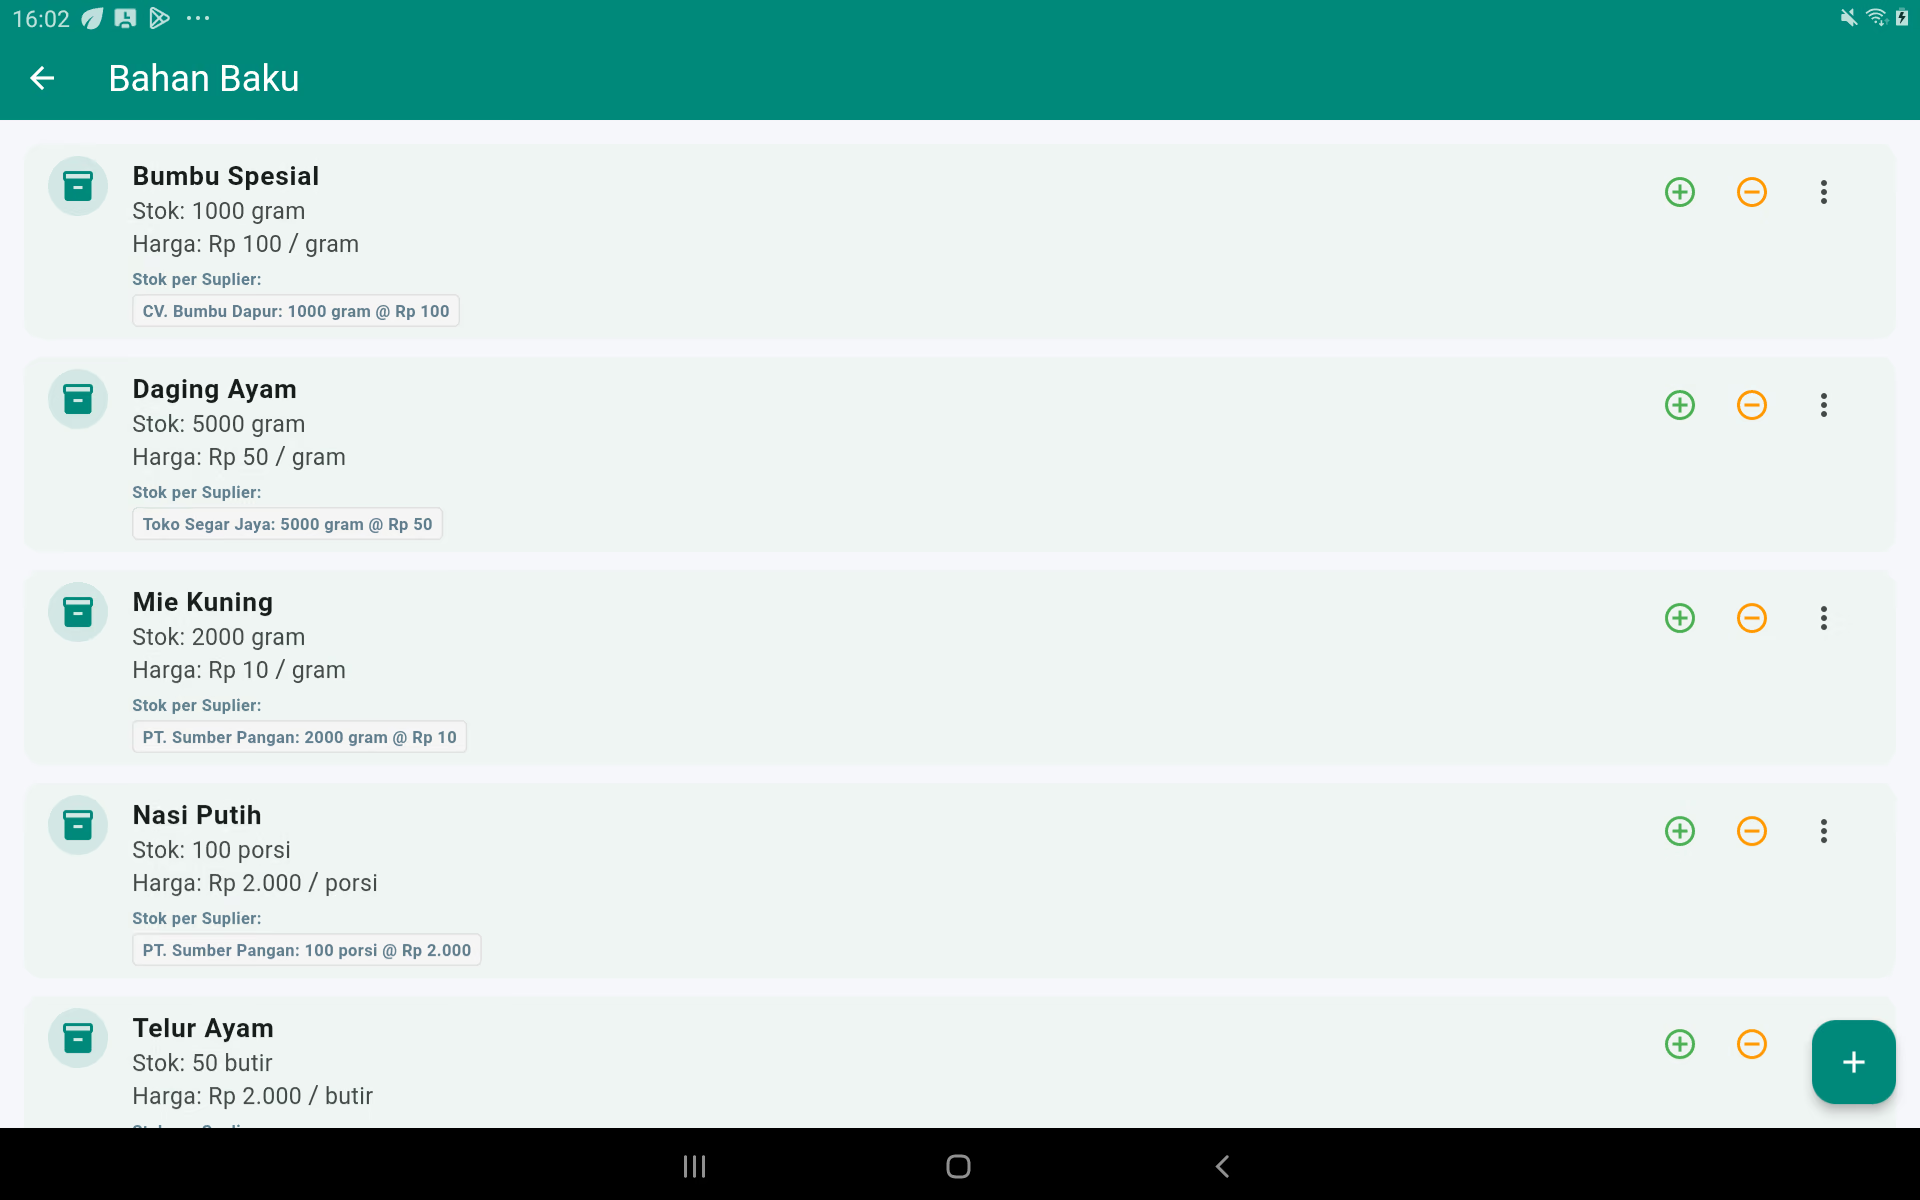
Add raw materials
- Press the plus.
- Fill in names, such as Rice, Egg, or Oil.
- Choose a consistent unit: grams, kilograms, milliliters, liters, pcs, or portions.
- Fill in the price per unit, the initial stock, and the bottom stock limit.
- Pick a supplier, then save it.
Purchasing of raw materials
- Press the stock on the material.
- Put the number in the stock unit.
- Pick a supplier and enter the purchase price.
- Save and check for new stock.
Creating a menu based on composition
Composition products do not have a stock of manually filled finished products. The app calculates how many servings can be made from the least amount of material. The capital price of the product is also automatically summed from the cost of all materials per serving.
Step 1 - Prepare the categories and materials
- Create a product category first, for example. Food.
- Open it up. Raw materials And make all the recipes.
- For each material, the name, unit, price per unit, initial stock, low stock limits, and supplier.
- Use the same unit as using a prescription. For example: Chicken is stored in grams, so the recipe needs are also included in grams.
- Make sure the stock and price of each material is correct.
Stage 2 - Create and store products
- Open it up. List of products Then press the plus.
- Fill in the product name, category, sales price, tax/fee, printer, and other settings.
- On the Stocks and inventory, activate it Use the Composition Stock.
- Activate it Block when stock is exhausted to prevent the product from being sold if one of the ingredients is insufficient.
- Activate it Low Stocks Warning If you need to.
- Press the button. Keep it. The product must be stored first so that the Composition Manager button is available.
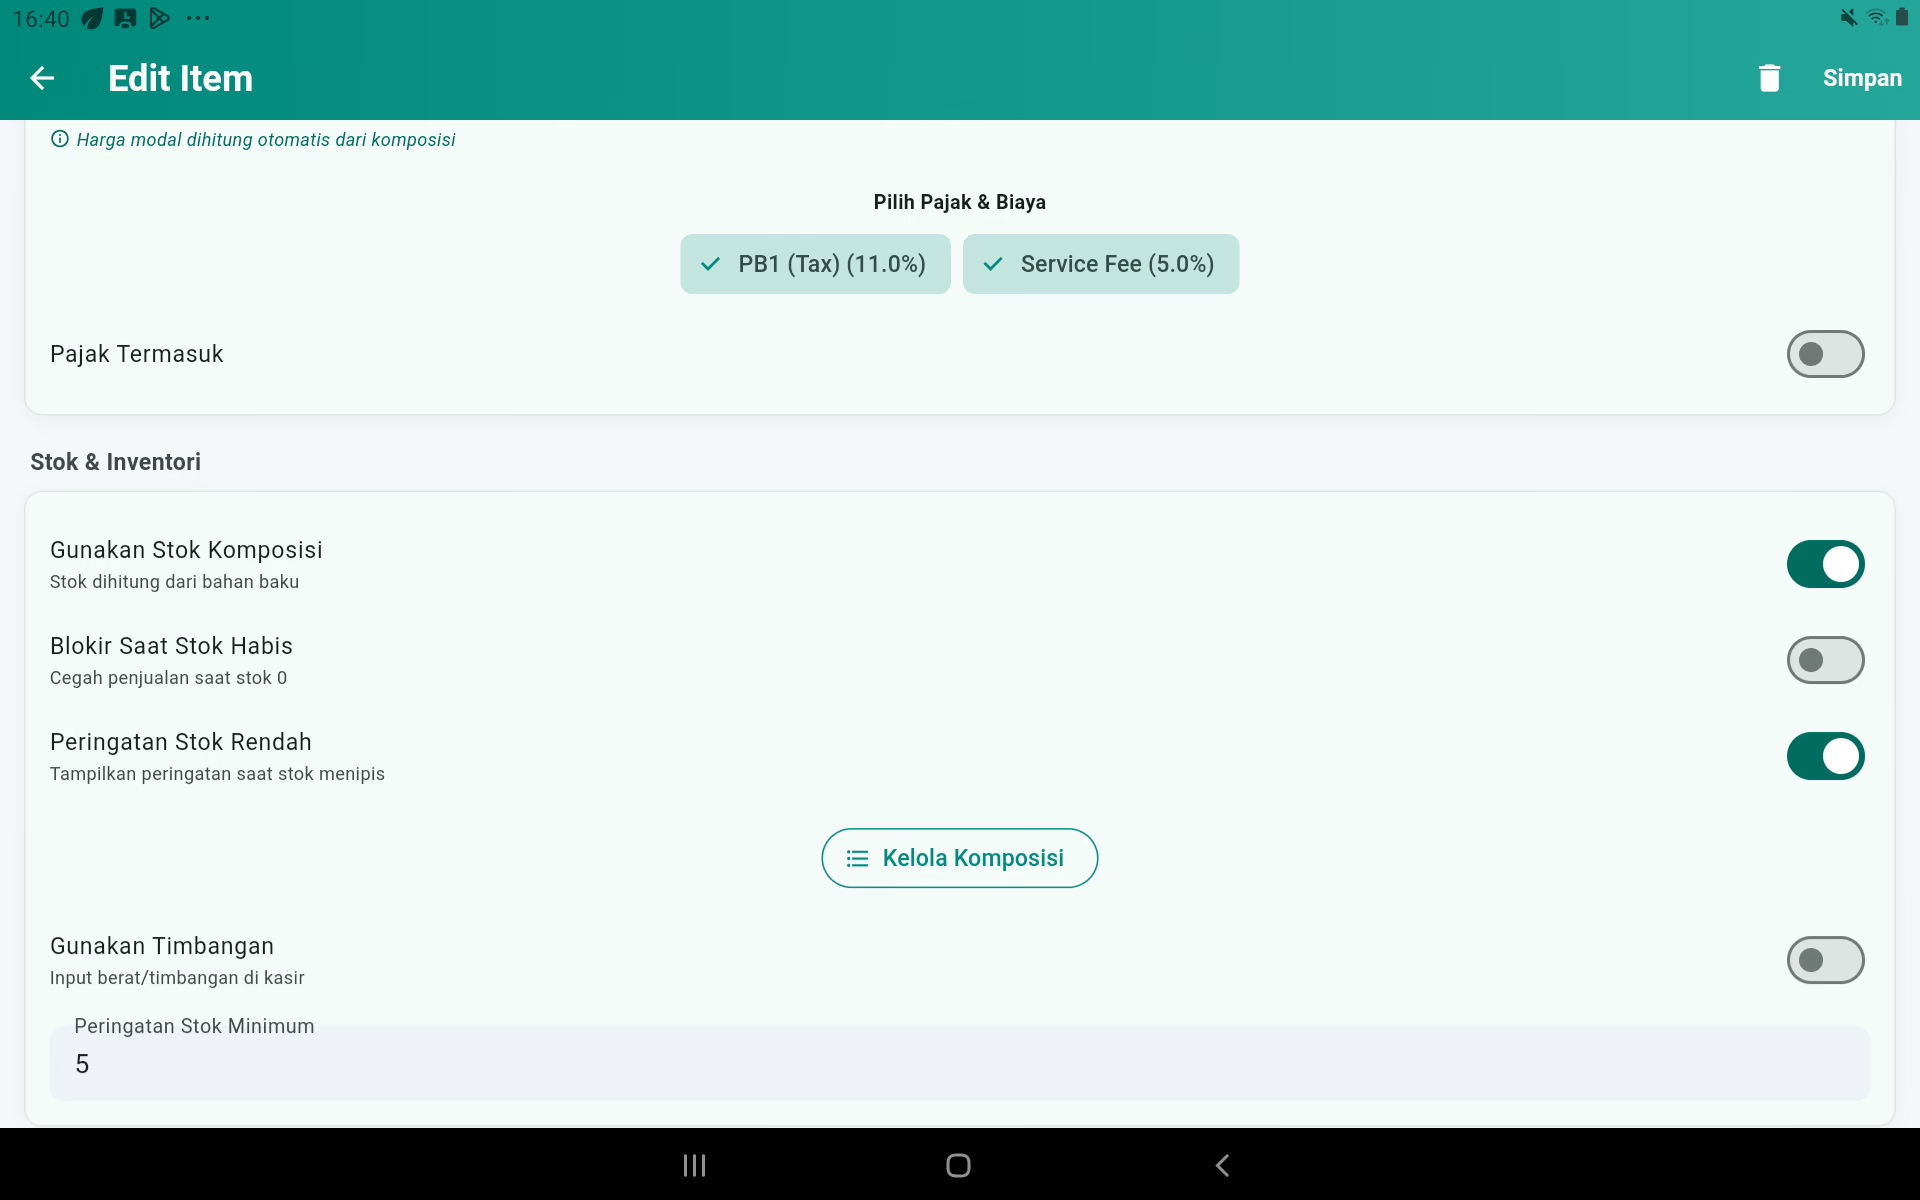
Stage 3 - Set up a recipe for each serving
- Open up the newly stored product.
- Go to the Stocks and inventory, then press Manage the composition.
- Press the button. Adding materials.
- Pick one of the raw materials.
- The amount used for One serving, and then press Add.
- Repeat until all the ingredients are in.
- Check it out. Total capital cost It's at the top.
- Use the pencil icon to correct the number or the delete icon to remove the ingredients from the recipe.
- Go back to the product and press Keep it.
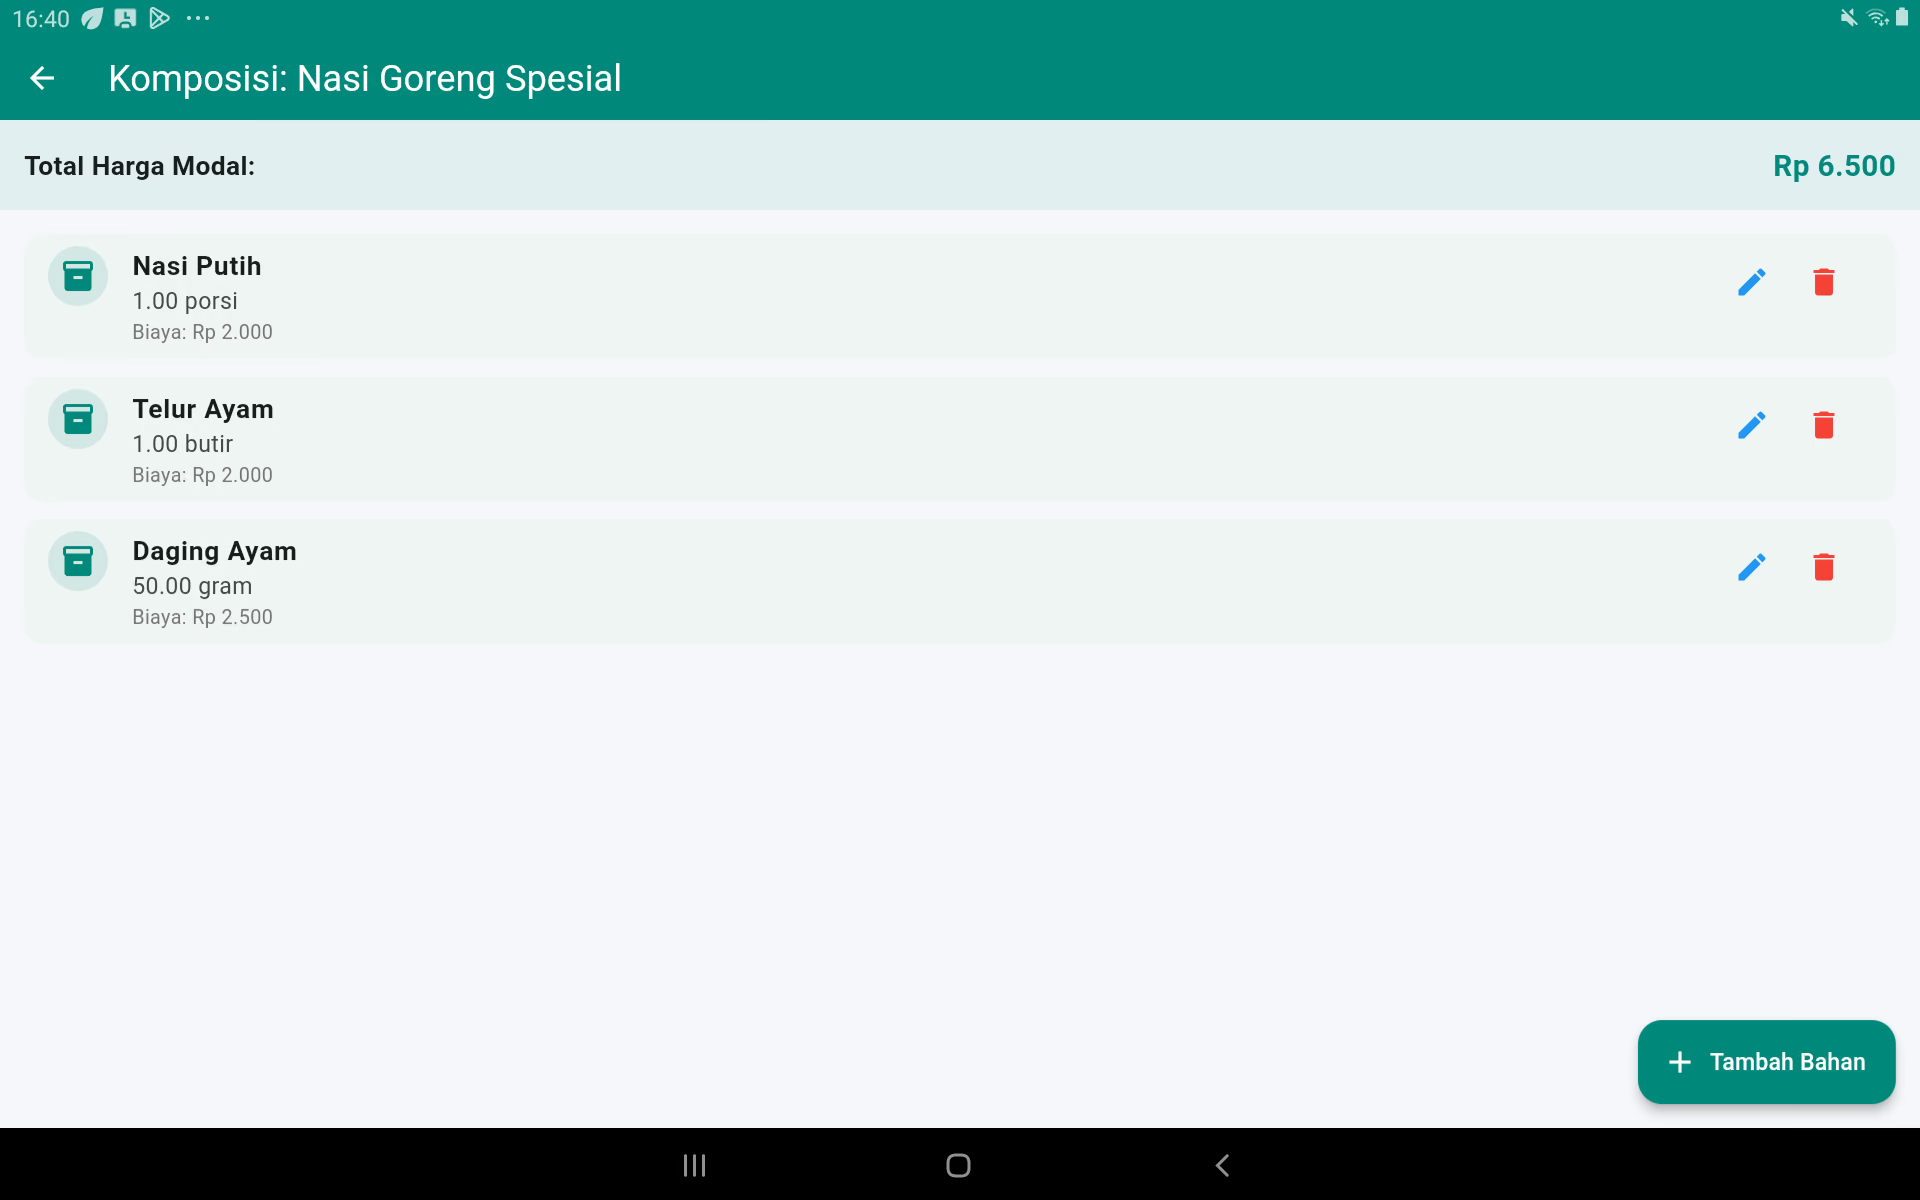
Example of how stocks are calculated
| The material | Stock is available | Needs per serving | Can be made |
|---|---|---|---|
| White rice | 100 servings | 1 serving | 100 menus |
| Chicken eggs | 50 grains | 1 grain | 50 menus |
| Chicken meat | 5,000 grams | 50 grams | 100 menus |
The app displays stock of the finished product 50, because eggs are only enough for 50 servings. If two servings are sold, the stock is reduced to two servings of rice, two eggs, and 100 grams of meat.
Add-on topping
Product and stock management → Addon management
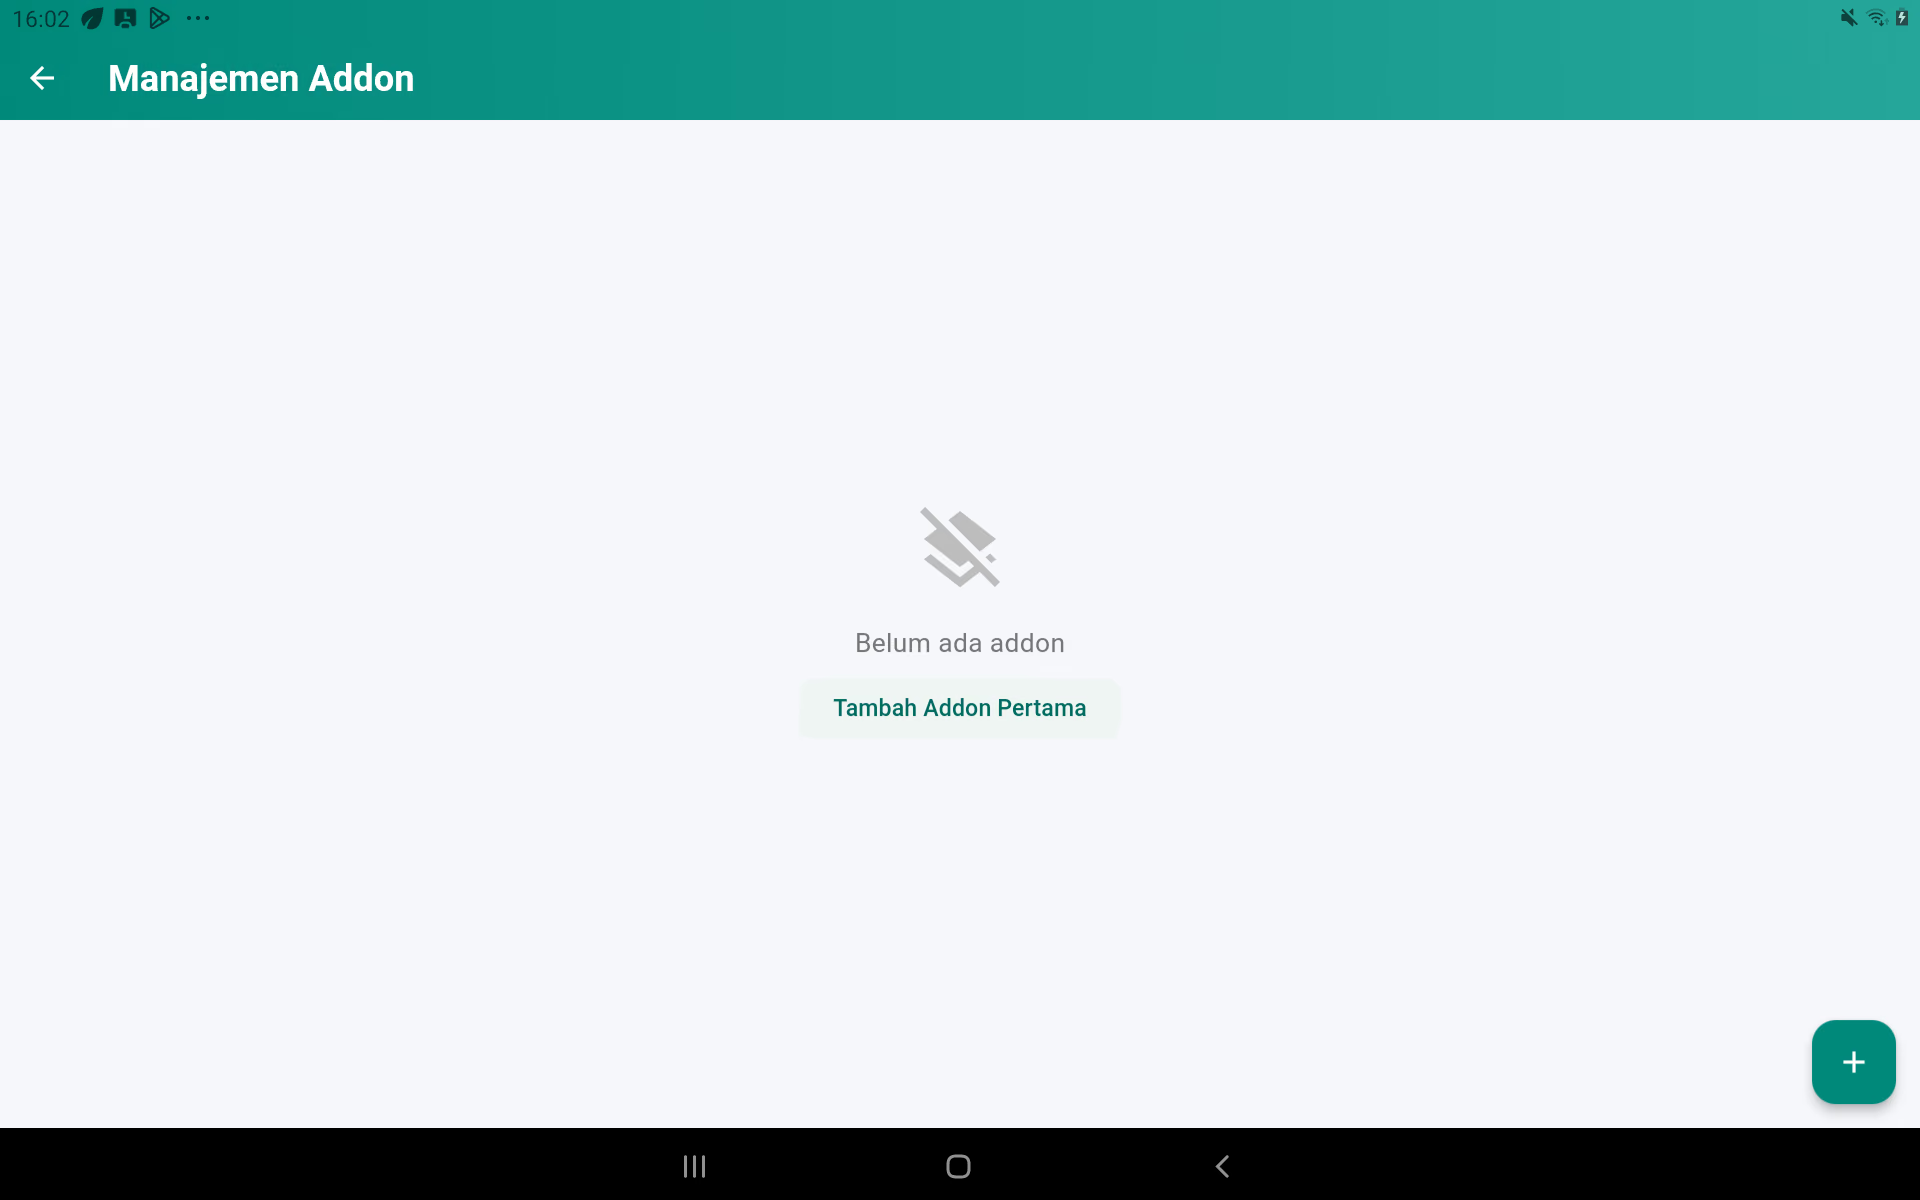
Added addon
- Press the plus.
- Name, capital price, selling price per order type, stock, and supplier.
- Decide whether the choice is optional or mandatory.
- Activate the addon and save it.
- Open the associated product, select the addon, then save the product.
Edit and delete
Press the addon to edit. Before you delete it, remove the product that is still selling it. Use the stock button for addon acceptance and correction.
11. Add, View, Change and Remove Supplier
Product and Stock Management → Supplier Management
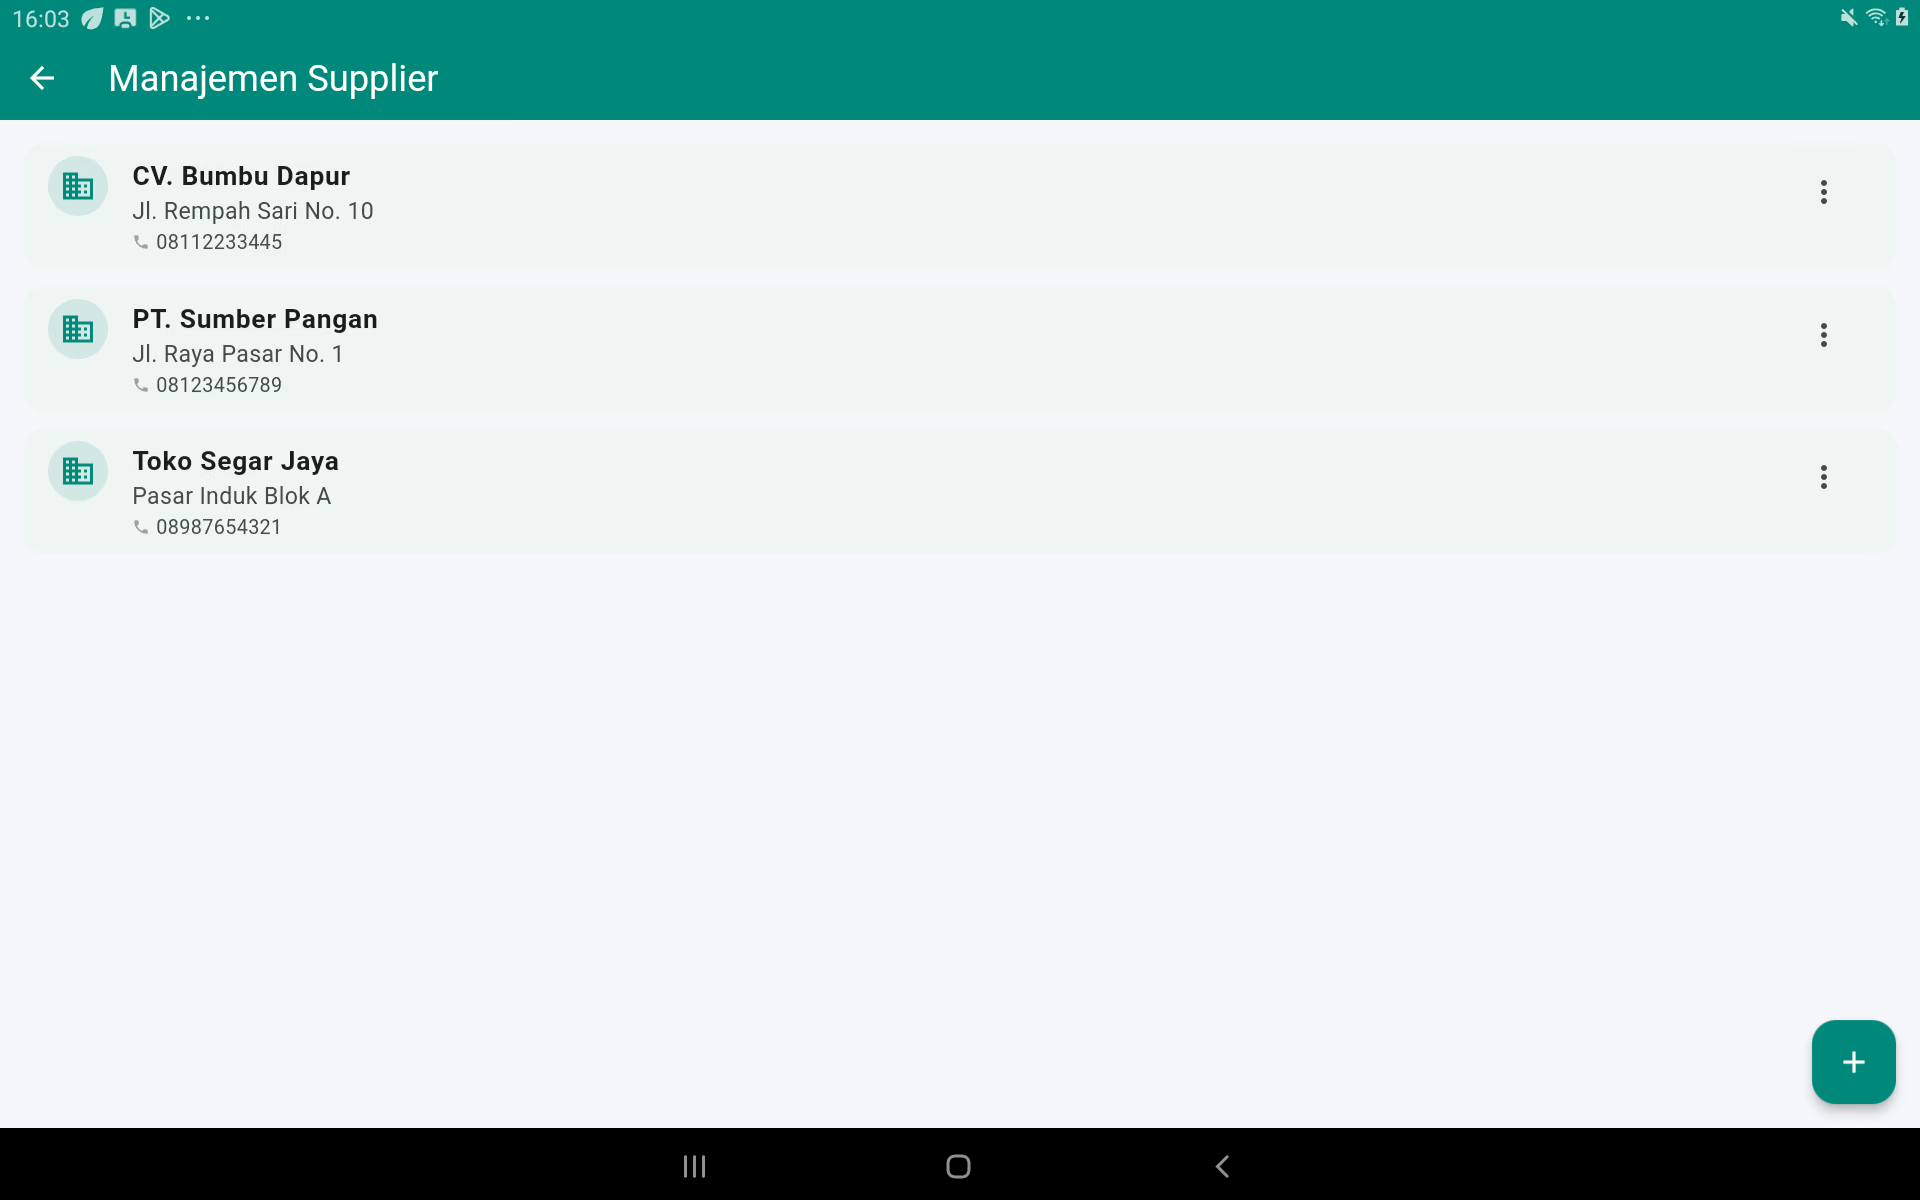
Added supplier
- Press the add button on the bottom right.
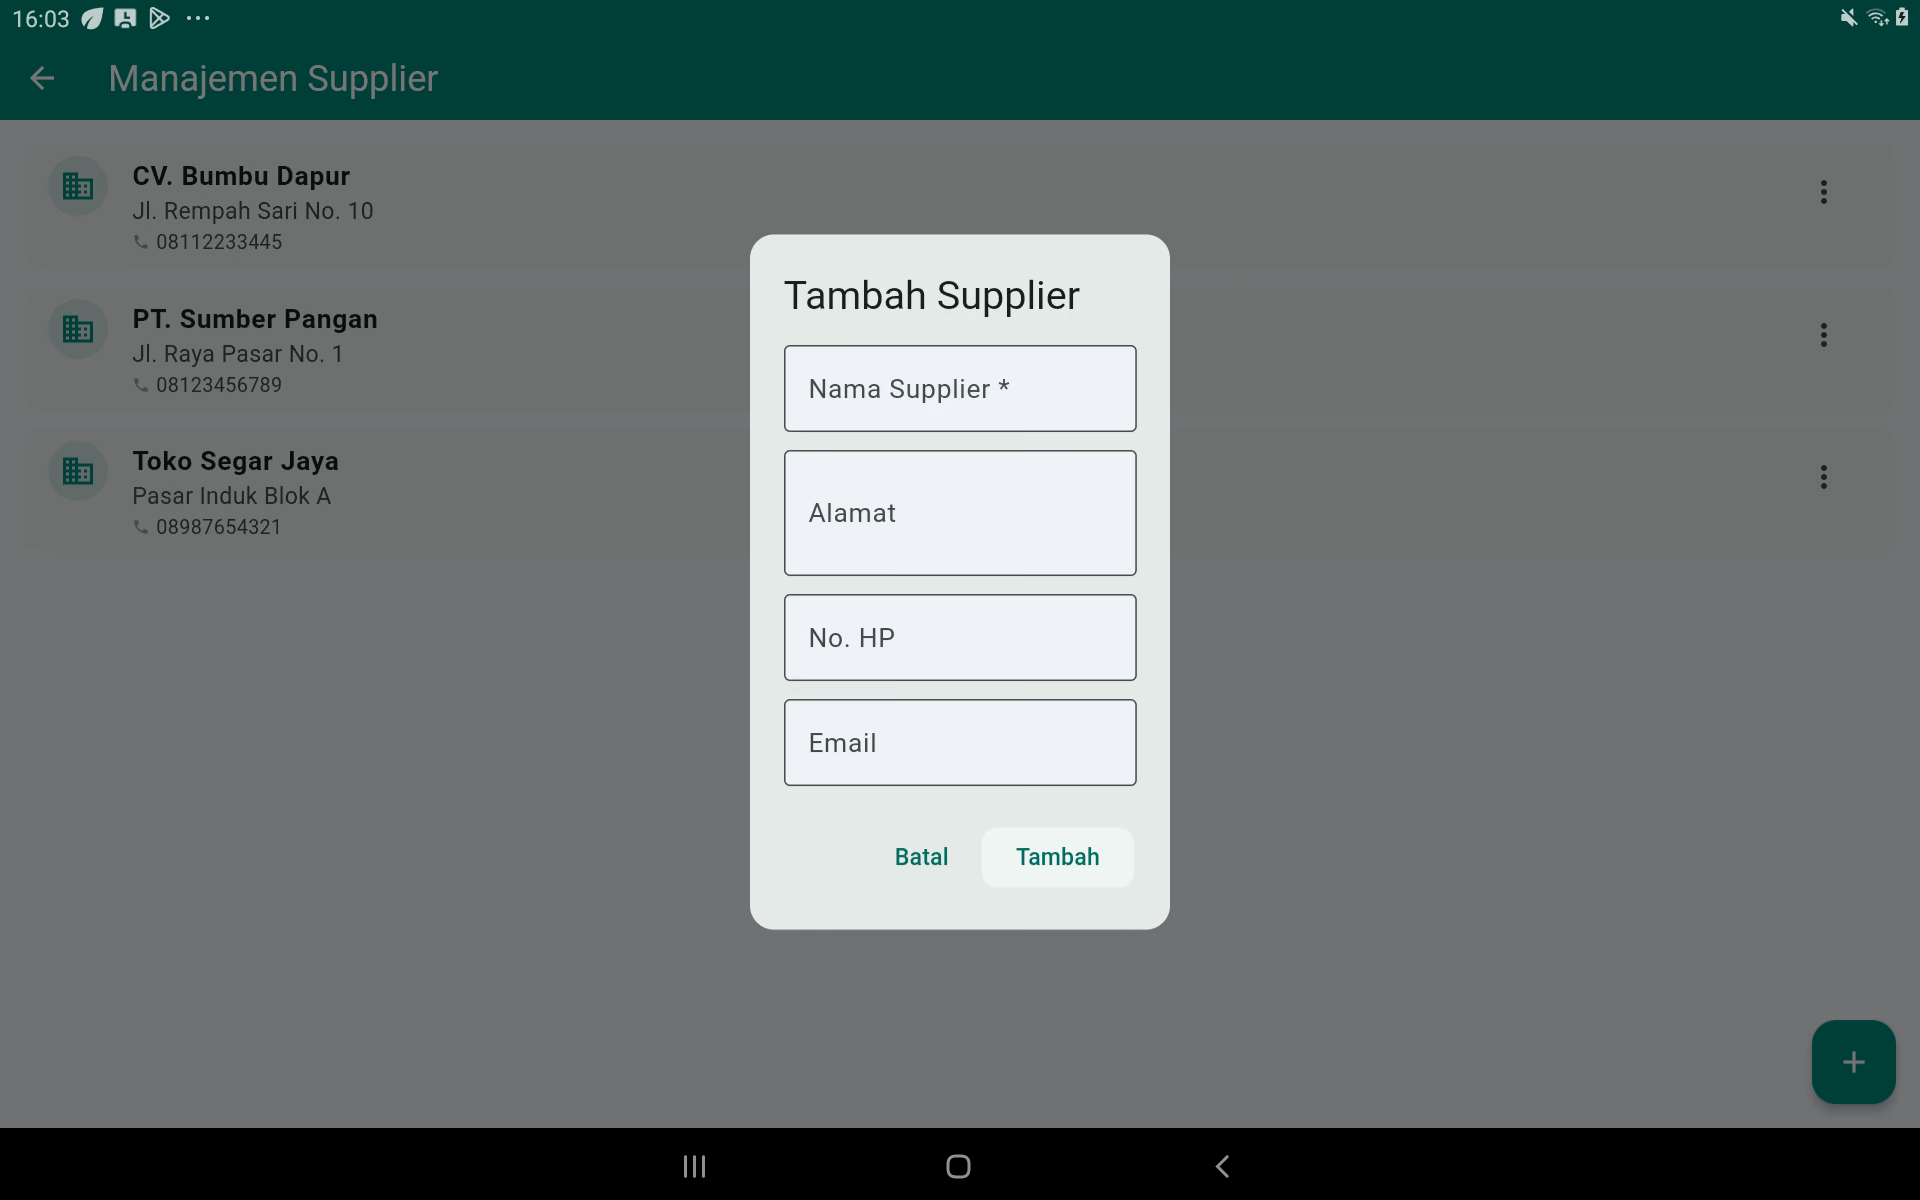
- Fill in the name of the supplier.
- Fill out the address, phone, and email.
- Check the phone number to make it easy to contact when booking.
- Press the button. Keep it.
Edit supplier
- Press the menu on the supplier.
- Select the Edit.
- Change the data, then save it.
Delete the supplier
Make sure no purchases or active stock are still to be traced to the supplier. Press the menu, select Delete, and then confirm.
Connecting suppliers
Suppliers can be selected when making products/materials/additions and when adding stock. Always choose the right supplier so that the inventory per supplier and capital price are reliable.
12. Add, View, Change, and Remove Discounts
POS → point three → Discount management
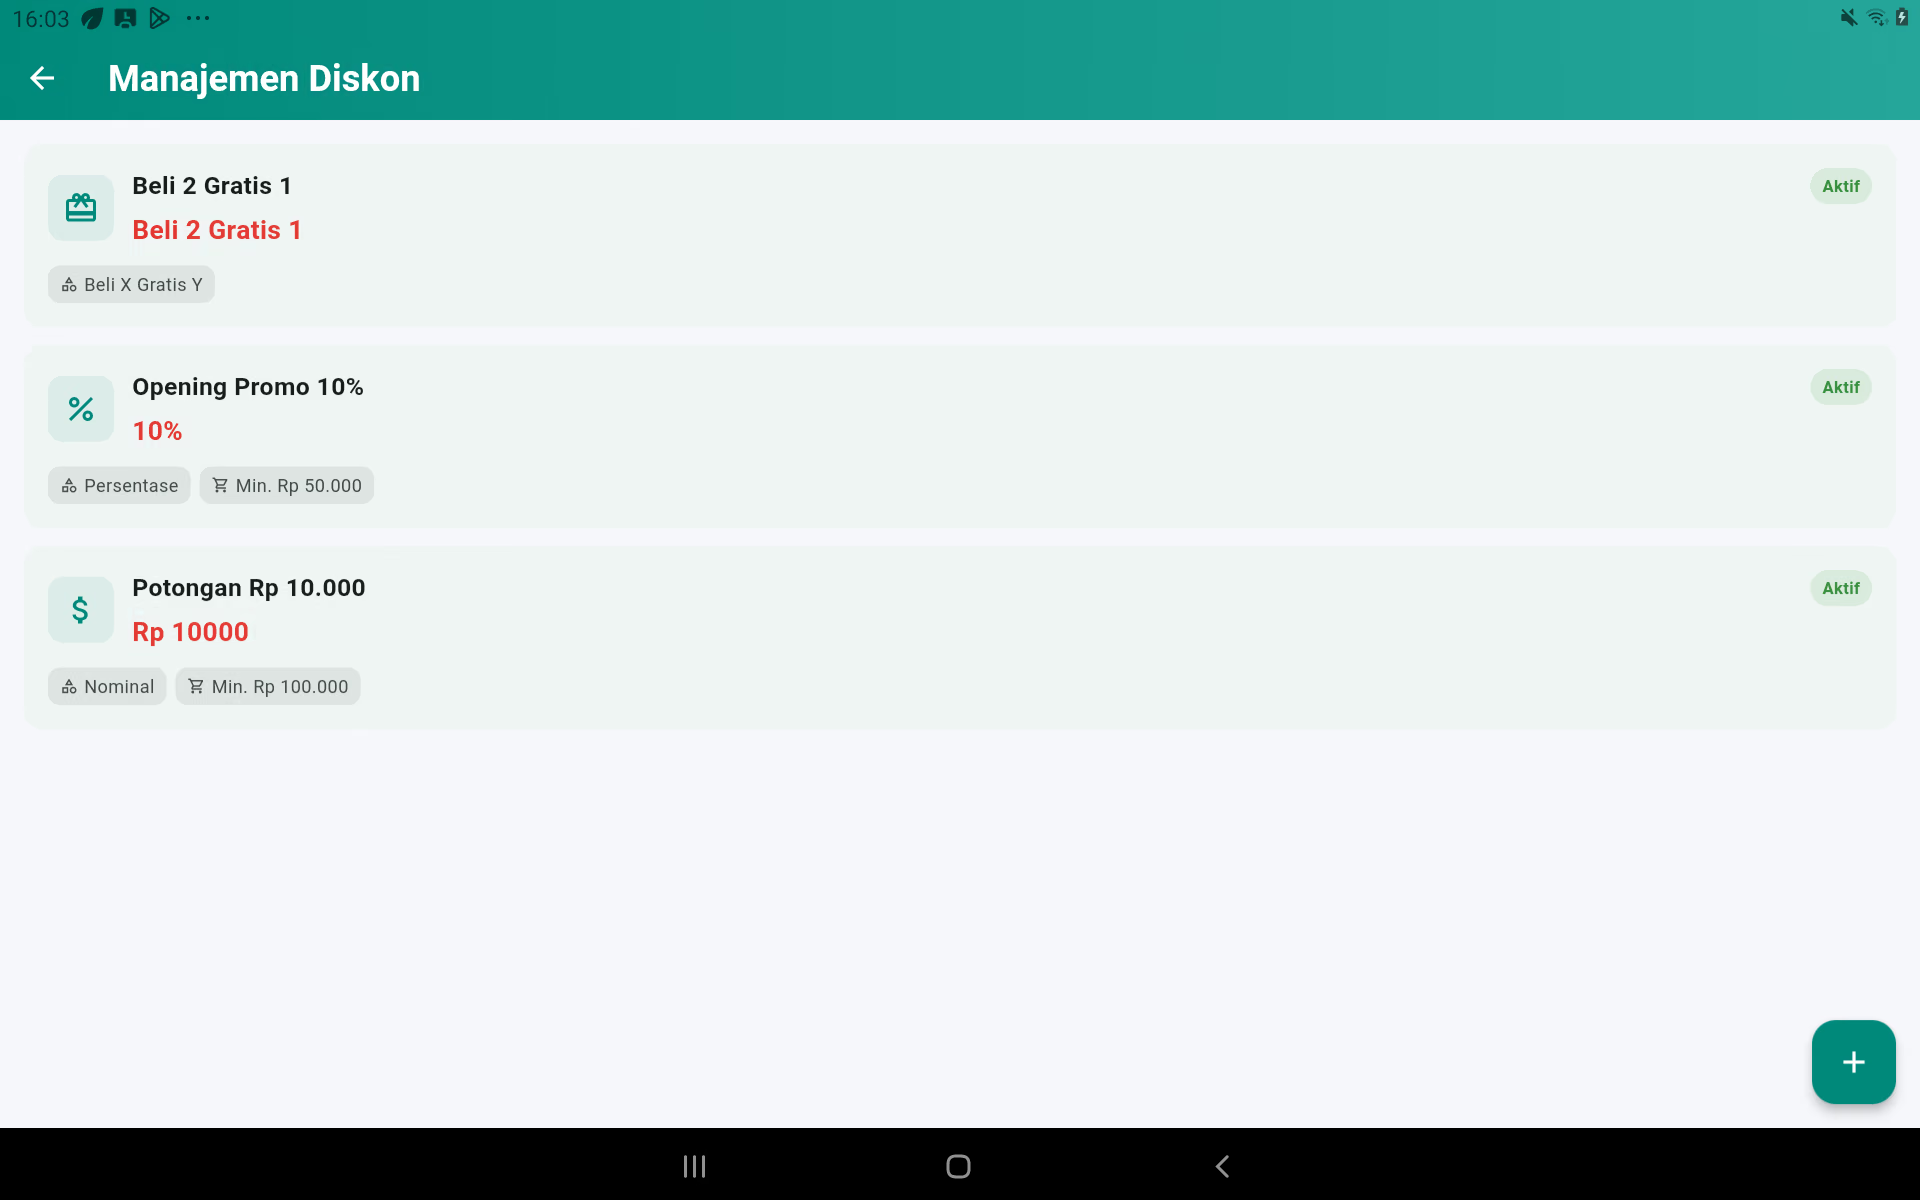
Discount type
| The type | How to count | Example |
|---|---|---|
| Percentage of the | The discount base times the percentage. Can be limited to the maximum number of pieces. | 10% of the ≈ $5.60 = ≈ $0.56. |
| Nominal | Cut a fixed amount and must not exceed the discount base. | The voucher. ≈ $0.56. |
| Buy free X and Y | Any amount of qualified purchases yields free items. Free items come in at a price. ≈ $0.00. | Buy two coffees, free one loaf. |
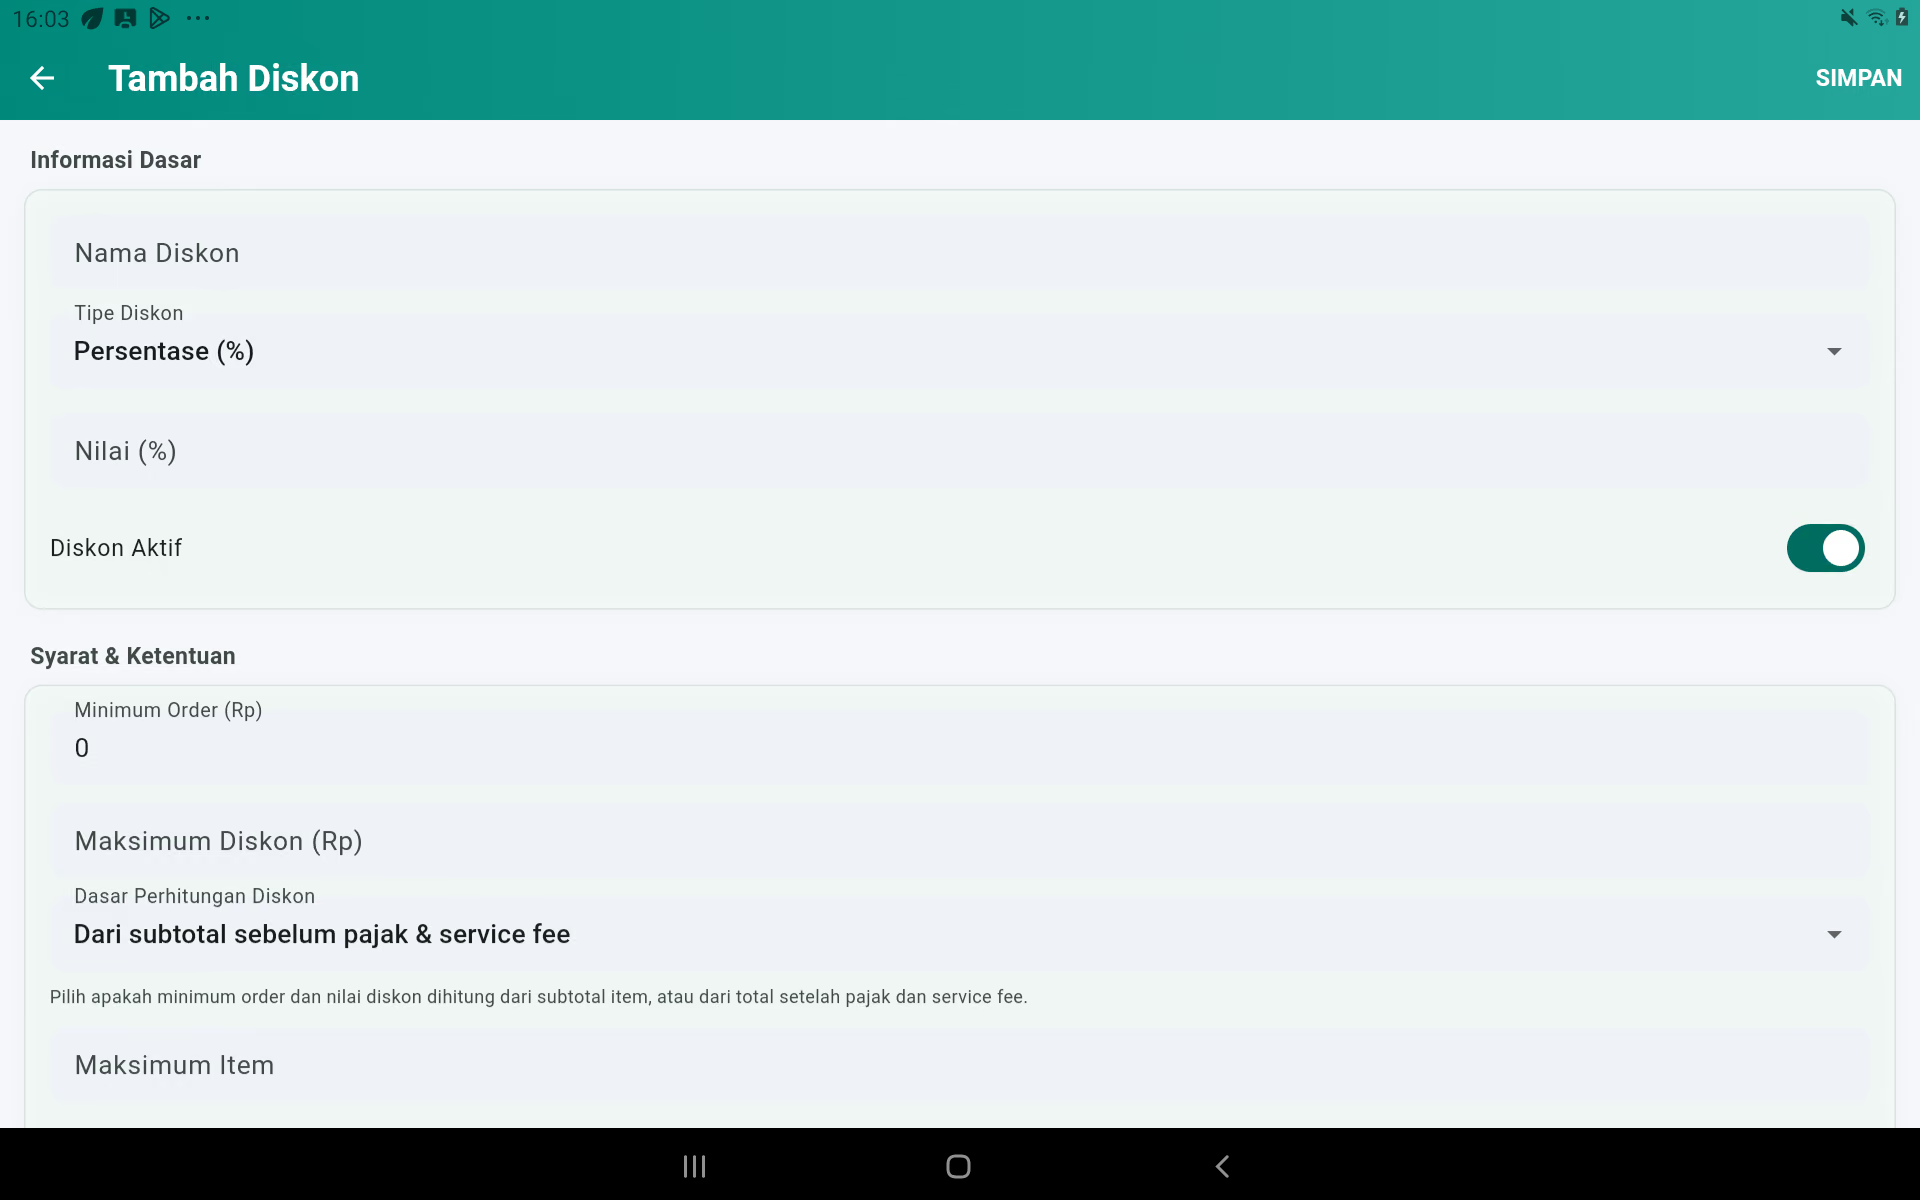
Basic options for discount calculations
| The Choice | The order of calculation | The impact |
|---|---|---|
| Subtotal before tax and service charges | Subtotal → Discount → Service Fee → Taxes | Discounts reduce the base service fee and tax for eligible items. |
| Total after tax and service charges | Subtotal → Service Fee → Taxes → Discounts | Service fees and taxes are calculated in full first, then the discount cuts the final total. |
Add the discount
- Press the plus.
- Fill out the promo name and select the type.
- The percentage or nominal amount of the purchase.
- Choose the right base of the calculation.
- Set minimum purchases and maximum cut limits.
- Specify a specific member or general.
- Activate the promo code if necessary and make the code easy to read.
- Set the dates, times, and dates.
- Choose all of the products or products.
- Activate the promo, save it, then test it on the payment page.
Edit, disable, delete
Press the discount card to edit. For promotions that are over, turn off so the history remains understandable. Delete only unused promotional samples.
Promotional testing
- Make a basket that meets the minimum shopping.
- Open the payment and pick the promo.
- Check the value of the piece.
- Repeat with an unqualified basket; promo should not be used.
Important rules of any kind
- Percentage of the total percent, minimum spending, and maximum discounts if you want to limit the cut.
- Nominal: if the value of the voucher is greater than the basis of the calculation, the deduction shall be only as much as the value of the eligible bill.
- Buy free X and Y: Select the trigger product and the prize product. The Mix & Match option allows the number of purchases collected from multiple trigger products; if turned off, the terms are calculated per product.
- Specific products: Only selected items form the basis of the discount.
- Maximum items: Limit the number of items that can be promotional.
- Specifically, member, code, date, time, and day: All the requirements must be met at the same time.
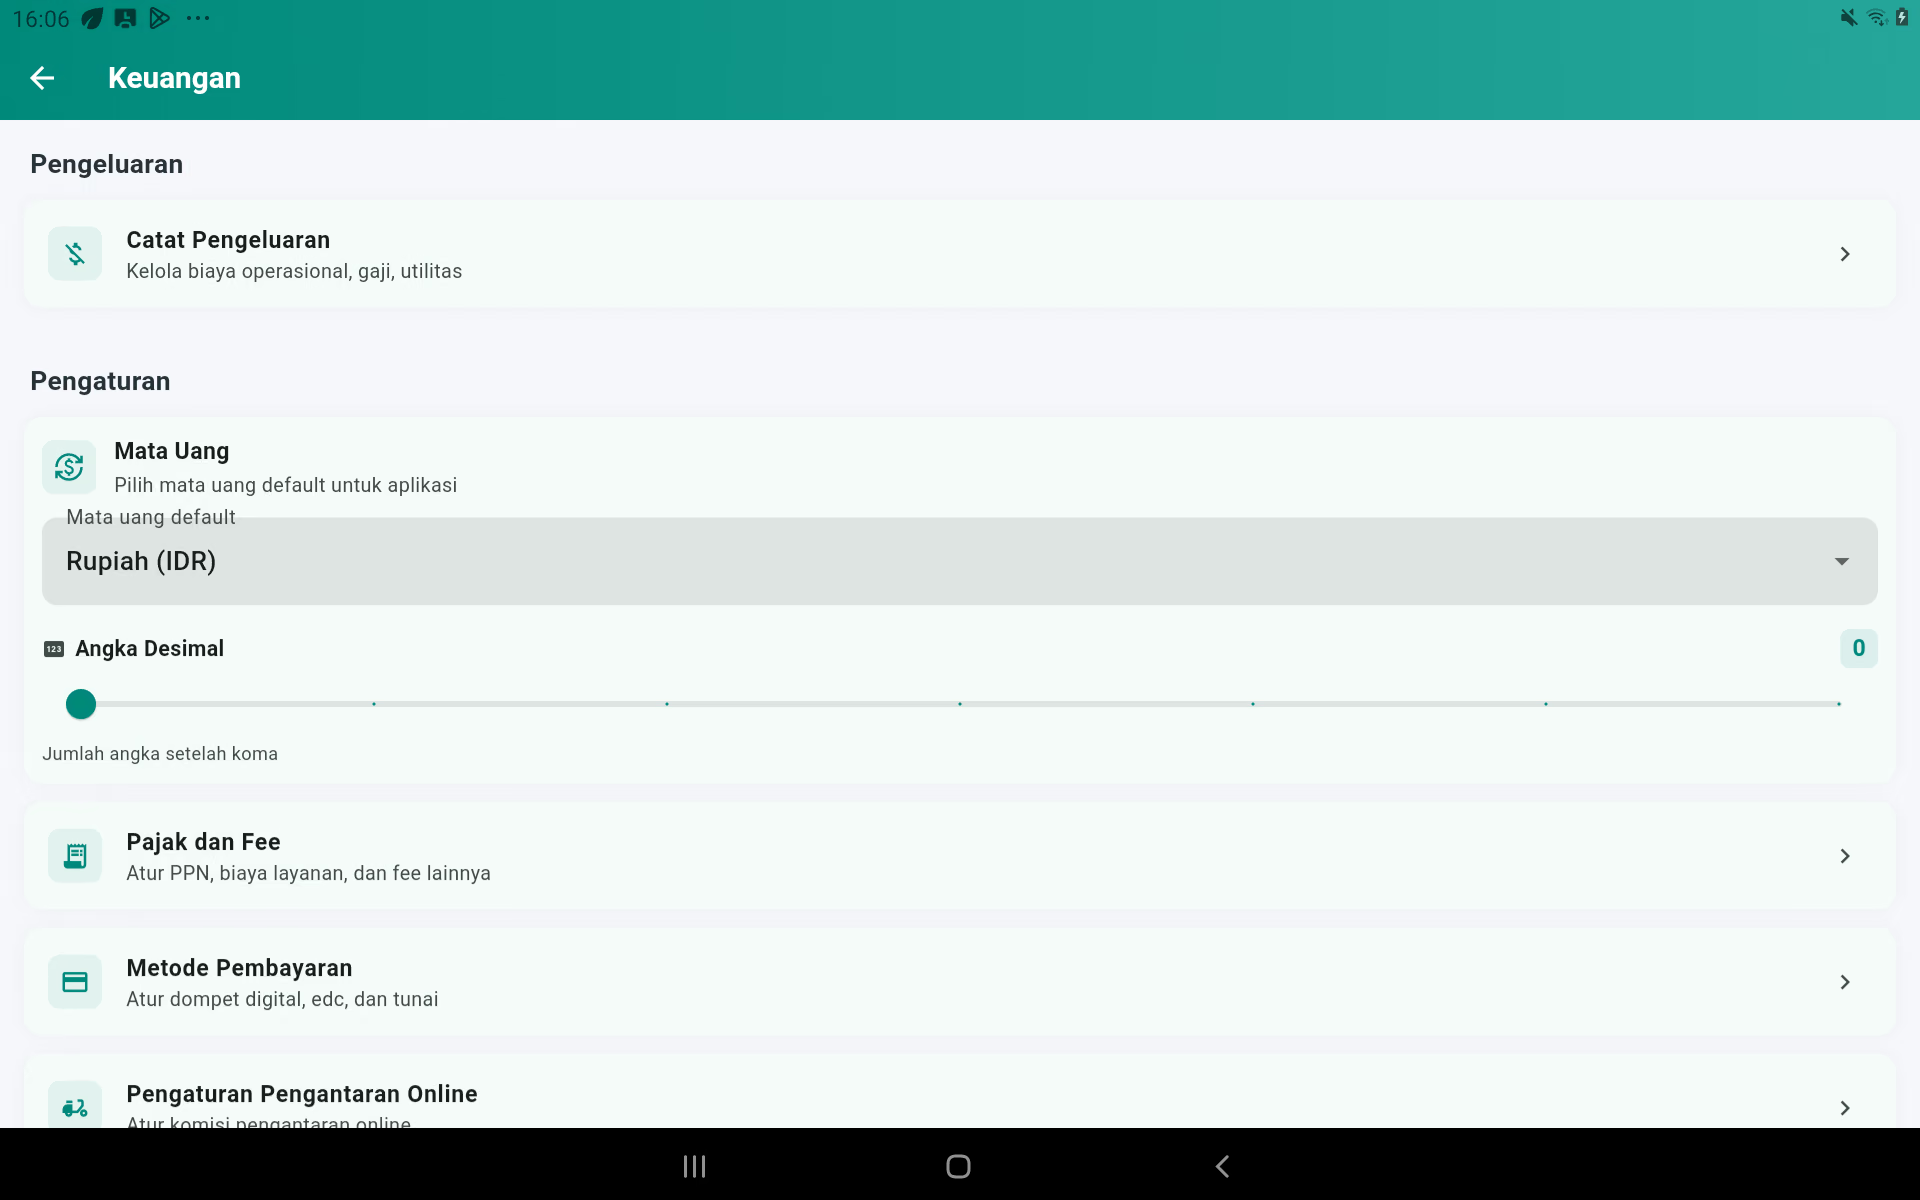
13. Taxes and Service Fee
POS → point three → Finance → Taxes and Fee
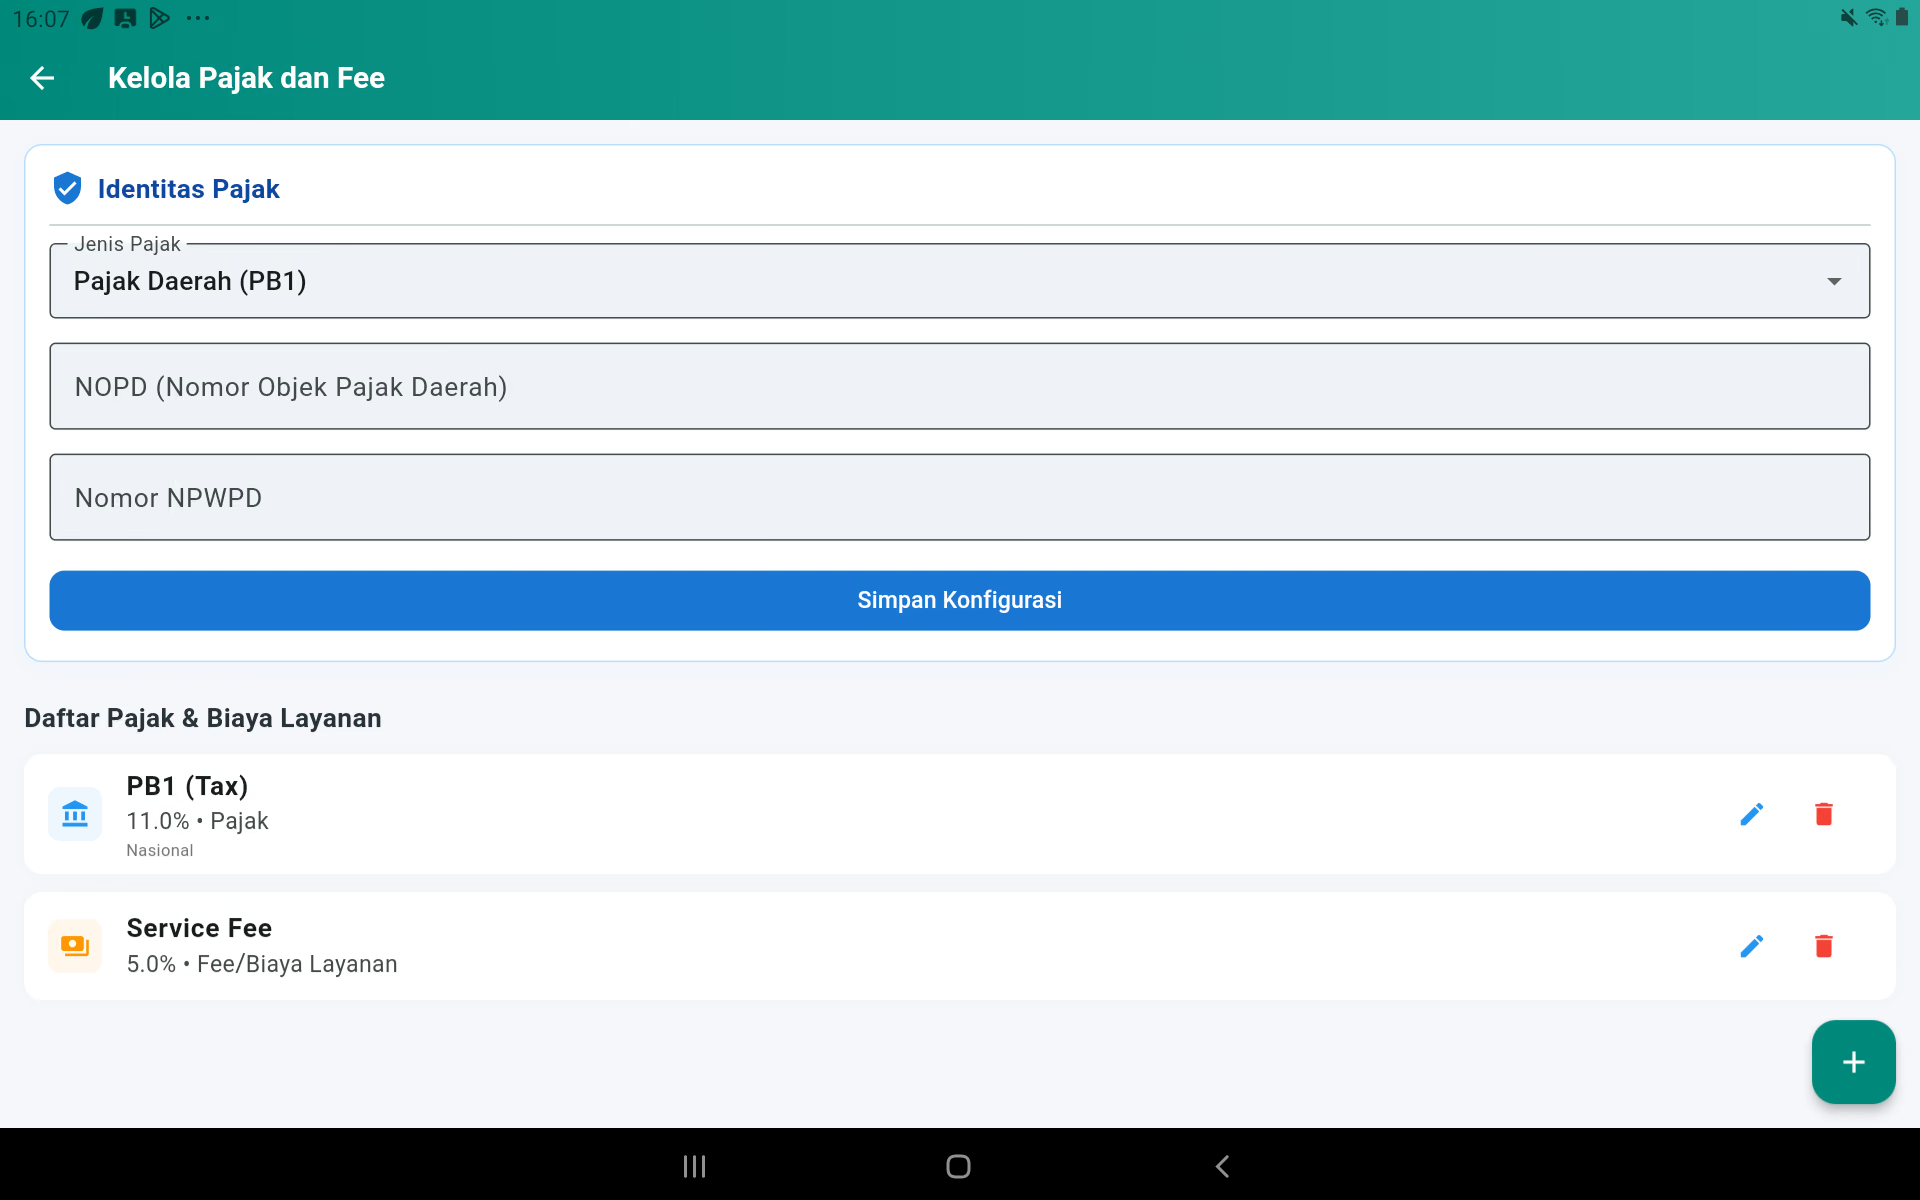
Fill out the tax ID
- Choose a regional or national tax type according to the business obligation.
- Fill in the appropriate tax identification number.
- Press the button. Save the configuration.
Increase taxes
- Press the plus.
- Fill in the name, for example. PB1.
- Fill in the percentages.
- Choose the type Taxes And the appropriate category.
- Activate it, then save it.
Added service fee
- Press the plus.
- Name it, like the service fee.
- Fill in the percentages.
- Choose the type Fee/Service fee.
- Activate and save.
Apply to the product
- Open the product form.
- Choose the applicable tax.
- Determine whether the price of the product is already taxed or not.
- Keep it.
- Add the product to the cart and check the details.
The order of the calculations used by the application
Each product can have its own taxes and service fees. The exact order follows the choice. The Basics of Calculation On the discount.
A. Tax and service fees
The formula: Total = Subtotal − Discount + Service Fee of value after discount + Tax to be added from value after discount.
Example
The price. ≈ $5.60, 10% discount, 5% service fee, 10% over-price tax, and tax is also levied on service fee.
Discount = ≈ $0.56. The new basics. ≈ $5.04. Service fee = 5% × ≈ $5.04 = ≈ $0.25. Product tax = 10% × ≈ $5.04 = ≈ $0.50. Service tax is 10% × ≈ $0.25 = ≈ $0.03. Total is equal to ≈ $5.60 − ≈ $0.56 + ≈ $0.25 + ≈ $0.50 + ≈ $0.03 = ≈ $5.82.
B. Tax and service fees discounted
The formula: Total before discount = Subtotal + Service Fee + Tax to be added. Then the discount is cut from the total.
Example
The price. ≈ $5.60, service fee 5%, over-price tax 10%, active service tax, then nominal discount ≈ $0.84.
Service fee = ≈ $0.28. Product tax = ≈ $0.56. Service tax = ≈ $0.03. Total before discount = ≈ $6.47. Total end = ≈ $6.47 − ≈ $0.84 = ≈ $5.63.
C. Taxes are already included in the price.
If you Taxes Included active, the tax section is only separated for reporting and No more additions. Price example ≈ $6.16 It's already included tax 10% has a tax share ≈ $0.56 and value before tax. ≈ $5.60.
D. Excess of the tax
If Incorporated Taxes are inactive, the tax is calculated from the item base and then added to the total. If the service fee tax option is active, the service fee also becomes the tax base.
E. Buy free X and Y
The prize product is included in the price. ≈ $0.00. The prize value is recorded as the promotional value for the report, but is no longer deducted from the total because the price of the free item is zero.
F. DP reservations and online commissions
The reservation DP is cut after the total order is completed: The total order is paid. The online delivery platform commission is noted for reporting and does not add or reduce customer bills.
14. Cash, early capital, cash in and cash out
POS → point three → Cash management
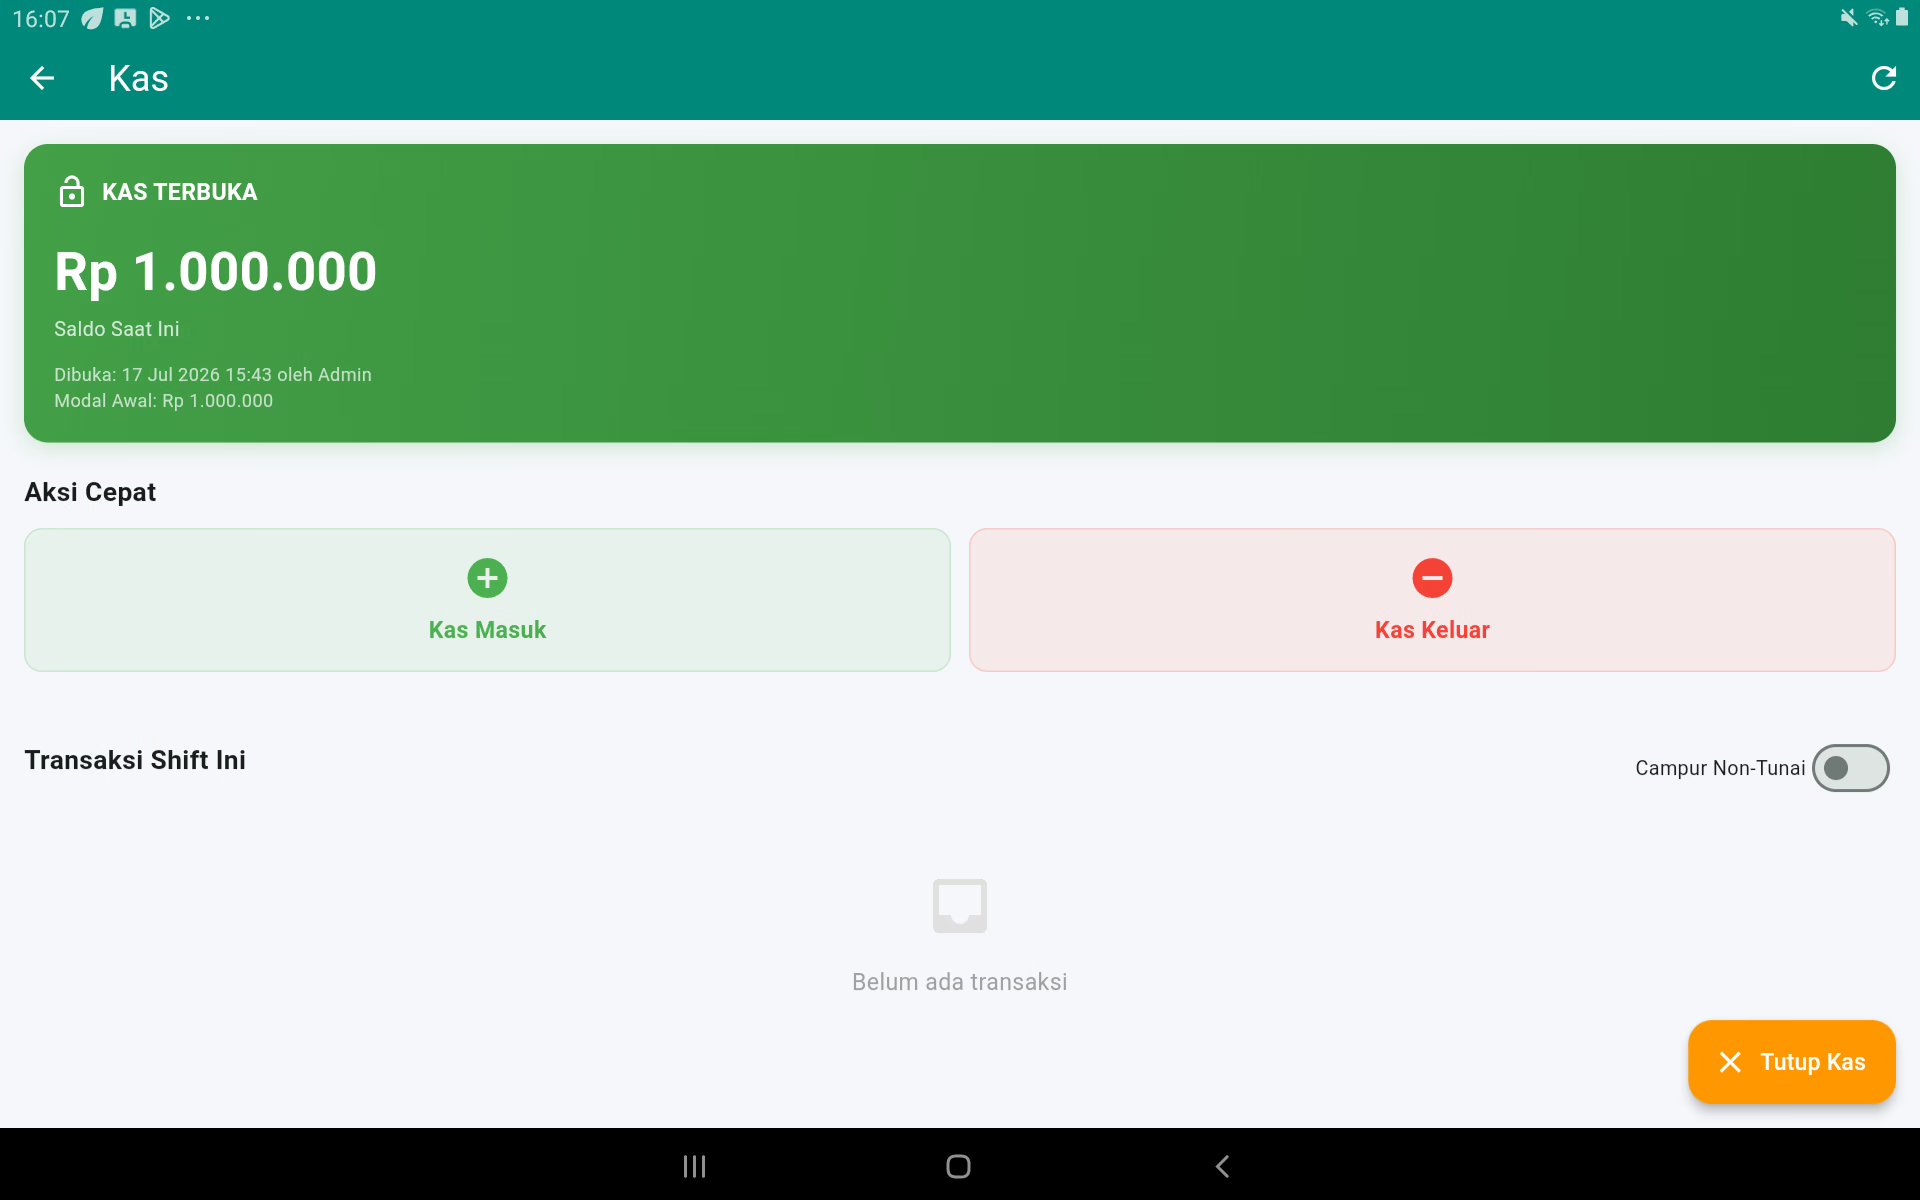
Open up cash and initial capital
- Count the initial cash in the drawer.
- Open the box.
- Press the button. Open the safe..
- Put in the initial capital according to the physical money.
- Confirm that. Status changed to The Bottle.
Additional capital deposits / cash in
- Press the button. Get in the pants..
- Select the category Capital Deposits Or a category that suits them.
- Enter the number.
- Fill in the notes and save them.
Cash out
- Press the button. Cash out.
- Select the category.
- Enter the number and the reason.
- Save it, then save the proof of expenses according to the store's procedure.
Close the safe.
- Make sure there's no cash transaction that's not done.
- Press the button. Close the safe..
- Calculate physical money without seeing the expected value when the store's procedure requires it.
- Enter the actual balance.
- Add notes if there's a difference.
- Confirm the closure.
- Save or print the shift summary.
15. Increase, View, Change, and Remove Spending
POS → point three → Finance → Expenditure records
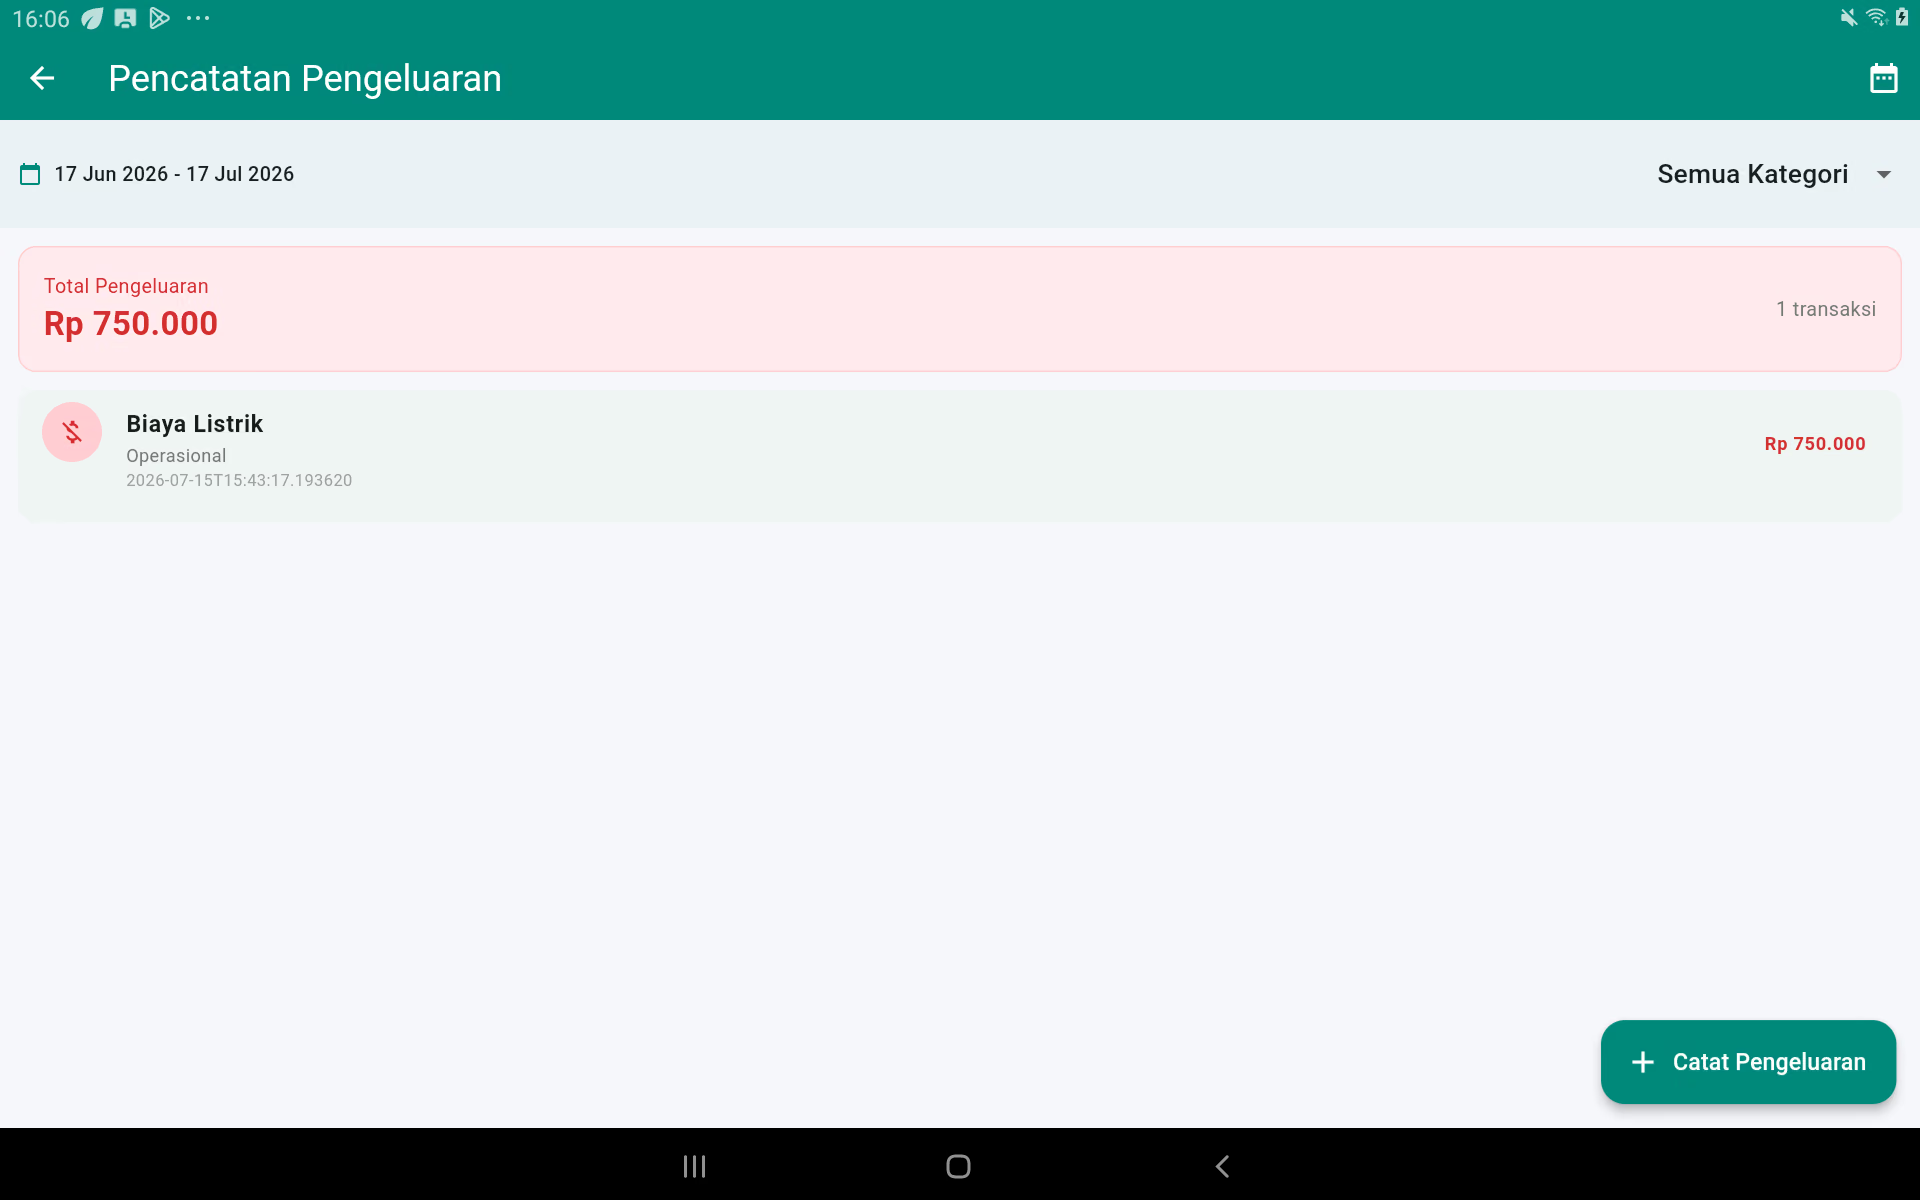
Add to it
- Press the plus.
- Select categories, such as raw materials, electricity, wages, operations, or other.
- It's a very easily recognizable piece of information.
- Enter the number and date.
- Fill in the evidence, then keep it.
Edit the
- Put the expense down.
- Fix the category, description, number, date, or record.
- Keep it.
- It's all gone.
Delete only duplicate or incorrect input notes that have not been used in reconciliation. Keep the physical evidence for examination.
16. Member and Customer Level
POS → point three → Member Management
Added members
- Press the plus.
- Fill out the name and phone number.
- Select the member level.
- Fill out the address or note if necessary.
- Keep it.
Edit and delete
Press the member to see the details and history of the transaction. Use the edit to update the data. Delete only double data; customer history will be safer if the data is kept.
Making the level member
- Open the level management from the member/settings page.
- Press the plus.
- Fill in the level names, discount values, minimum shopping, and minimum transaction.
- Keep it.
Using members on transactions
- Pick the type of Dine In or Take Away.
- Press the button. Select a Member It's up on the right.
- Search by name/phone.
- Choose a member.
- Check the name of the member appears and the price/discount member is applied.
- Finish the deal.
17. Table and Reservation
Add, view, change, and delete tables
POS → point three → Table management
- Press the plus to make the table.
- Fill in the name and capacity.
- Keep it.
- To edit, press the pencil icon on the table.
- To delete, make sure the table does not contain orders or reservations, and then press delete.
Making a reservation
POS → Reservation icon or point three → Reservation
- Press the plus.
- Choose a regular or a member.
- Fill in the name, phone number, number of guests, date, and time.
- Pick a table.
- Fill in the deposit/DP if accepted.
- Add pre-ordered products if you have any.
- Fill in the notes, then keep them.
- Send or print proof of reservation if necessary.
Check in with the police.
- Get a reservation today.
- Check the name, time, table, DP, and pre-order.
- Press the button. Check in with the police..
- Orders are loaded to the POS; check that the DP and pre-order are carried.
Cancellation and absence
Use the action menu on the reservation. Select Cancel or Not-Be-Available as the event, write the reason when requested, and follow the store's return policy.
18. Creating a Cash Account and Managing Permits
POS → point three → Settings → User & Role → User Management
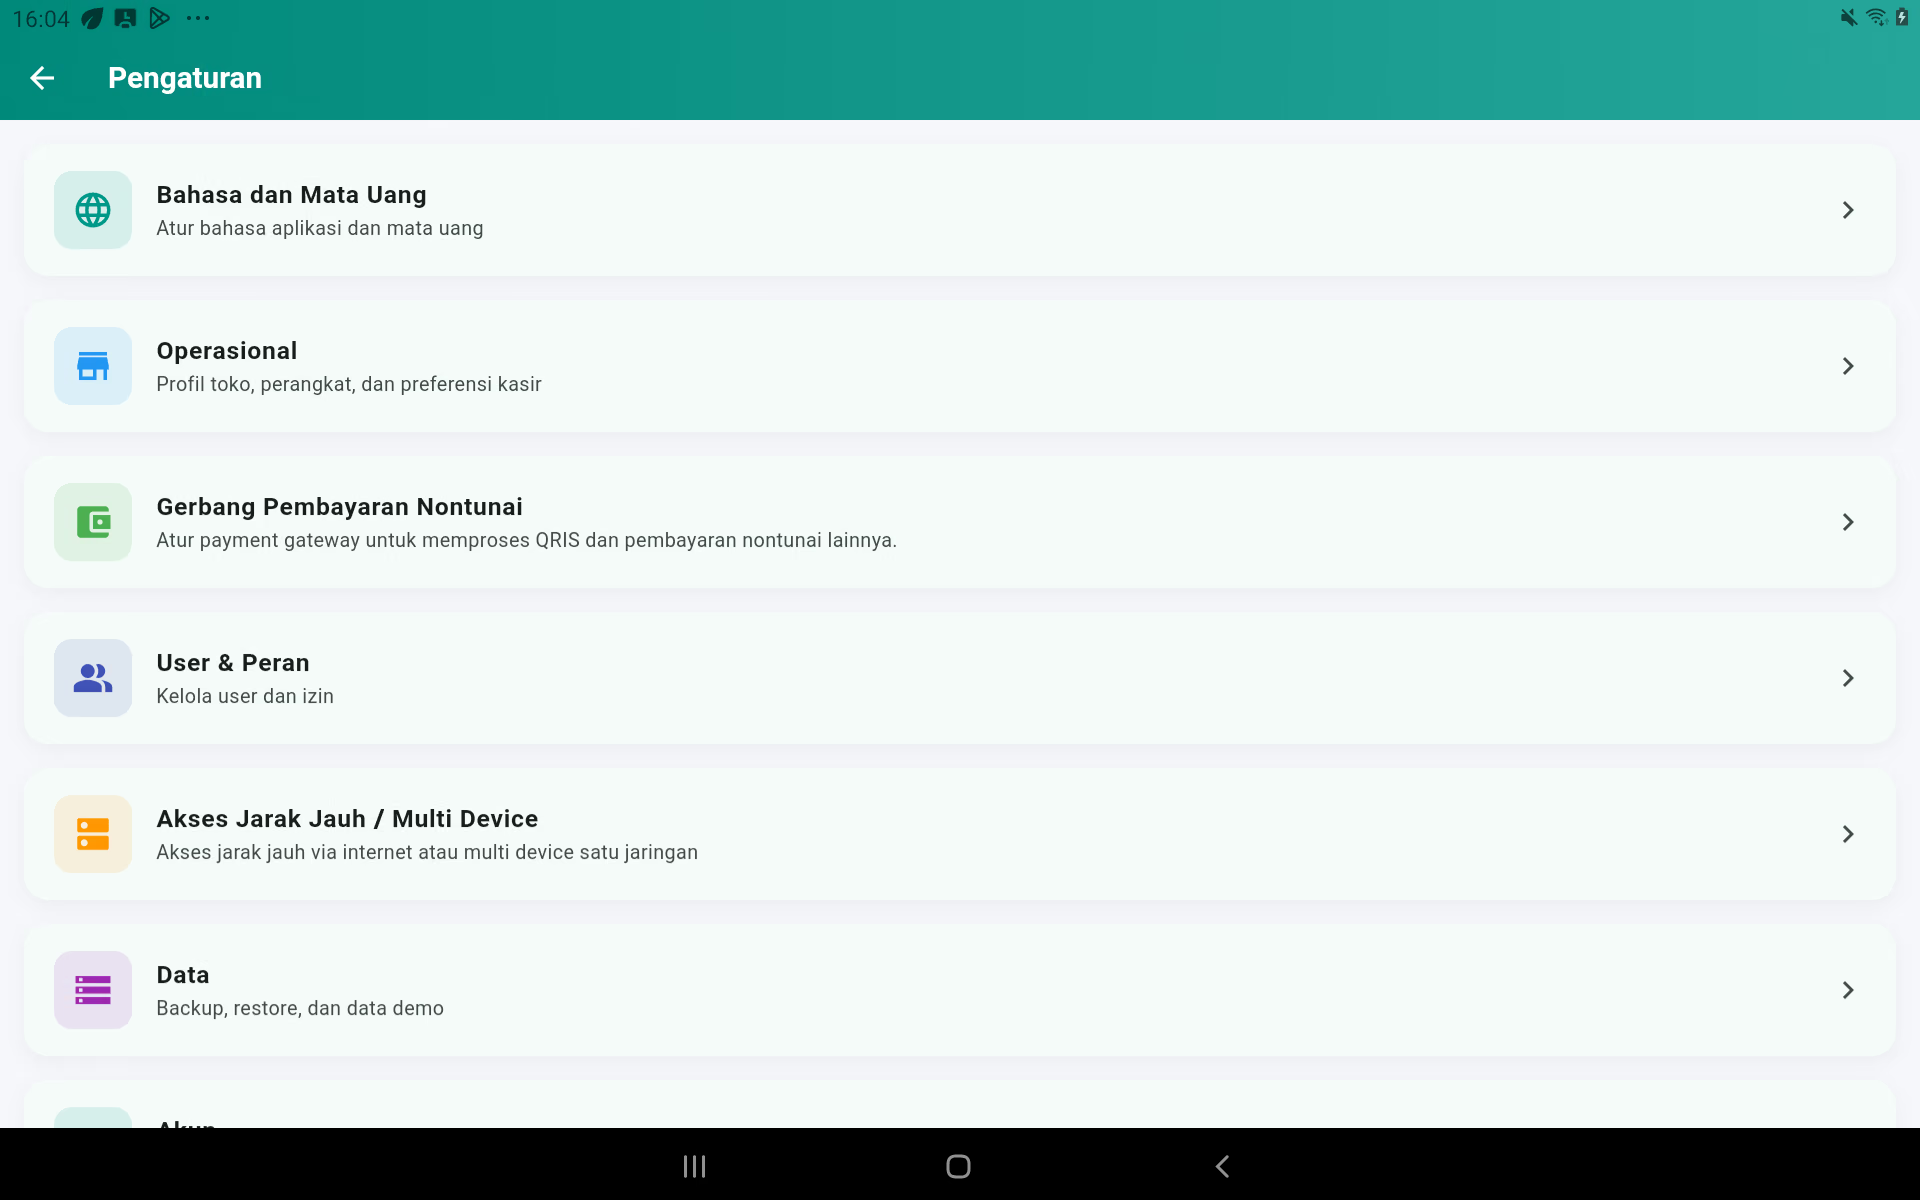
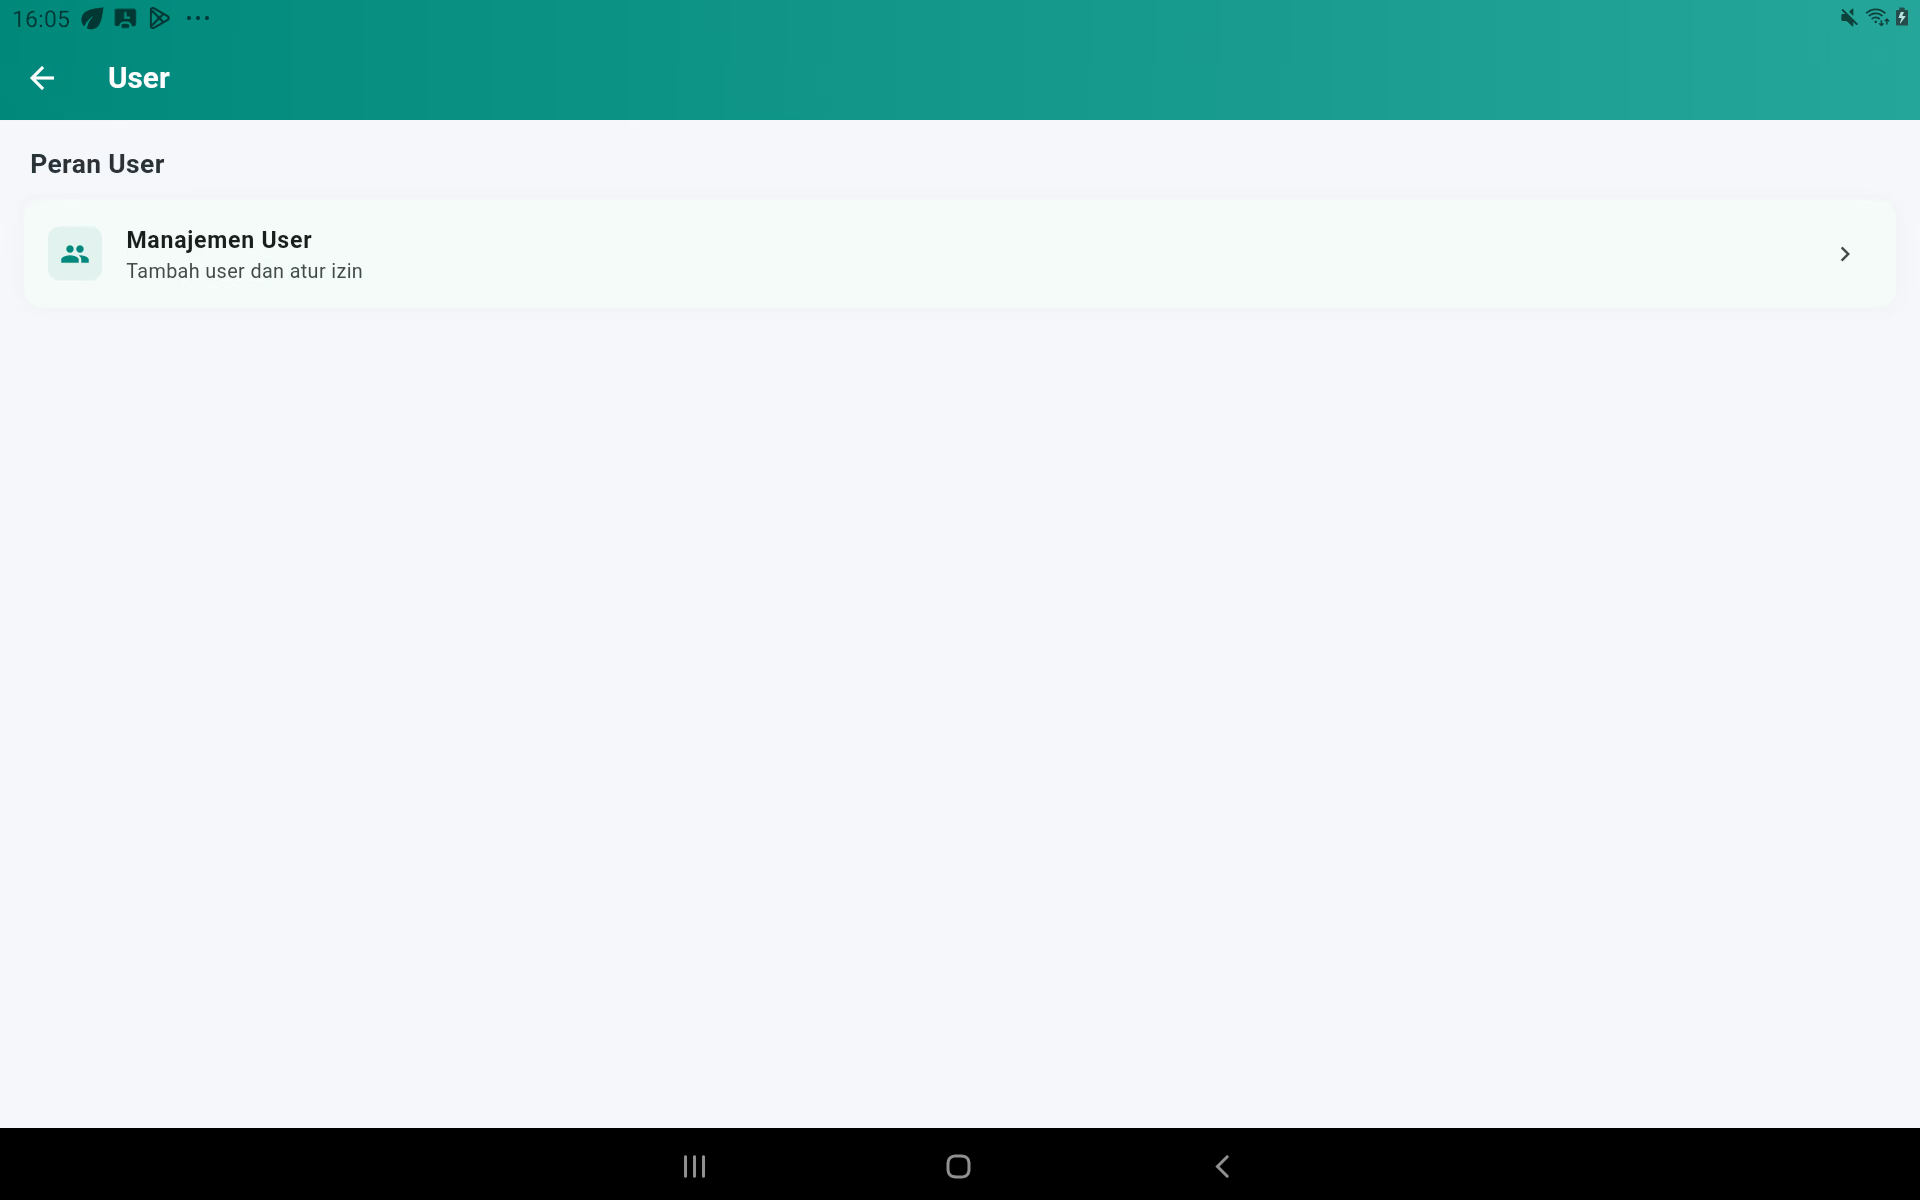
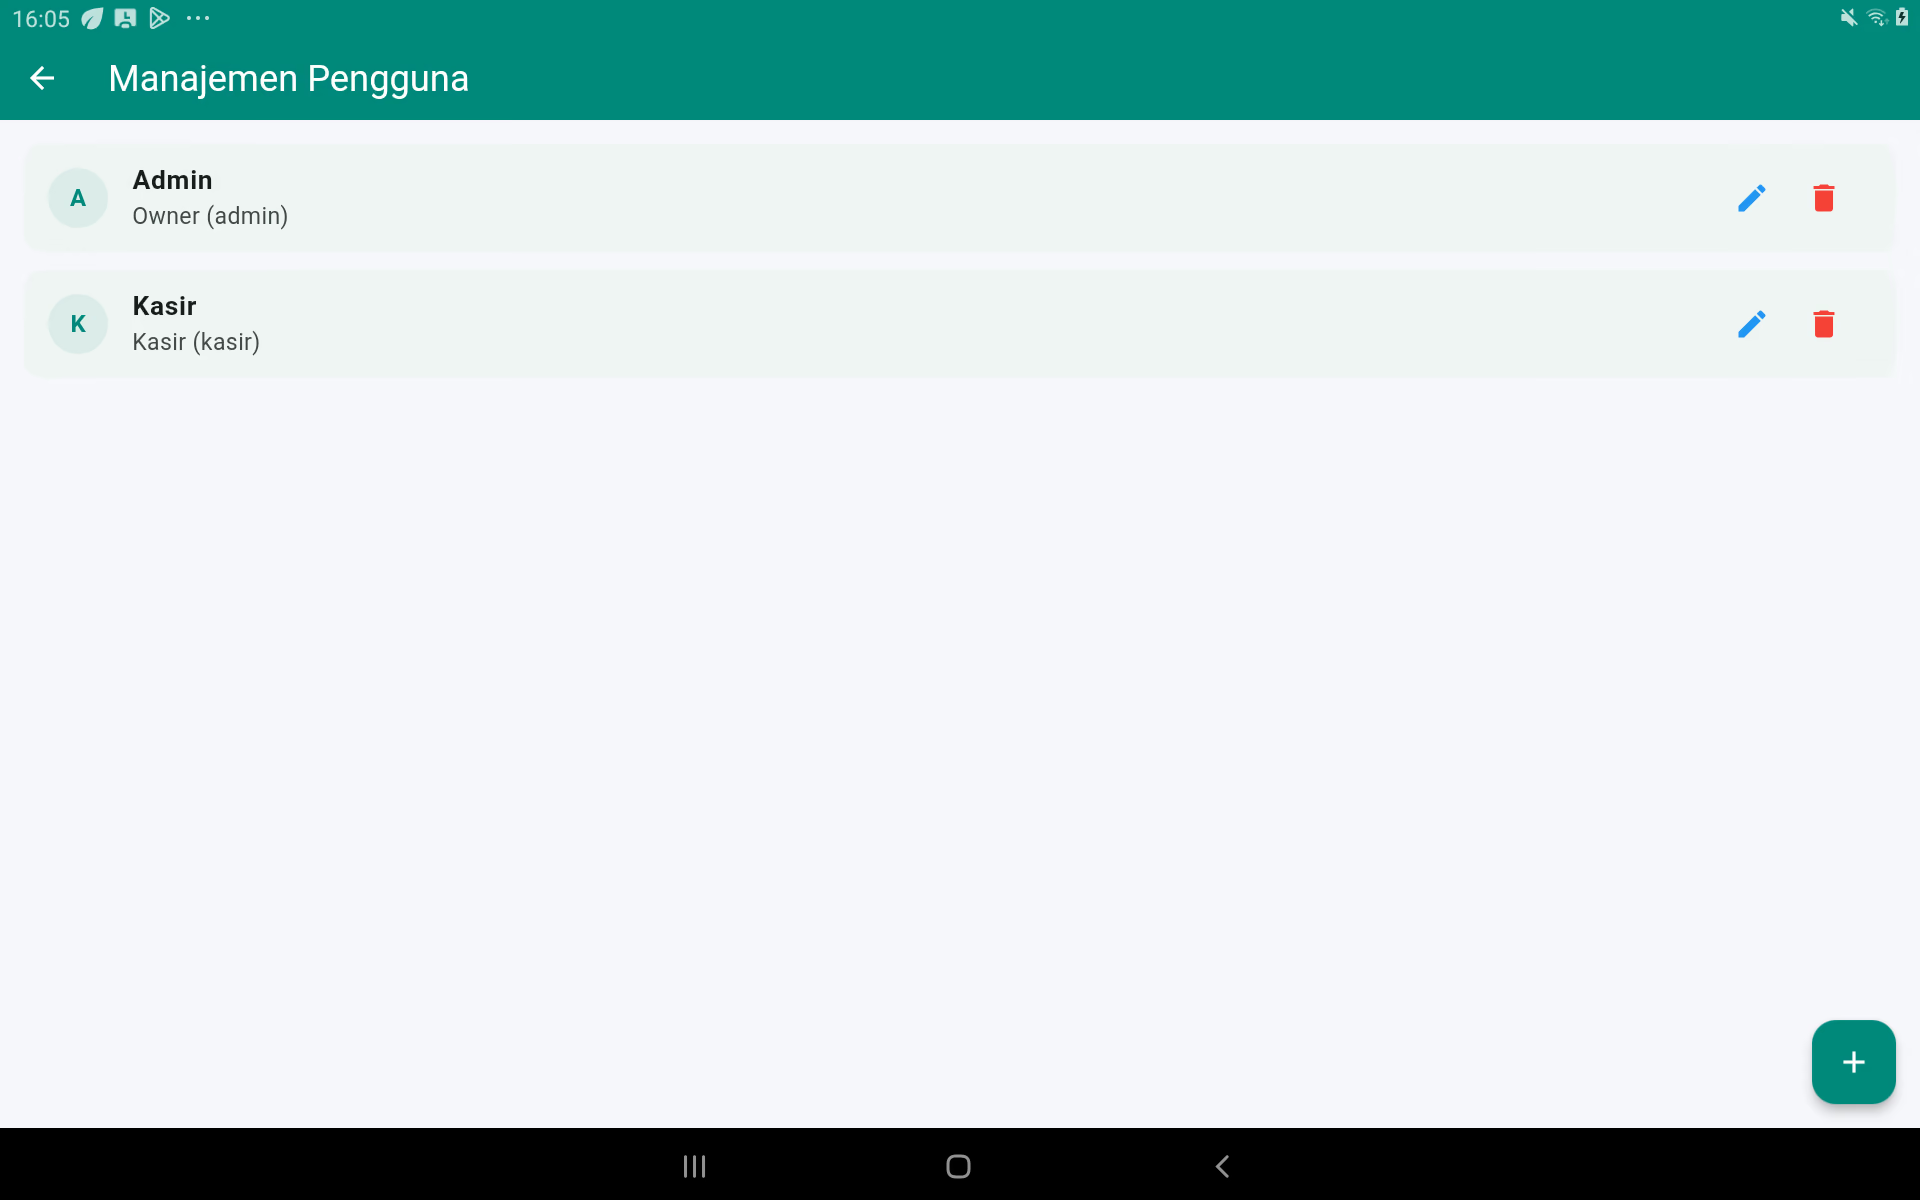
Creating a checking account
- Log in using the owner/admin account.
- Open it up. User management.
- Press the plus.
- Fill in the full name, username, and initial password.
- Choose a position The cashier.
- Activate the account.
- Check the in-house permits and remove unnecessary permits.
- Save the user.
- Log out, then test your login with a new account.
- Ask the cashier to change the initial password.
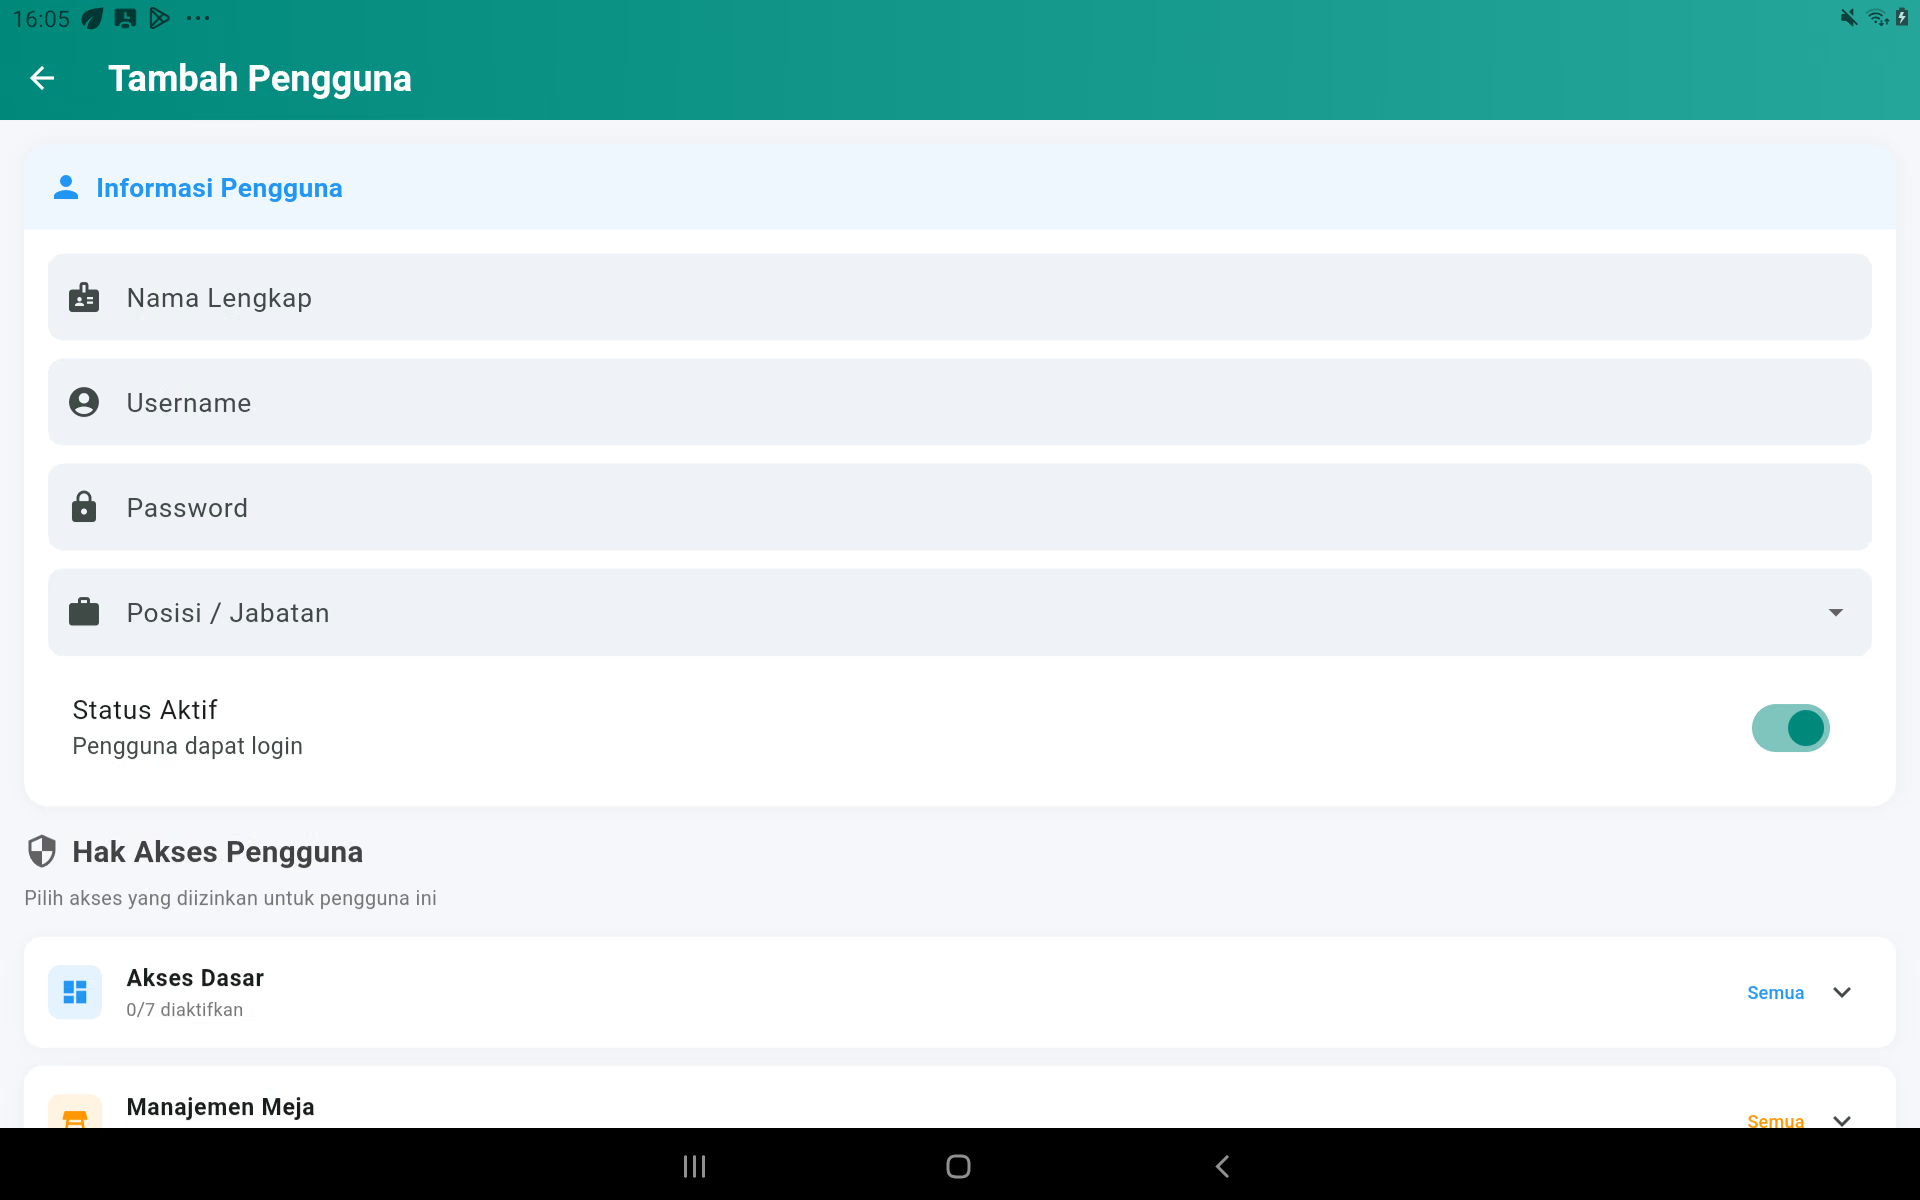
How access rights options work
- It's on. The user obtains the menu or button described in the table below.
- Off and out: The menu or button is either hidden or unusable.
- Tap the permission group name to open the list, then check the permissions one by one.
- Use the All/Delete option only after checking all permissions in the group.
- Press the button. Save the user, then ask the user to log out and log back in.
Full list of access rights
Basic access
| Right of access | If it's active | If it's not active |
|---|---|---|
| Cashed out | Mark the user as a POS officer. | Do not provide additional menus; use the detailed permissions below to restrict work. |
| Access to the Report | The report menu appears. | The report menu is hidden. |
| Access to settings | The Settings menu is up. | The Settings menu is hidden. |
| Product management | The basic product authorization is recorded; keep Product Management active in the Product Management group. | Use the Product Management details as the menu determinant. |
| Stock management | The basic stock permit is recorded; maintain the appropriate material/product permit. | Use the product/material details permission as the button determinant. |
| Access to the safe | The Cash Manager menu is up. | The cash manager menu is hidden. |
| User management | Basic permissions are recorded; actual access requires User Settings. | User settings are the main determinants. |
Table management
| Right of access | On the | Off |
|---|---|---|
| Access to the menu | The Table Management menu is showing up. | The menu is hidden. |
| Adding a table | The button plus the table shows up. | The button's hidden. |
| Edit the table | The edit button appears. | The edit button is hidden. |
| Clear the table | The delete button appears. | The delete button is hidden. |
Member management
| Right of access | On the | Off |
|---|---|---|
| Access to the Member Menu | The Member Management menu is showing up. | The menu is hidden. |
| Added Members | The button plus member appears. | The plus key is usually hidden. |
| Edit Member | Permission to update the member data. | Don't give the member's management line to this account. |
| Delete the member | The delete button appears. | The delete button is hidden. |
Management of expenditure
| Right of access | On the | Off |
|---|---|---|
| Access to Expenditure | The Finance menu appears, including expenses, taxes/fees, payments, and online delivery. | The Finance menu is hidden. |
| Increase in Spending | The spending note button appears. | The button's hidden. |
| Edit the release | The notes can be pressed to be edited. | The notes are not editable. |
| Delete the Expenditure | Long presses can erase. | Long presses do not erase. |
Management of raw materials
| Right of access | On the | Off |
|---|---|---|
| Access to and management of raw materials | The raw materials menu is on. | The menu is hidden. |
| Adding materials | The button plus the material appears. | The button's hidden. |
| Edit the Materials | The edit option for the material appears. | The edit option is hidden. |
| Remove the material | The deleting option appears. | The deactivation option is hidden. |
Discount and Ojol Management
| Right of access | On the | Off |
|---|---|---|
| Discounted access | Discount management menu is showing up. | The menu is hidden. |
| Added Discount | The button plus promo appears. | The button's hidden. |
| Edit Discount | Promo cards can be opened for editing. | The card cannot be edited. |
| Delete the Discount | Removal permission is recorded; it's safer to disable promotions than delete them. | Not giving you the right to delete. |
| The Commission's management/arrangement | It's meant to change the name of the platform and the commission; it also requires access to Finance. | Don't give me access to the Financials if the account can't change it. |
Reservation
| Right of access | On the | Off |
|---|---|---|
| Reserved access | The menu and booking page are open. | The menu is hidden and the page refuses access. |
| Additional Reservations | The button is on. | The button's hidden. |
| Edit the reservation | Active reservations are editable. | Press to edit is disabled. |
| Delete the reservation | The permanently deleted option appears. | The permanently deleted option is hidden. |
Product management
| Right of access | On the | Off |
|---|---|---|
| Category manager | Product portal and category menu appear. | The category is hidden. |
| Product management | The list of products and suppliers appears. | Both menus are hidden unless there's another permission to open the portal. |
| Addon/Topping management | The addon menu is showing up. | The addon menu is hidden. |
| Management of raw materials | The raw materials menu is on. | The raw materials menu is hidden. |
Management of the organization
| Right of access | On the | Off |
|---|---|---|
| User settings | The User & Role category appears; can create, change, disable, and authorize accounts. | The category is hidden. |
| Operational arrangements | Language, currency, store profile, printer, cashier preferences, and payment gateway are displayed. | The category is hidden. |
| Multi-device remote access | Solo, Master, Client, KDS, and Self Order settings are featured. | The category is hidden. |
| Data settings | Backup, restore, import, demo data, and delete data are displayed. | The Data category is hidden. |
| Account settings | Account profiles and logins appear in Settings. | The account category is hidden. |
| Info and Help | Versions, licenses, help, and contacts are displayed. | The information category is hidden. |
Reporting management
| Right of access | On the | Off |
|---|---|---|
| Sales reports | Sales reports are coming in. | Hiding it. |
| Profit and Loss Report | The profit and loss report came in. | Hiding it. |
| Discounted reports | Discount report is coming in. | Hiding it. |
| Stock reports | Stock reports are coming in. | Hiding it. |
| Cash reports | The cash report came in. | Hiding it. |
| Tax reports | The tax report came in. | Hiding it. |
| Service Fee Report | The service fee report is coming in. | Hiding it. |
| Ojol report | The online delivery report is coming in. | Hide if the sales report is off. |
| All staff reports | The portal and all staff reports are on display. | The Staff Portal is hidden. |
| Sales Staff | Sales reports per staff are allowed. | Hide if all staff reports are off. |
| Absence/Presence of Staff | Reporting staff attendance is permitted. | Hide if all staff reports are off. |
| Staff salaries | Staff pay reports are allowed. | Hide if all staff reports are off. |
| Staff cashier | The staff drawer report is allowed. | Hide if all staff reports are off. |
| Staff Performance | Staff performance reports are permitted. | Hide if all staff reports are off. |
Transaction management
| Right of access | On the | Off |
|---|---|---|
| The history of the transaction | The transaction history menu is up. | The menu is hidden. |
| The History of the Void | Intended to view void transactions; access to the list remains dependent on the Transaction History. | Don't give out the transaction history if the account can't see the data. |
| Void Transaction | The Void button appears on the transaction details. | The Void button is hidden. |
Employee management
| Right of access | On the | Off |
|---|---|---|
| Content of the Absence | The Absence menu and Today tab are available. | Today's tab is hidden unless you have other leave of absence. |
| History of the Absence | The History tab is available. | The history tab is hidden. |
| Setting Absence & Salary | The Settlement tab, shifts, pay, deductions, fines, and holiday badges are available. | The settings tab is hidden. |
Suggestions for permits per post
| Account type | Suggested permits |
|---|---|
| The cashier | POS, cash, absenteeism, transaction history, membership, tables, reservations, and discounts as policy. Void remains off. |
| Supervisor | The cashier's permits plus the voids, the sales/cash reports, the discount edits, and the stock inspection. |
| Warehouse staff | Category, product, add-on, raw material, supplier, stock, and stock reports; without financial statements. |
| Owner/Admin | Full automatic access. |
Edit, disable, delete
Edit the account for name, position, password, or permission changes. When the staff is out, disable the account as soon as possible. Deleting accounts is only done if you make sure it doesn't interfere with the search for old transactions.
19. Absence, Shift, and Presence
POS → point three → absence
Clock in
- Log in with your own account.
- Open the abs.
- Make sure the date and time is correct.
- Press the button. Clock in.
- Check the time of entry.
Clock out
- Open the abscess before you go home.
- Press the button. Clock out.
- Check the working hours.
The history
Open the History tab, select the period, and then check the entry, home hours, delays, permits, sickness, absences, and holidays.
Admin settings
The administrator can make shifts, specify start/finish hours and tolerances, match shifts to employees, set salary types, deductions, fines, and see payroll calculations. Test one employee sample before the rules apply to all staff.
20. All reports
POS → point three → Report
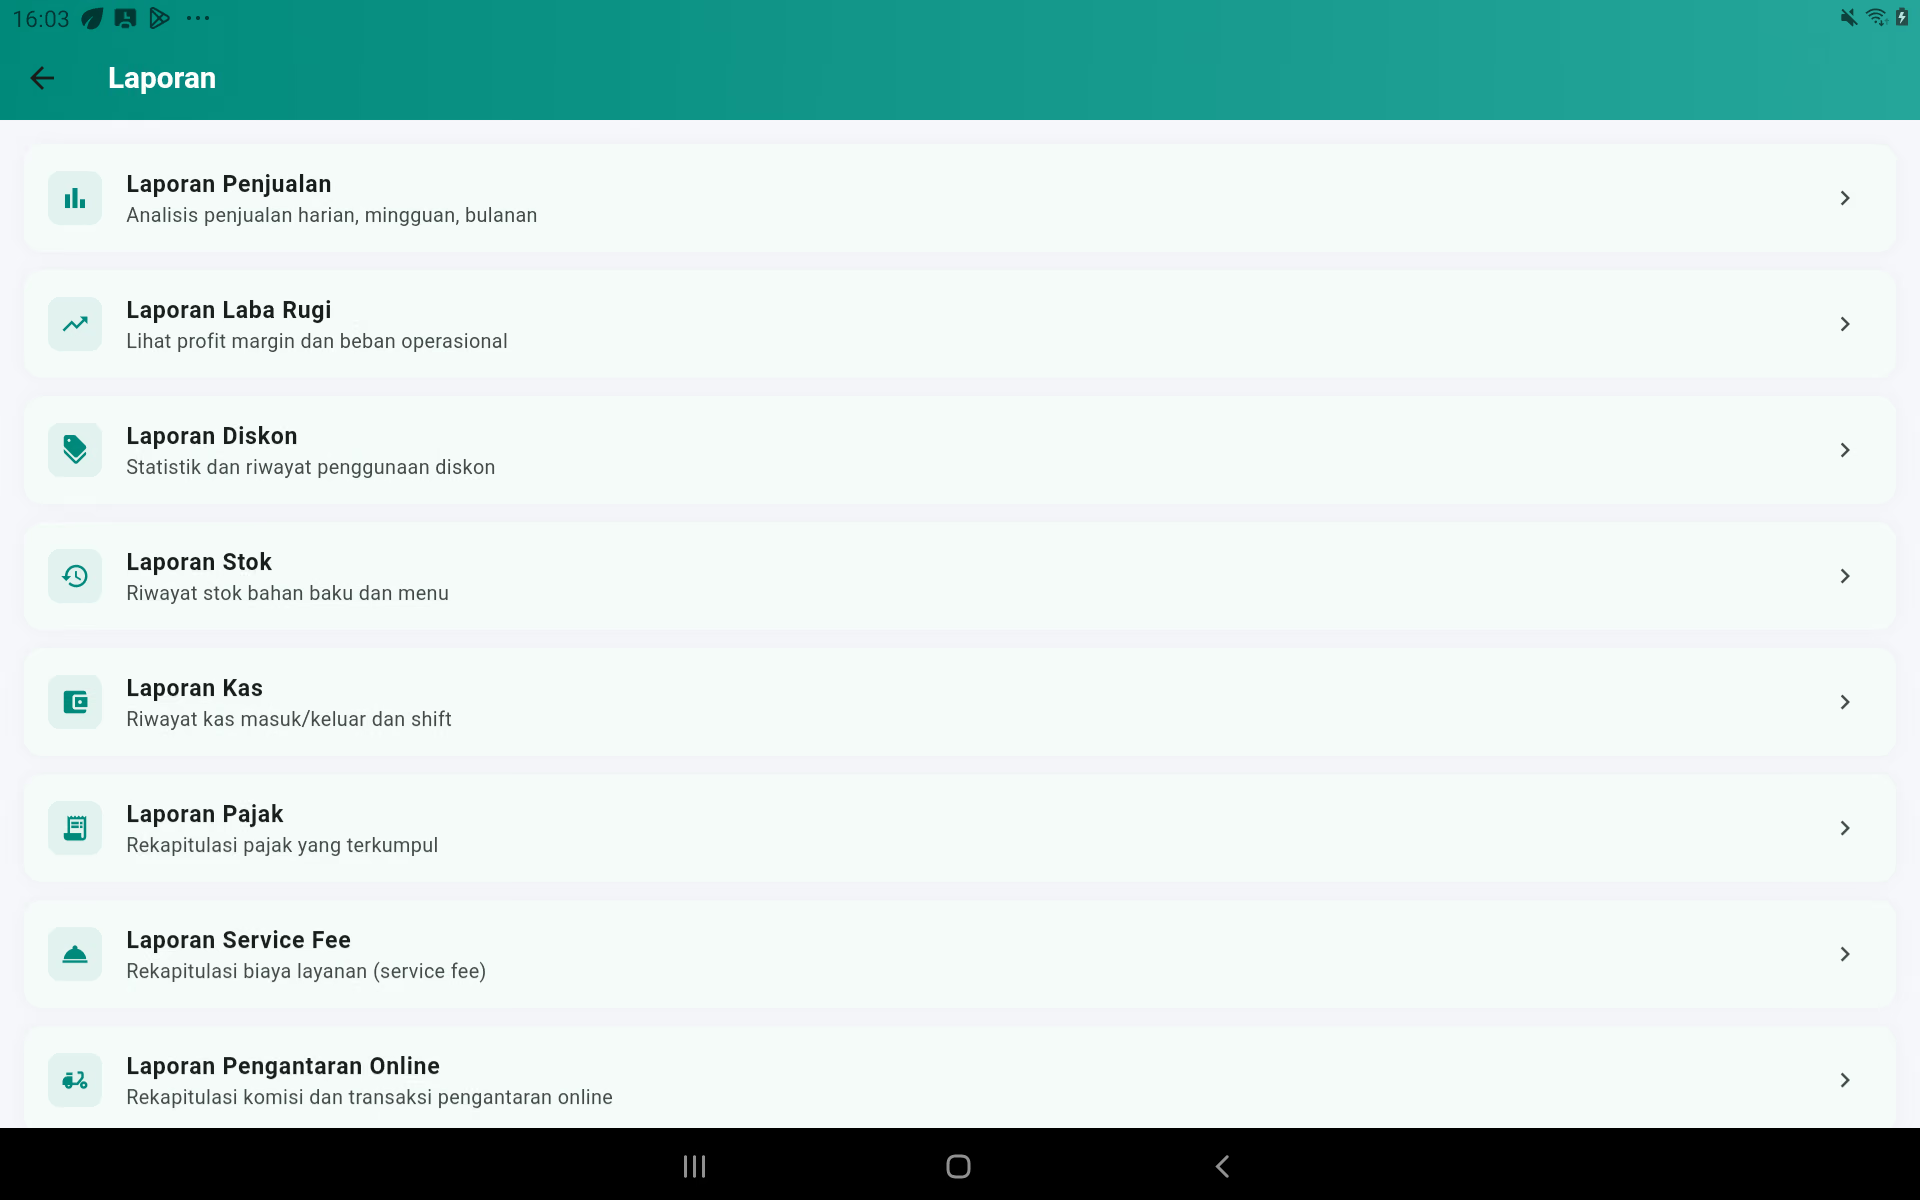
Common way of opening reports
- Pick the type of report.
- Choose a period: today, week, month, year, or a specific range.
- Set up other filters when available.
- Wait for the data to load.
- Check the brief and the details.
- Use print or export when necessary.
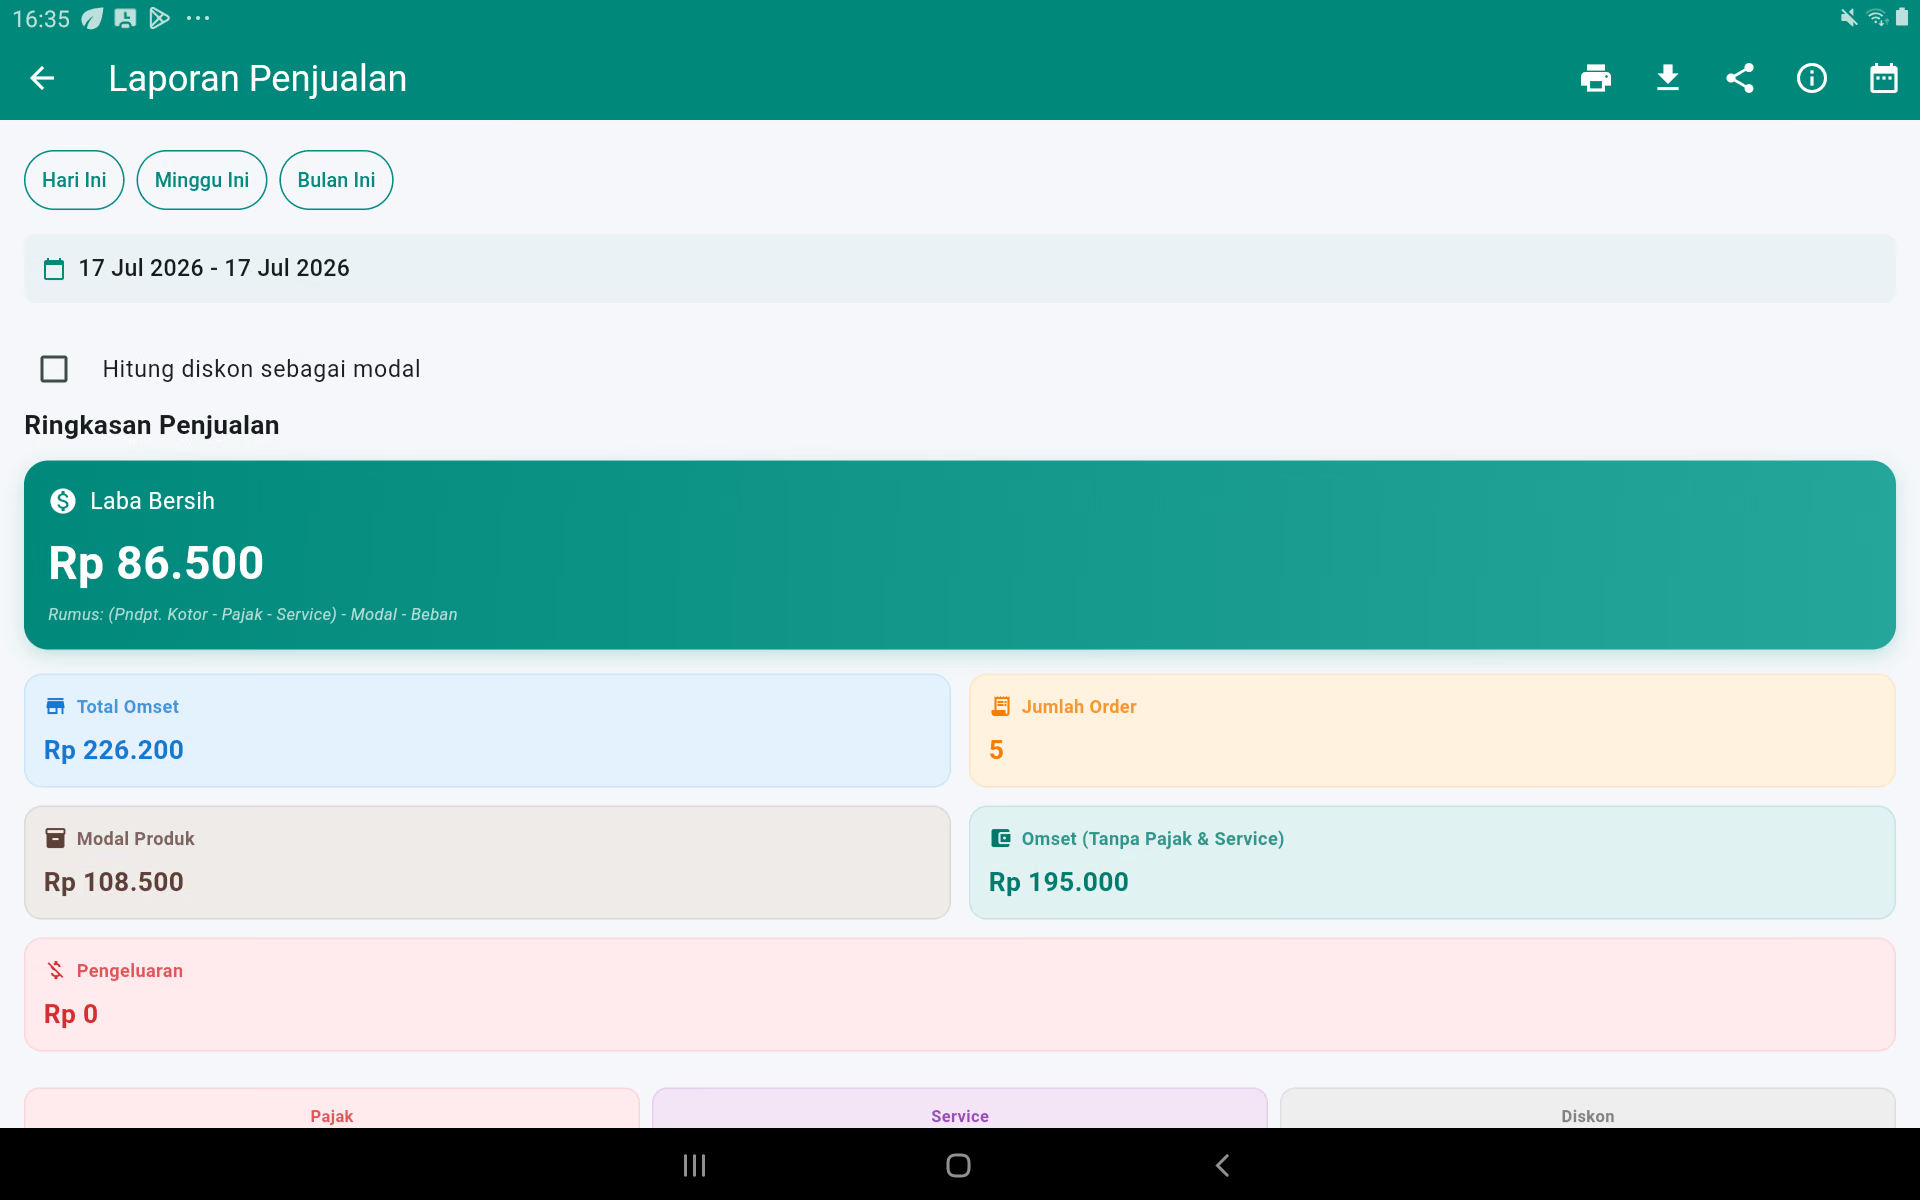
1. Sales reports
Use it to find out the sales results in a period. Select the date, and then read total turnover, net sales, order amount, HPP, profit, expense, tax, service fee, discount, online commission, order type, payment method, and items sold. Enable the option to include discounts as expenses only if it is consistent with the business analysis method. The printer icon prints the report, the download icon makes the CSV, and the information icon explains the formula.
2. Profit and Loss Report
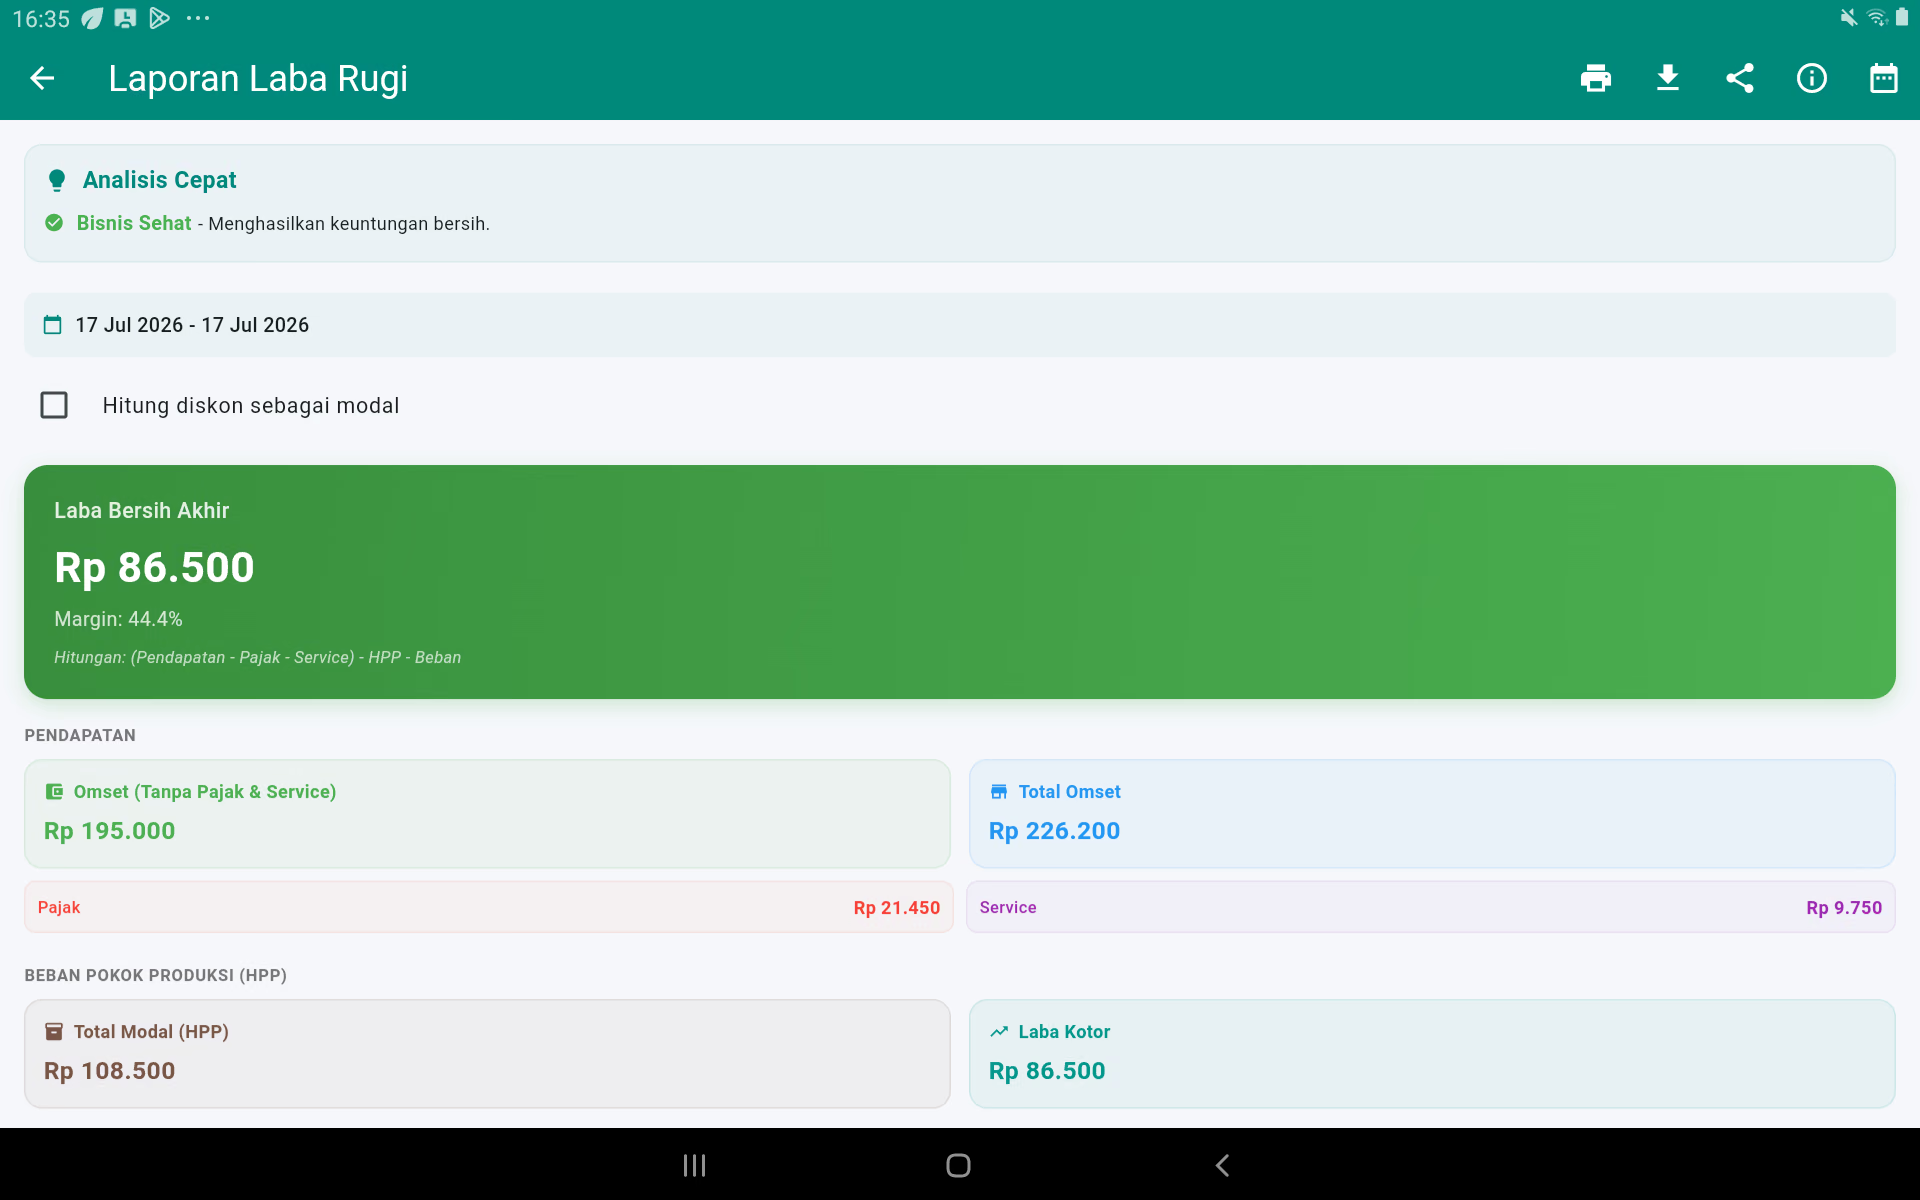
This report answers whether the venture is profitable or not. Omzet without taxes and service The Commission has also taken into account the information provided by the Commission in its communication to the Council. The Quick Analysis card warns if the HPP or load is too high. The capital price of the product and material must be correct so that the report does not mislead. The Choice Calculate the discount as capital changing the way discounts are treated in analytics.
3. Discounted reports
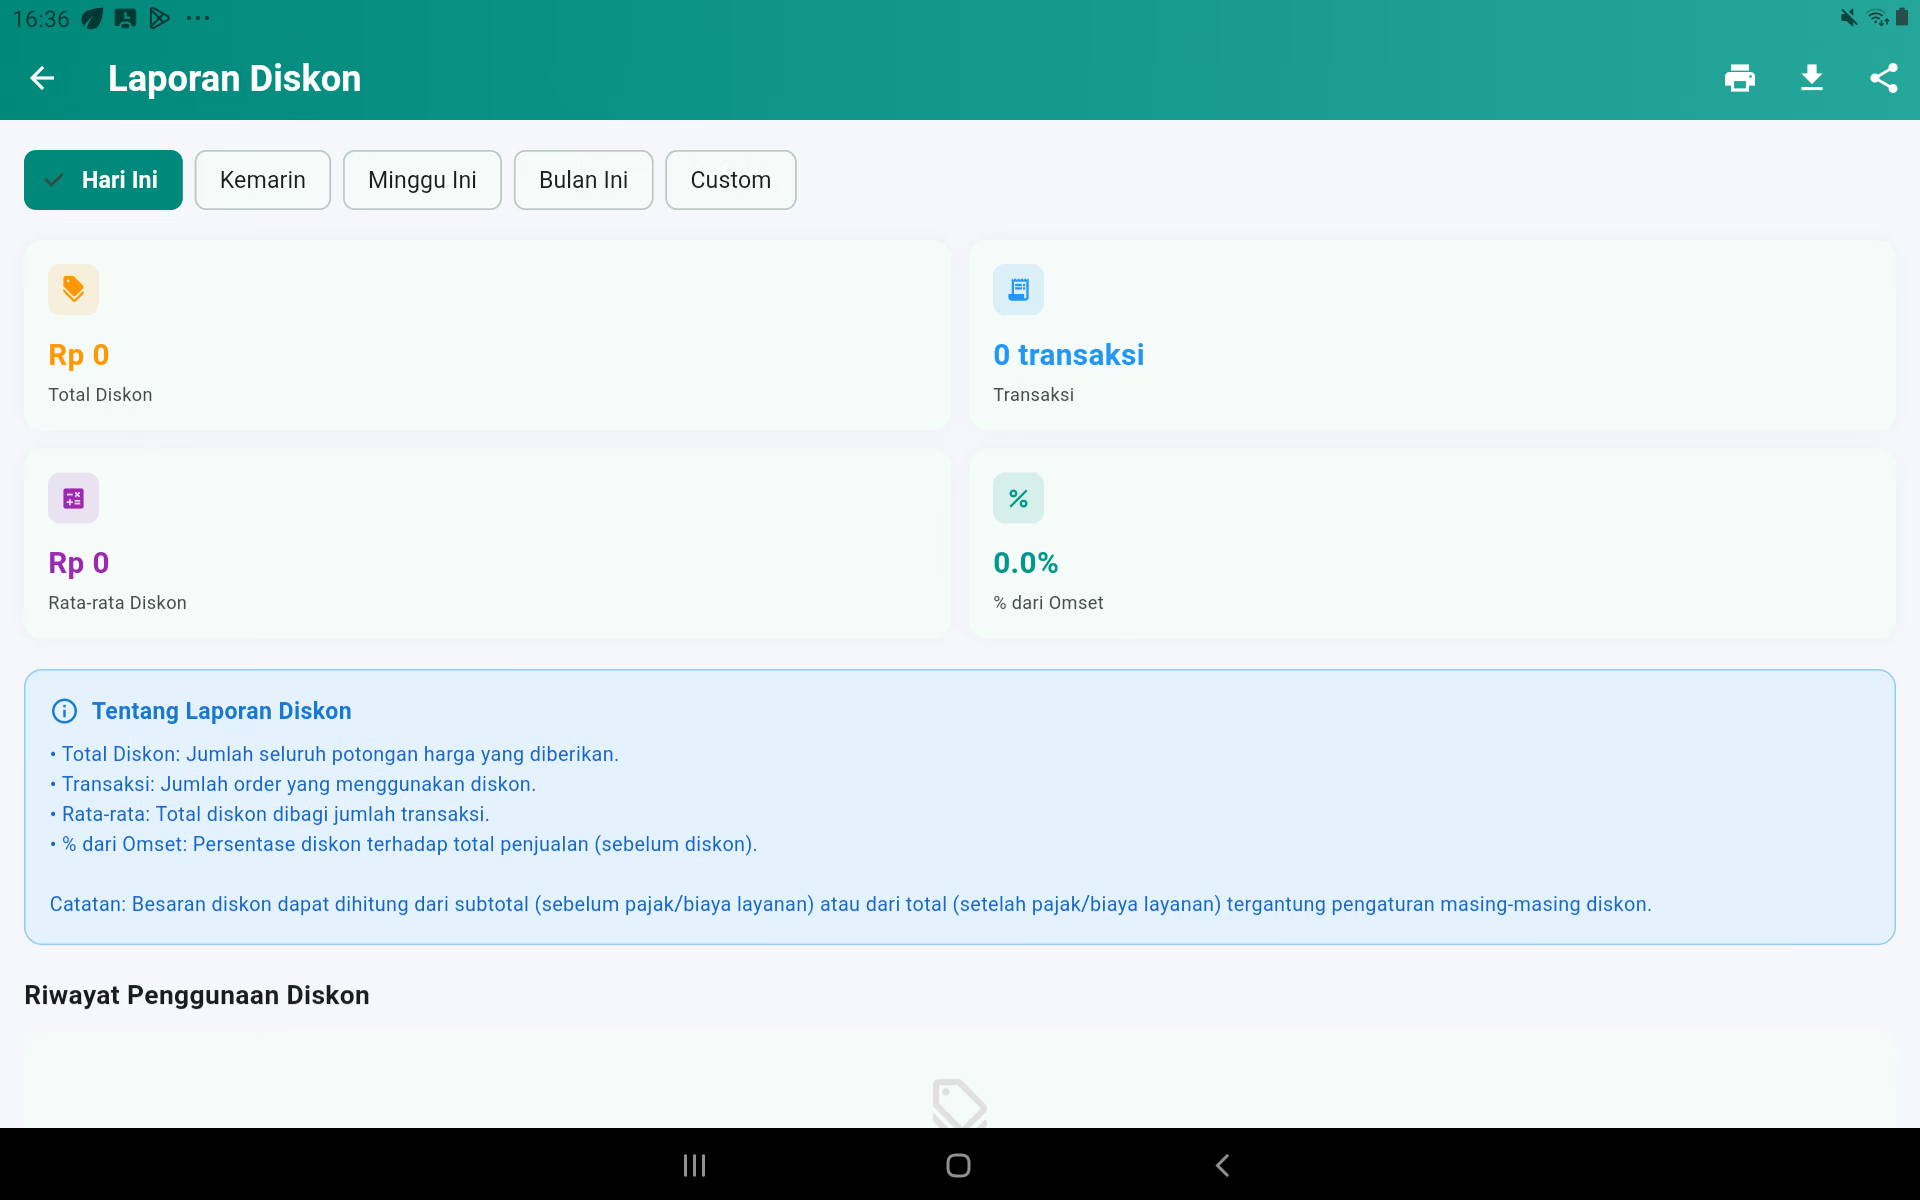
Choose Today, Yesterday, This Week, This Month, or Custom. The report shows total discounts, number of transactions using discounts, average discounts, percentage of discounts against pre-discount turnover, top promotions, and usage history. Use this to check if the promo increases the transaction without spending the margin.
4. Stock reports
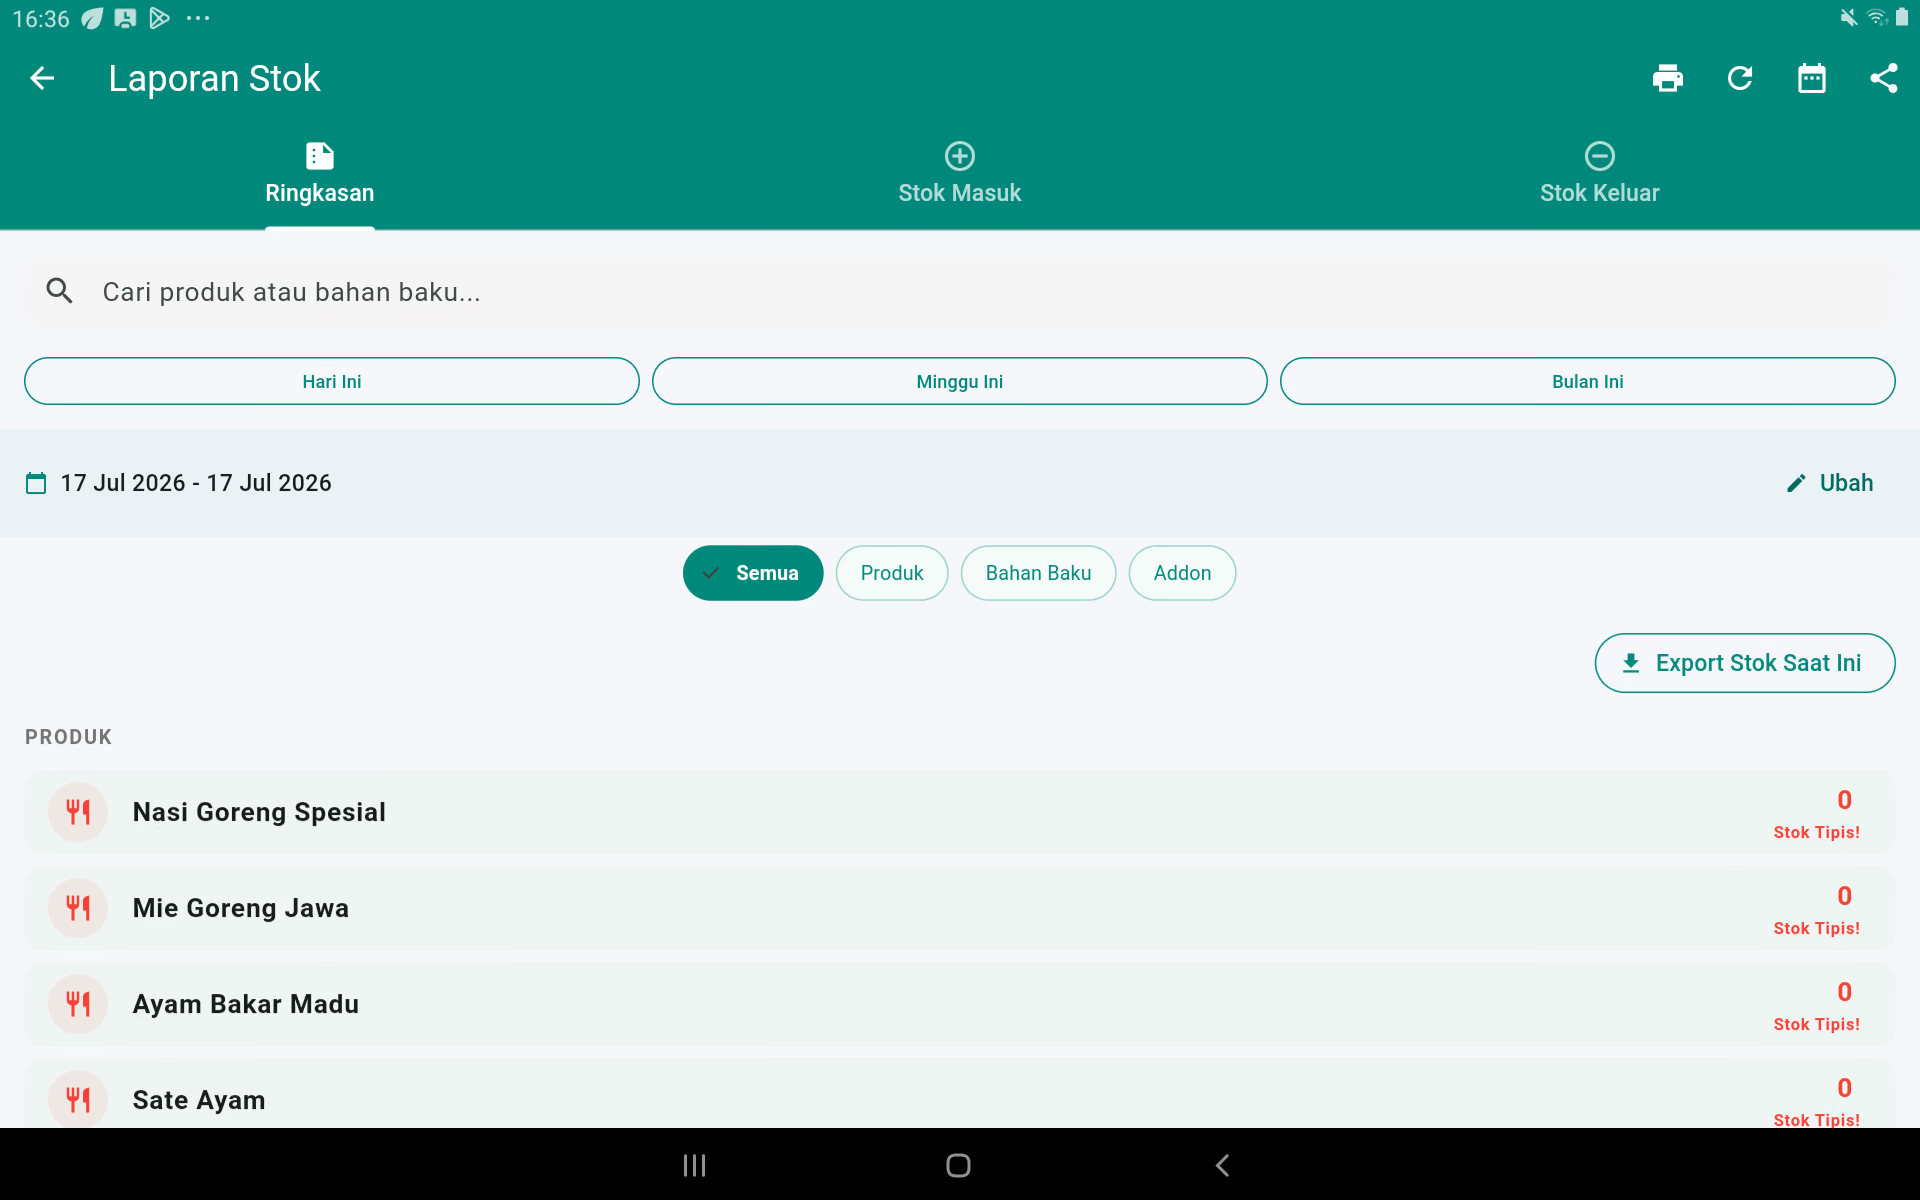
There are three tabs: Summary For the current stock, Stock is in. for purchases/additions, and Stock out For sale or for deduction. Use the search, period, and product/addon filters. Item marked "Tiny Stock" must be inspected immediately. The Stock Export button now makes a stock list for stock opname.
5. Cash reports
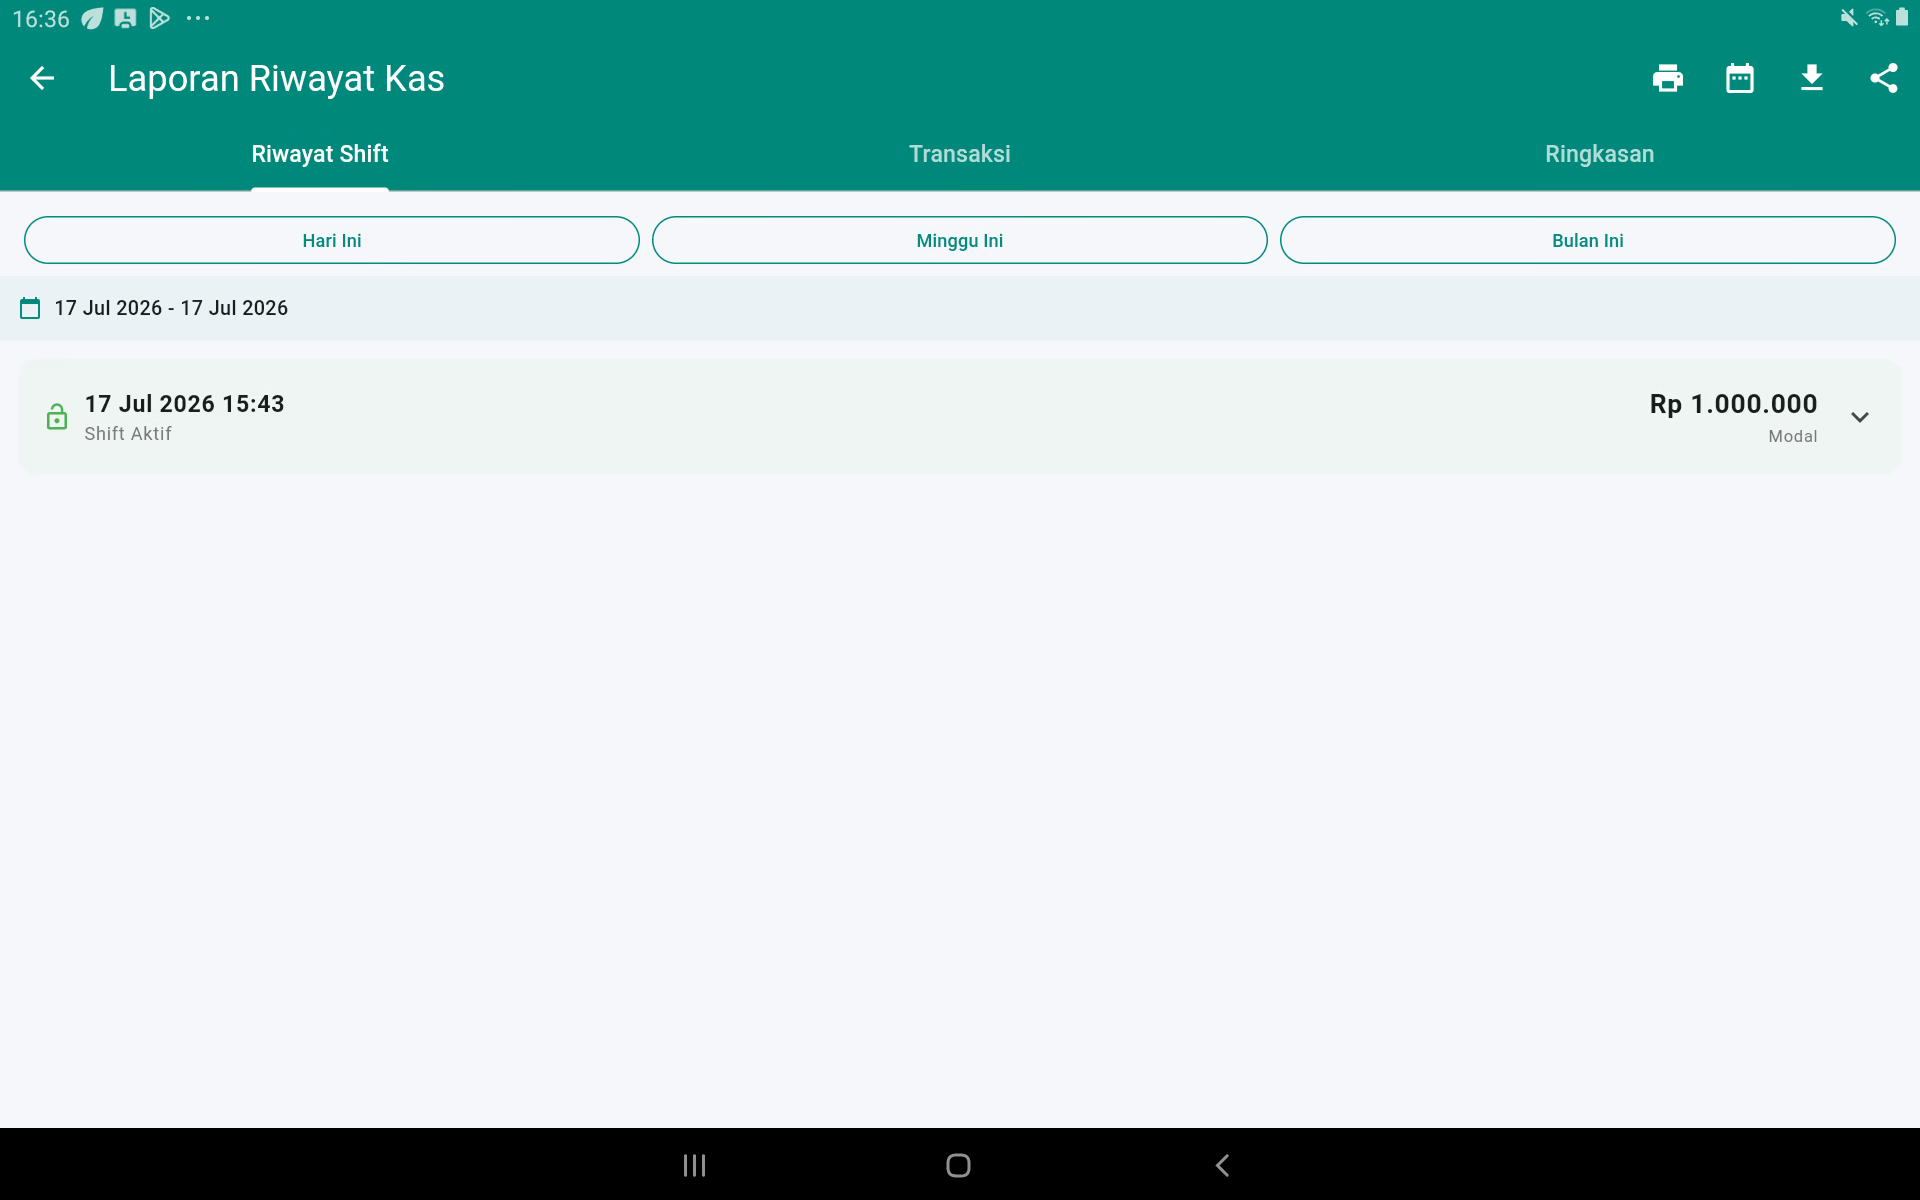
Tabs History of the Shift It shows the opening/closing session and the initial capital. Tabs The transaction It shows the cash in/out. Tabs Summary combines the value of the period. Open the shift line to see the balance of expectations, the actual balance, and the difference. Match the total cash to the physical cash before the shift closes.
6. Tax reports
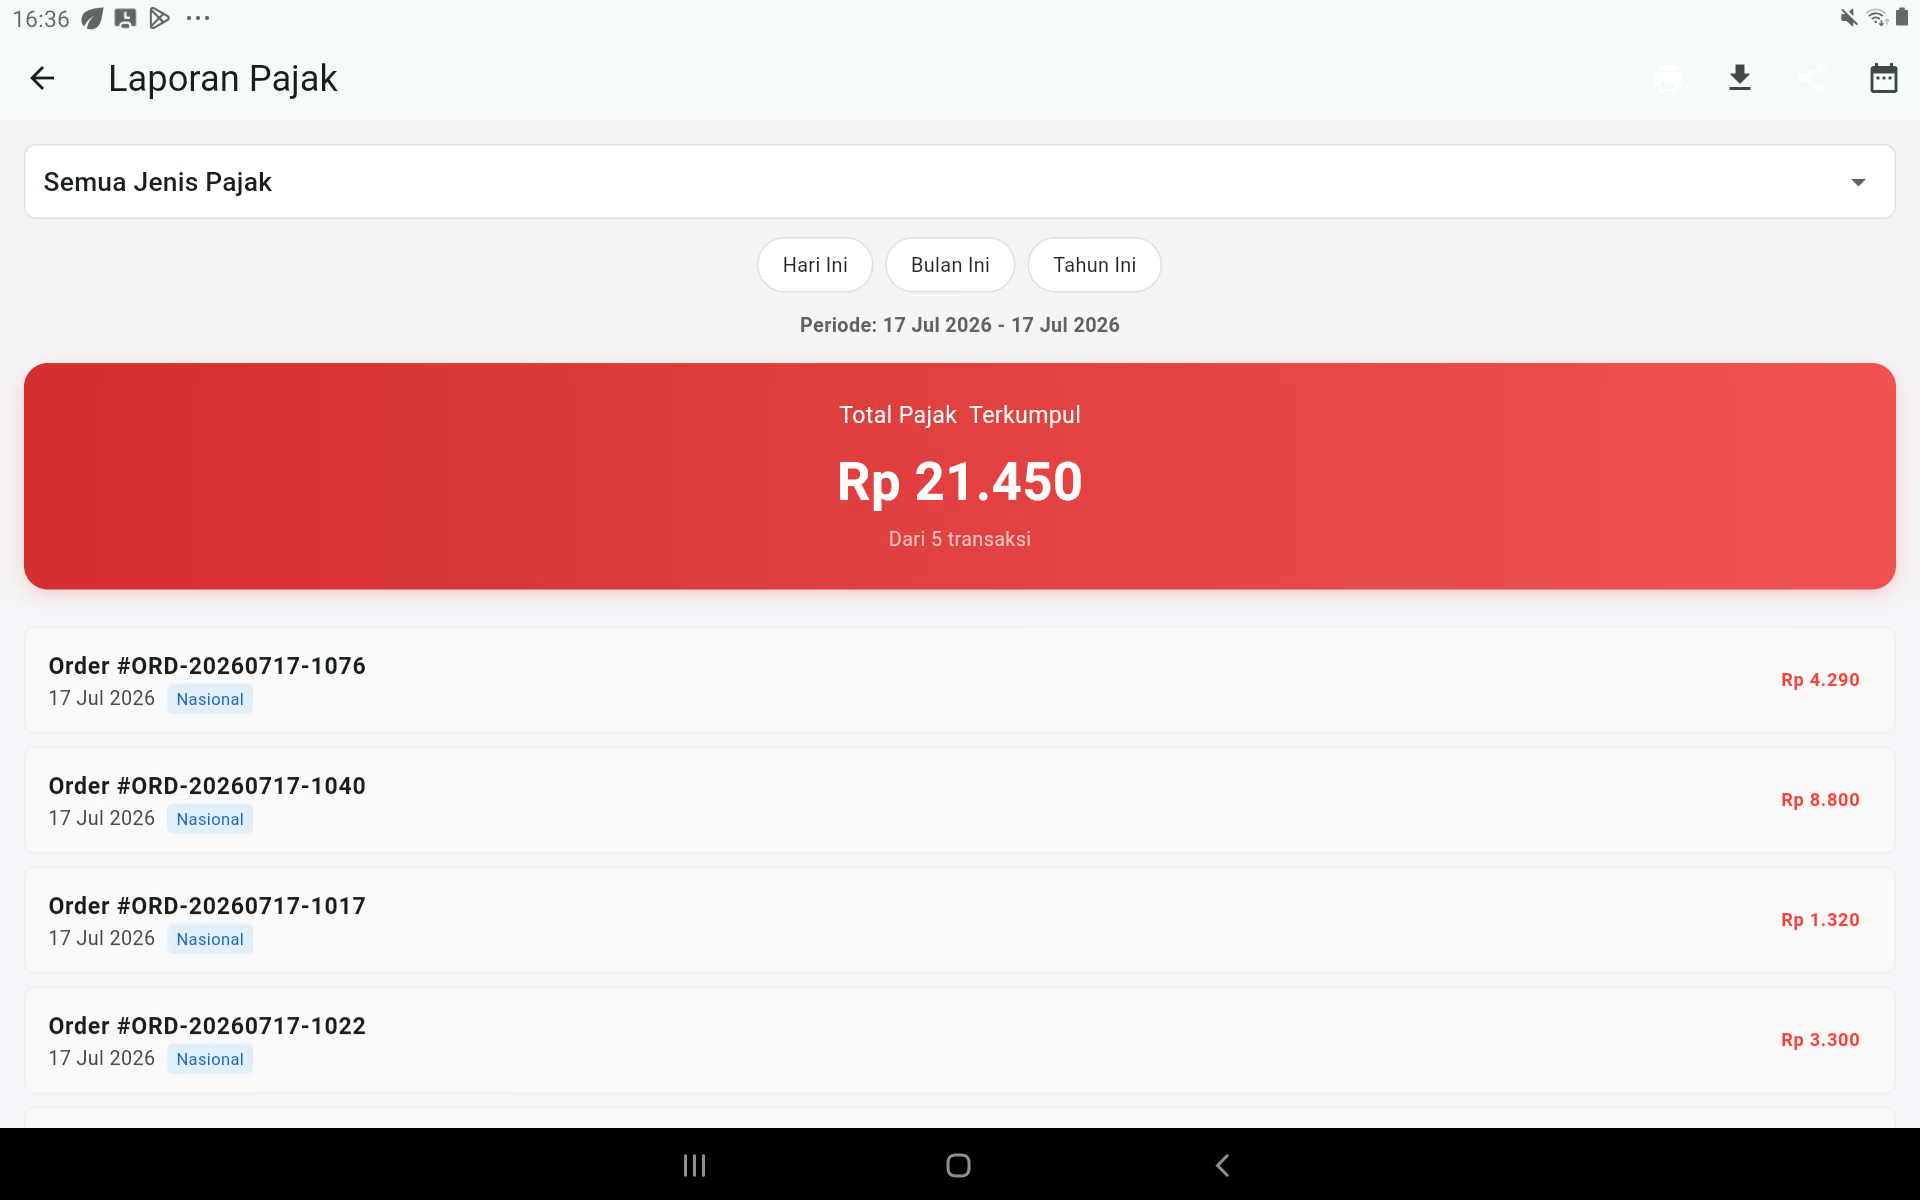
Choose the tax type all, PB1Regional, or national, and set period. The top card shows the total tax collected; the bottom list shows the order number and tax for each transaction. Use exports to obtain DPP details, tax identity, and transaction data that require inspection.
7. Service Fee Report
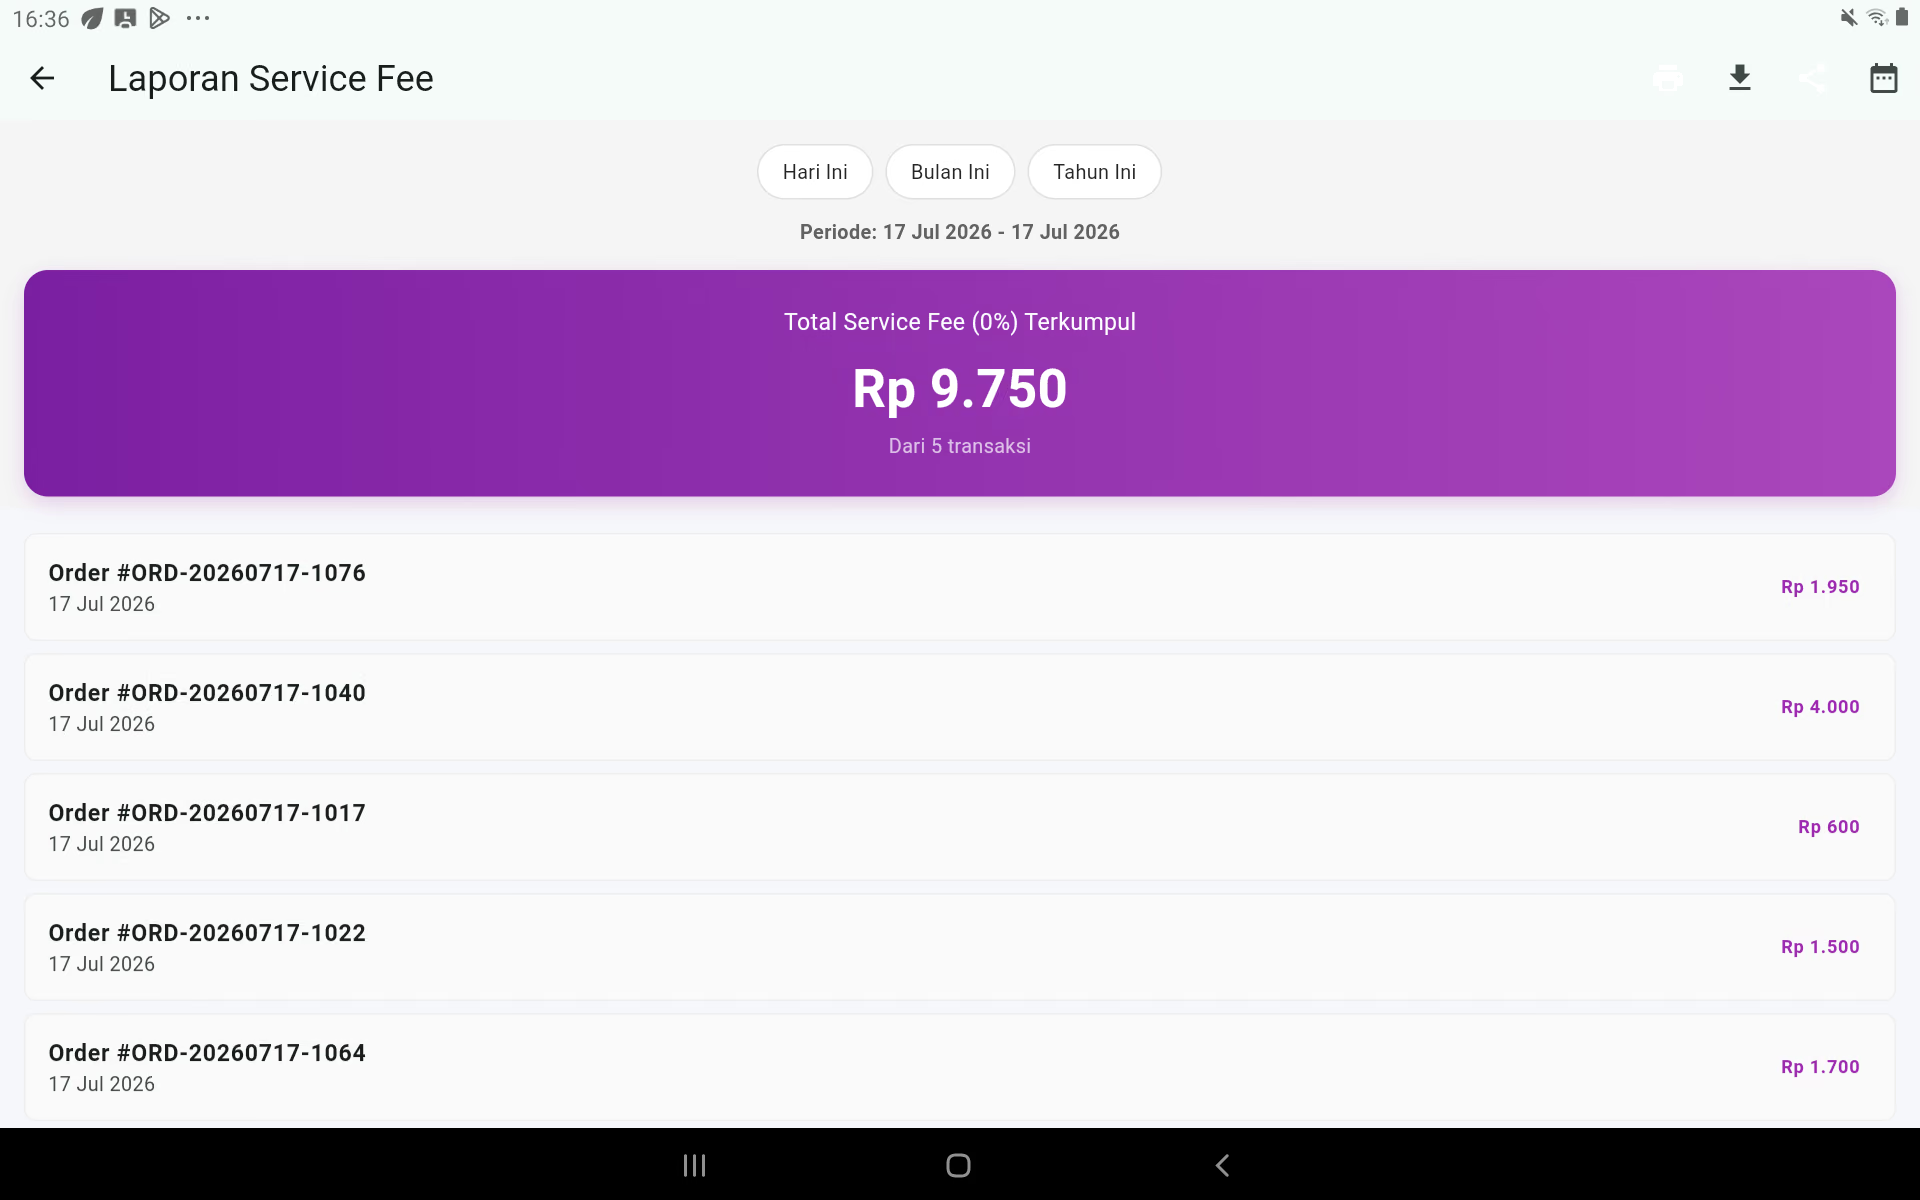
Displays the total service charges collected, the number of transactions, and the value of the service fee per order. Use the options Today, This Month, This Year, or Calendar. If empty, check if the fee is active and has been selected on the product.
8. Online delivery reports
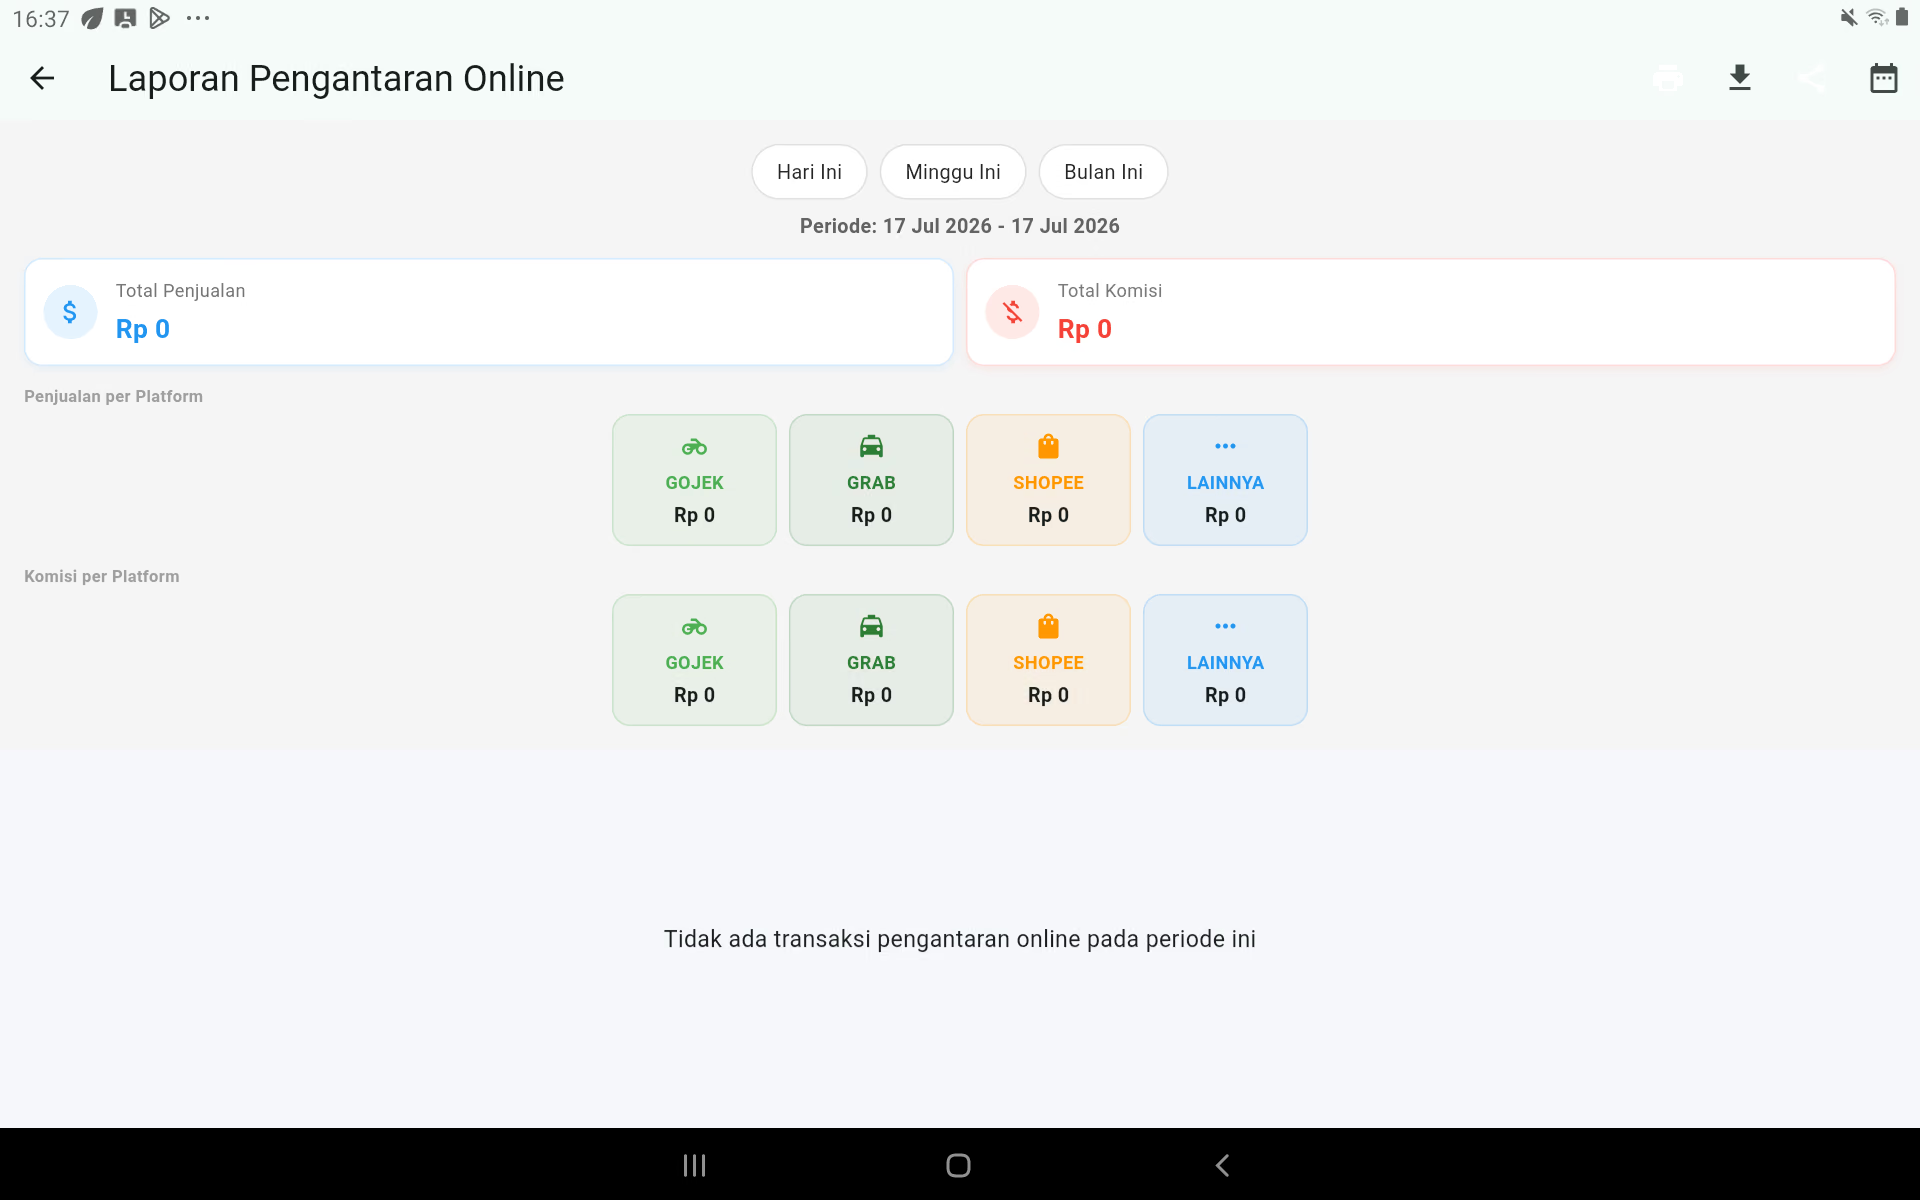
This report separates sales and commissions based on the platform. Pick a period, then compare gross revenue, commission, and value after commission for Gojek, Grab, Shopee Food, or other platforms. The commission is a reporting fee and does not change the customer's bills.
9. Staff reporting centre
The center contains five separate reports. Only the owner or supervisor should be able to see the salaries and performance of the entire staff.
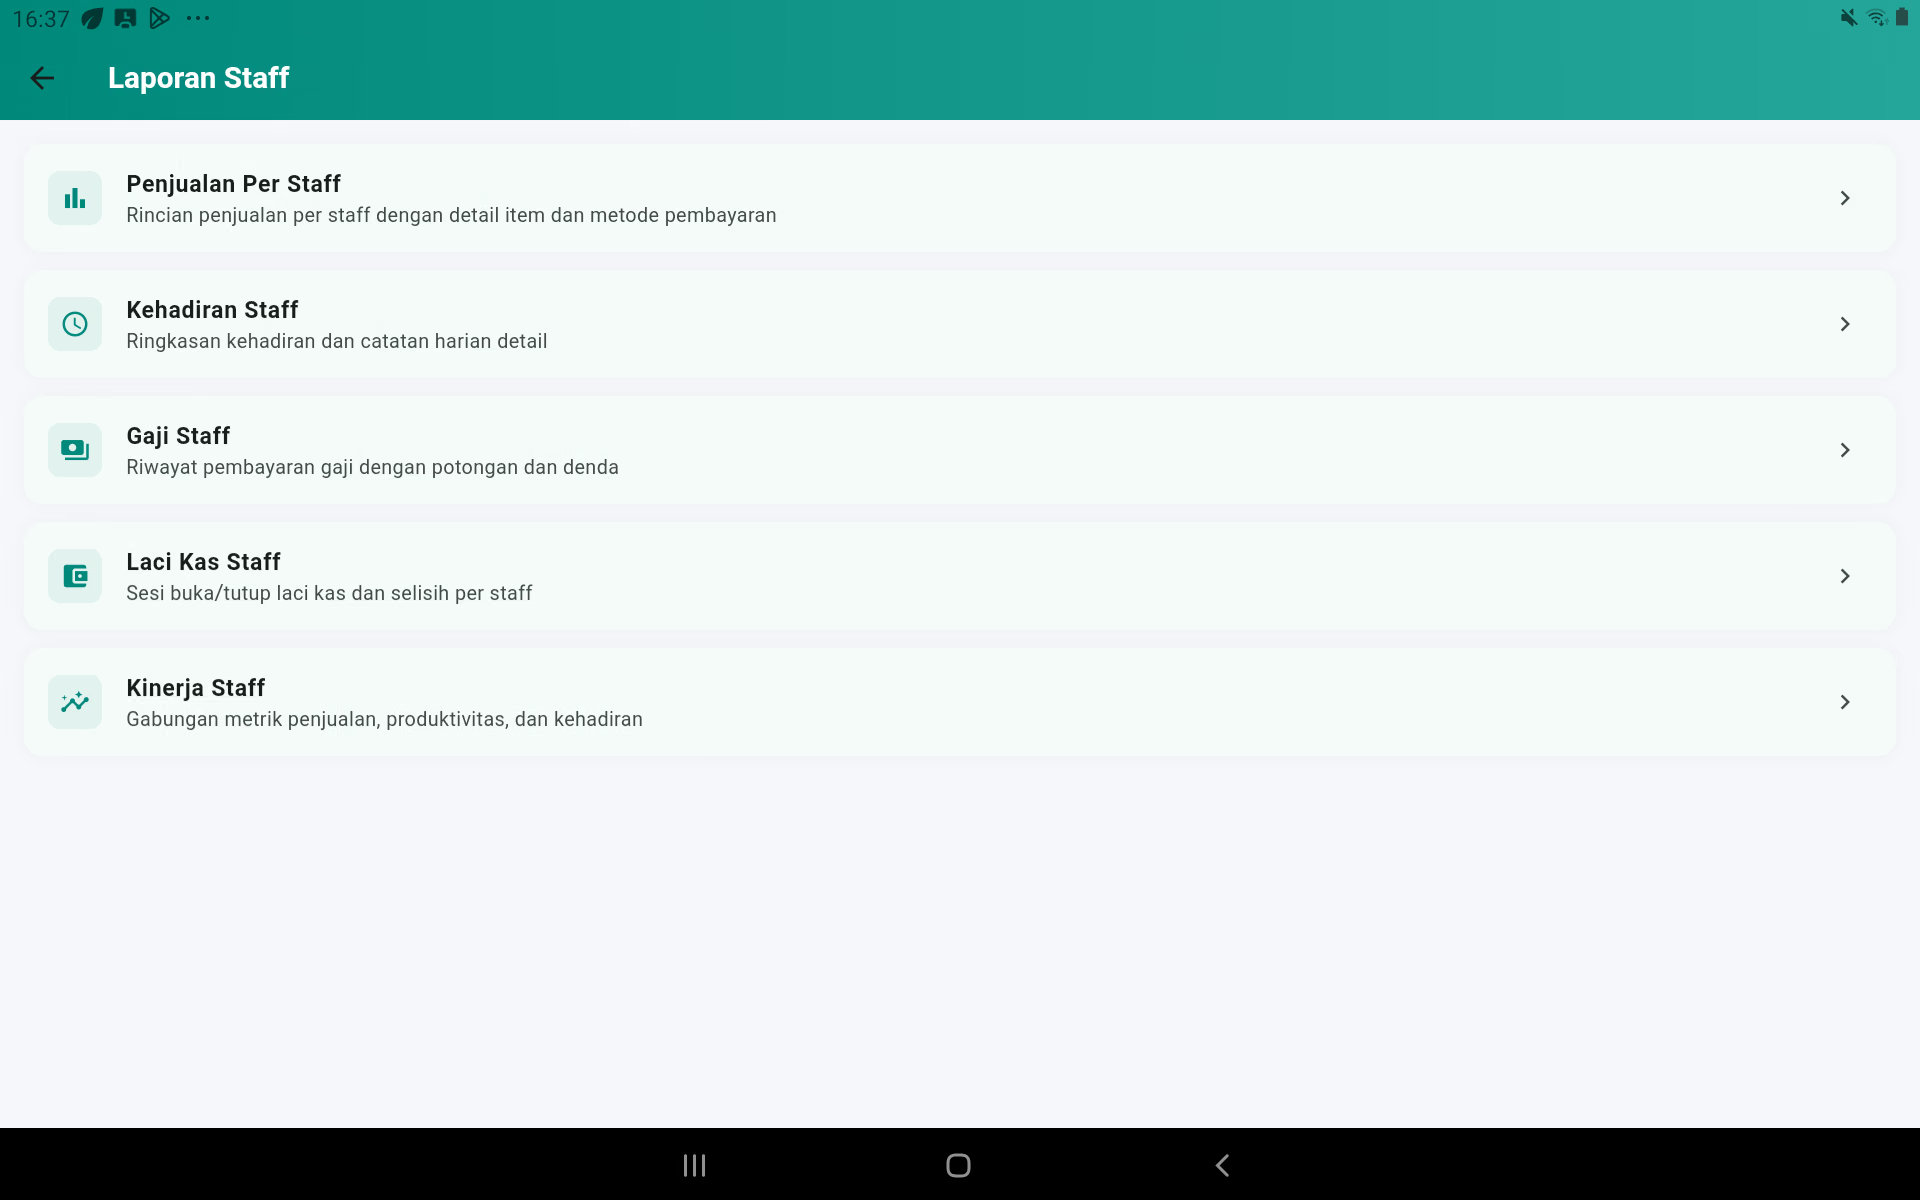
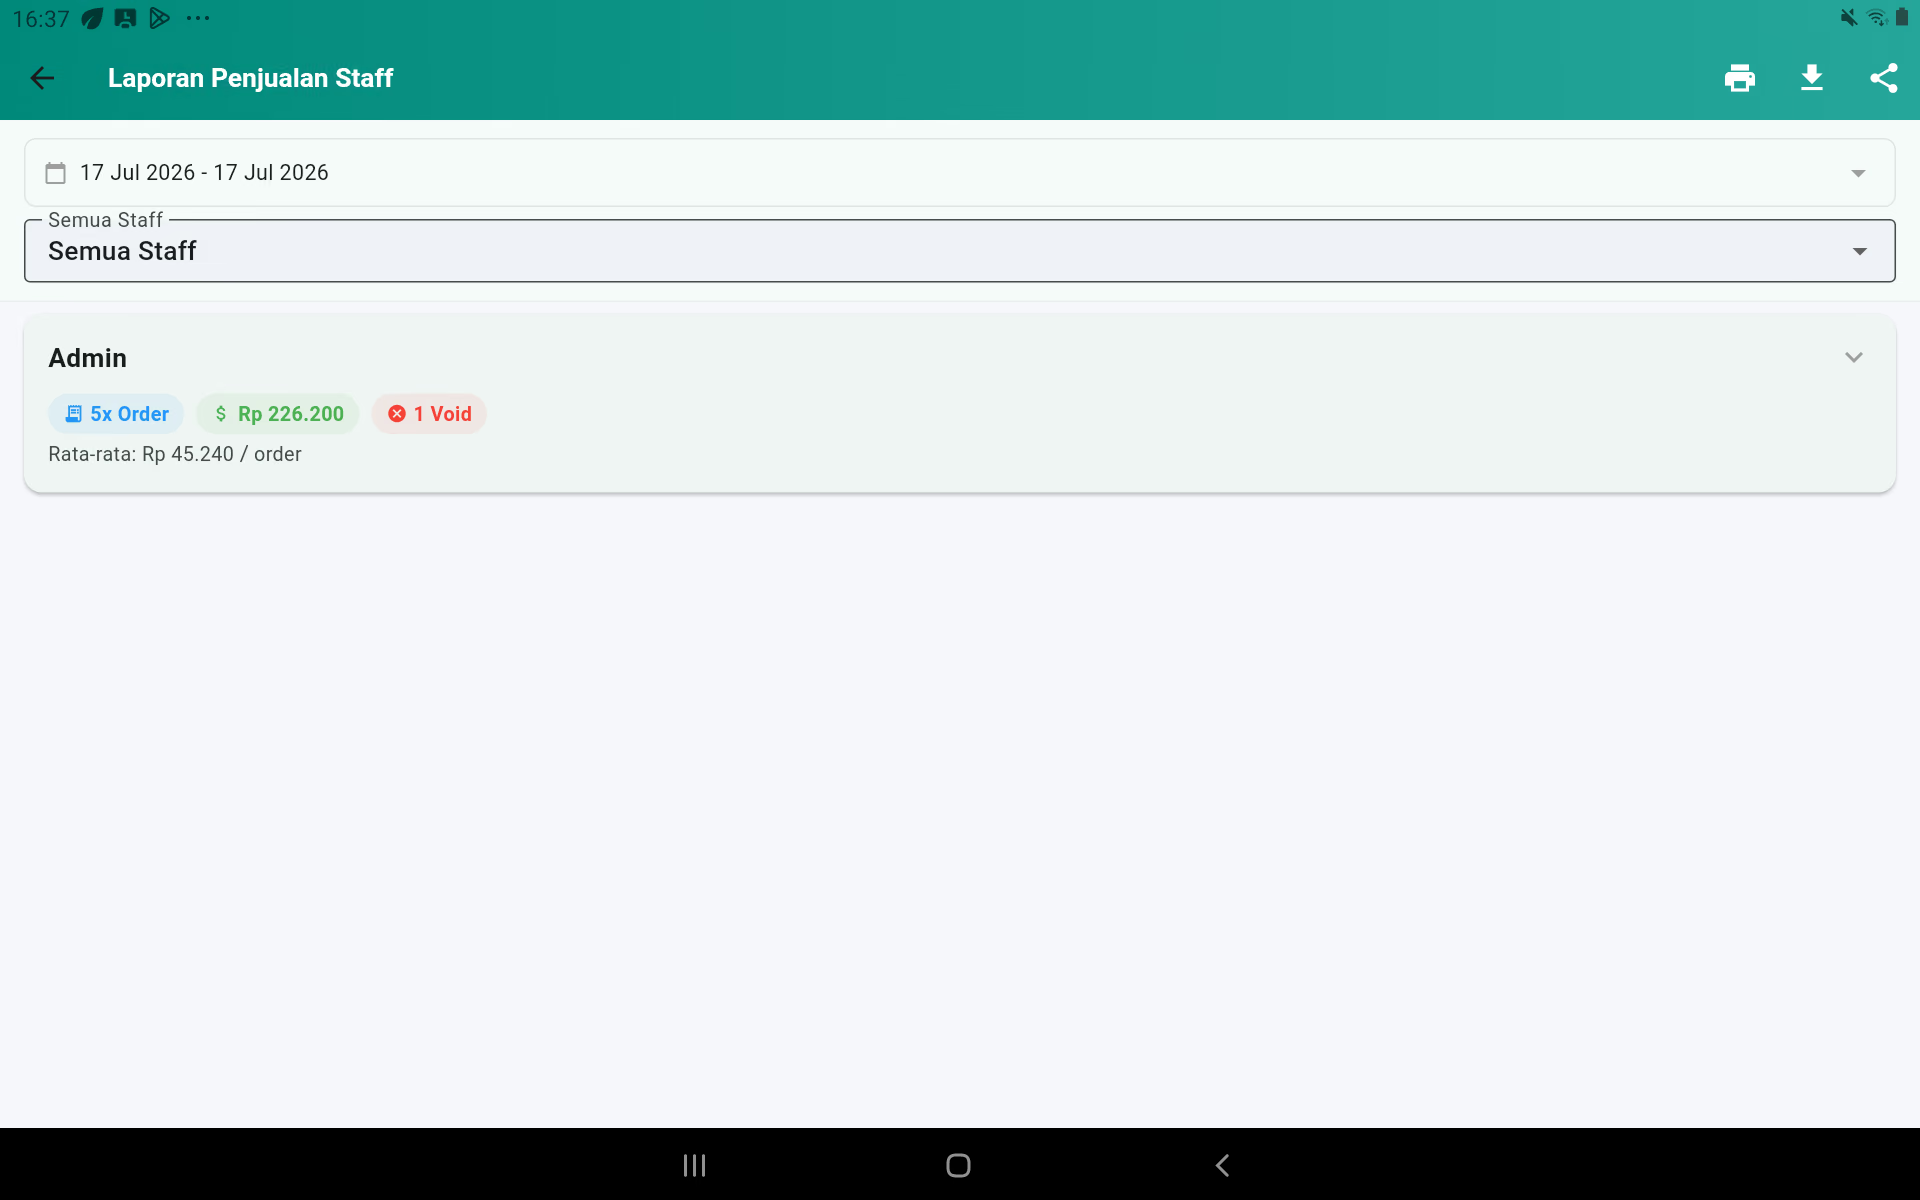
9A. Sales Per Staff
Select staff and period to see turnover, order amount, average transaction, payment method, and items sold by the officer. Use it for reconciliation and sales assessment, not as the only measure of performance.
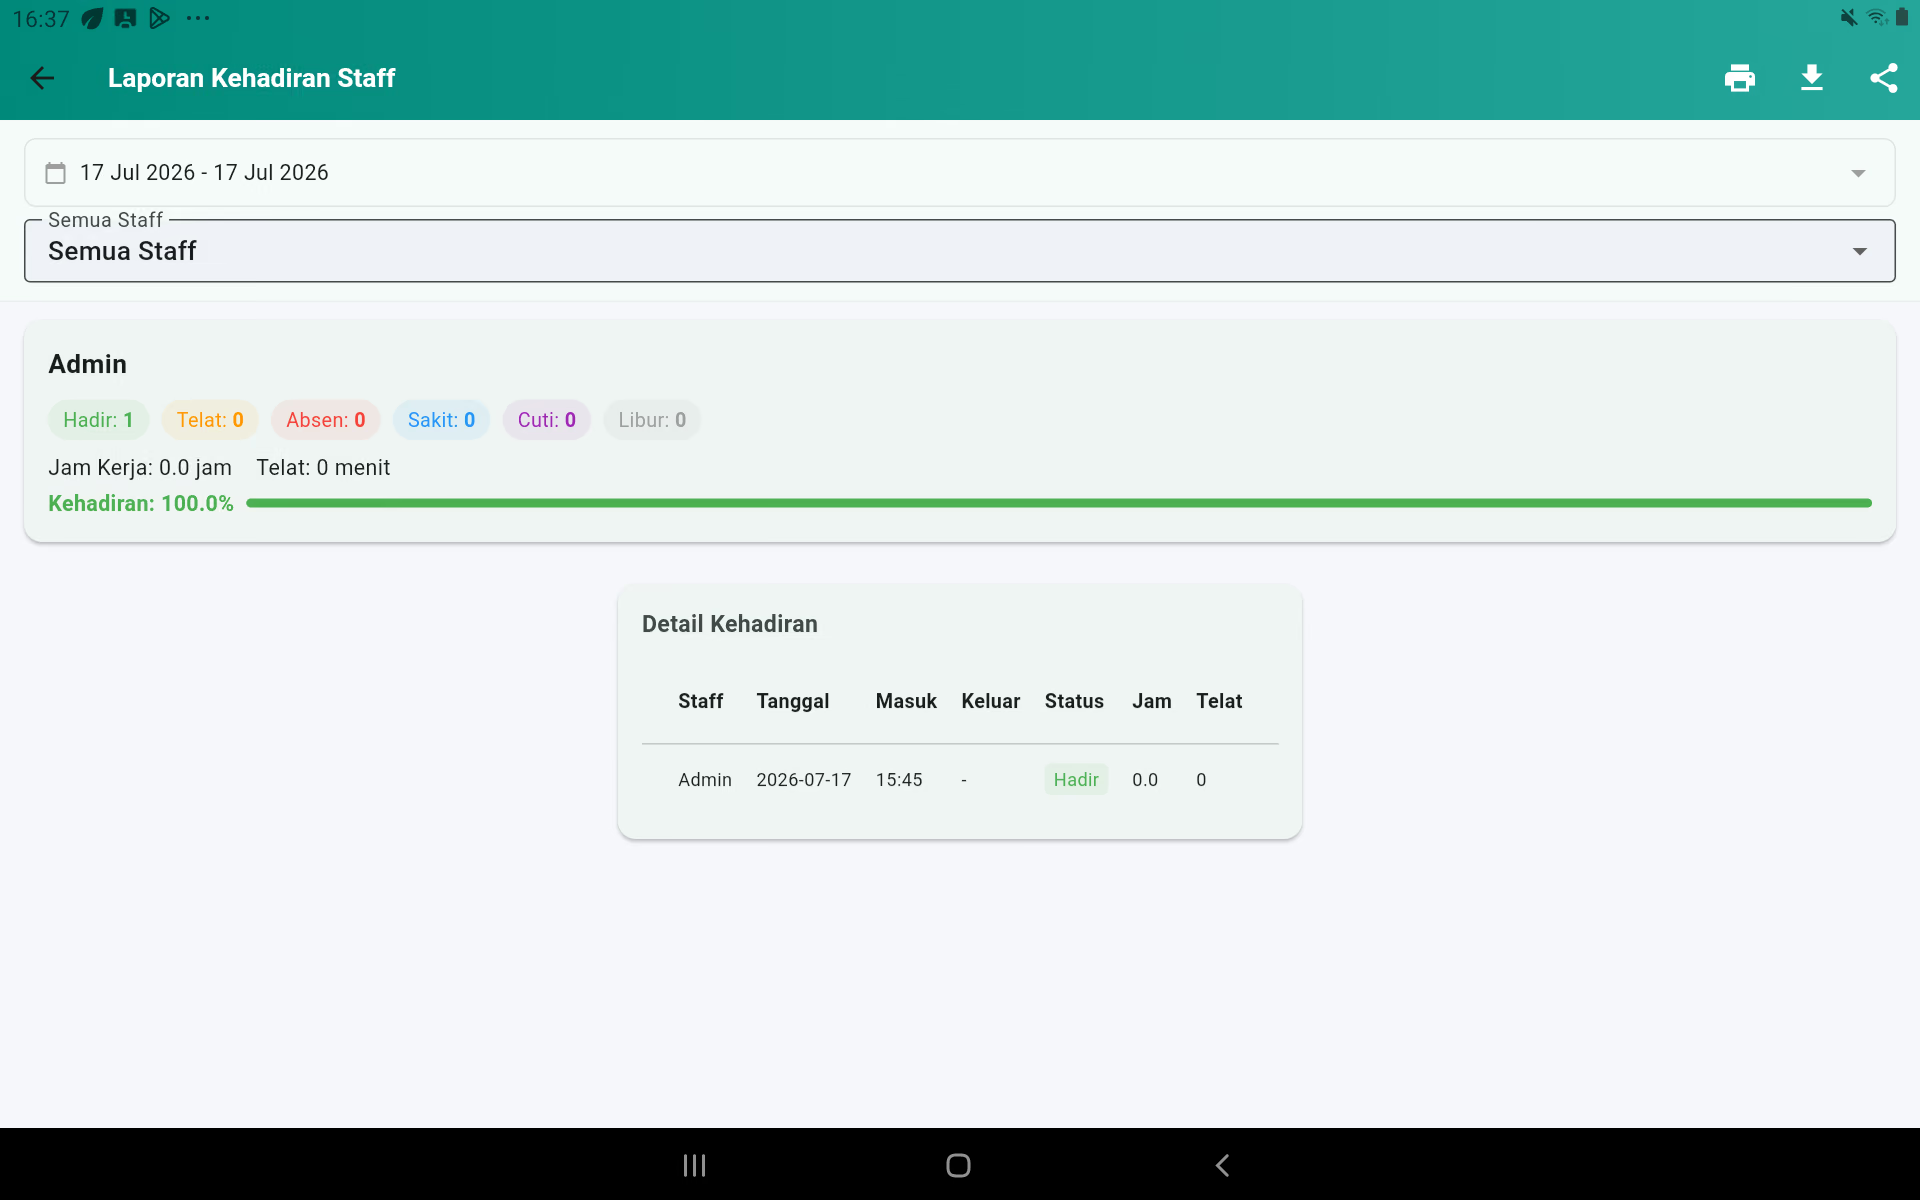
9B. Staff presence
Indicates working days, attendance, late, leave, sickness, absence, holidays, time of entry/return, and hours of work. Choose the correct pay period before exporting.
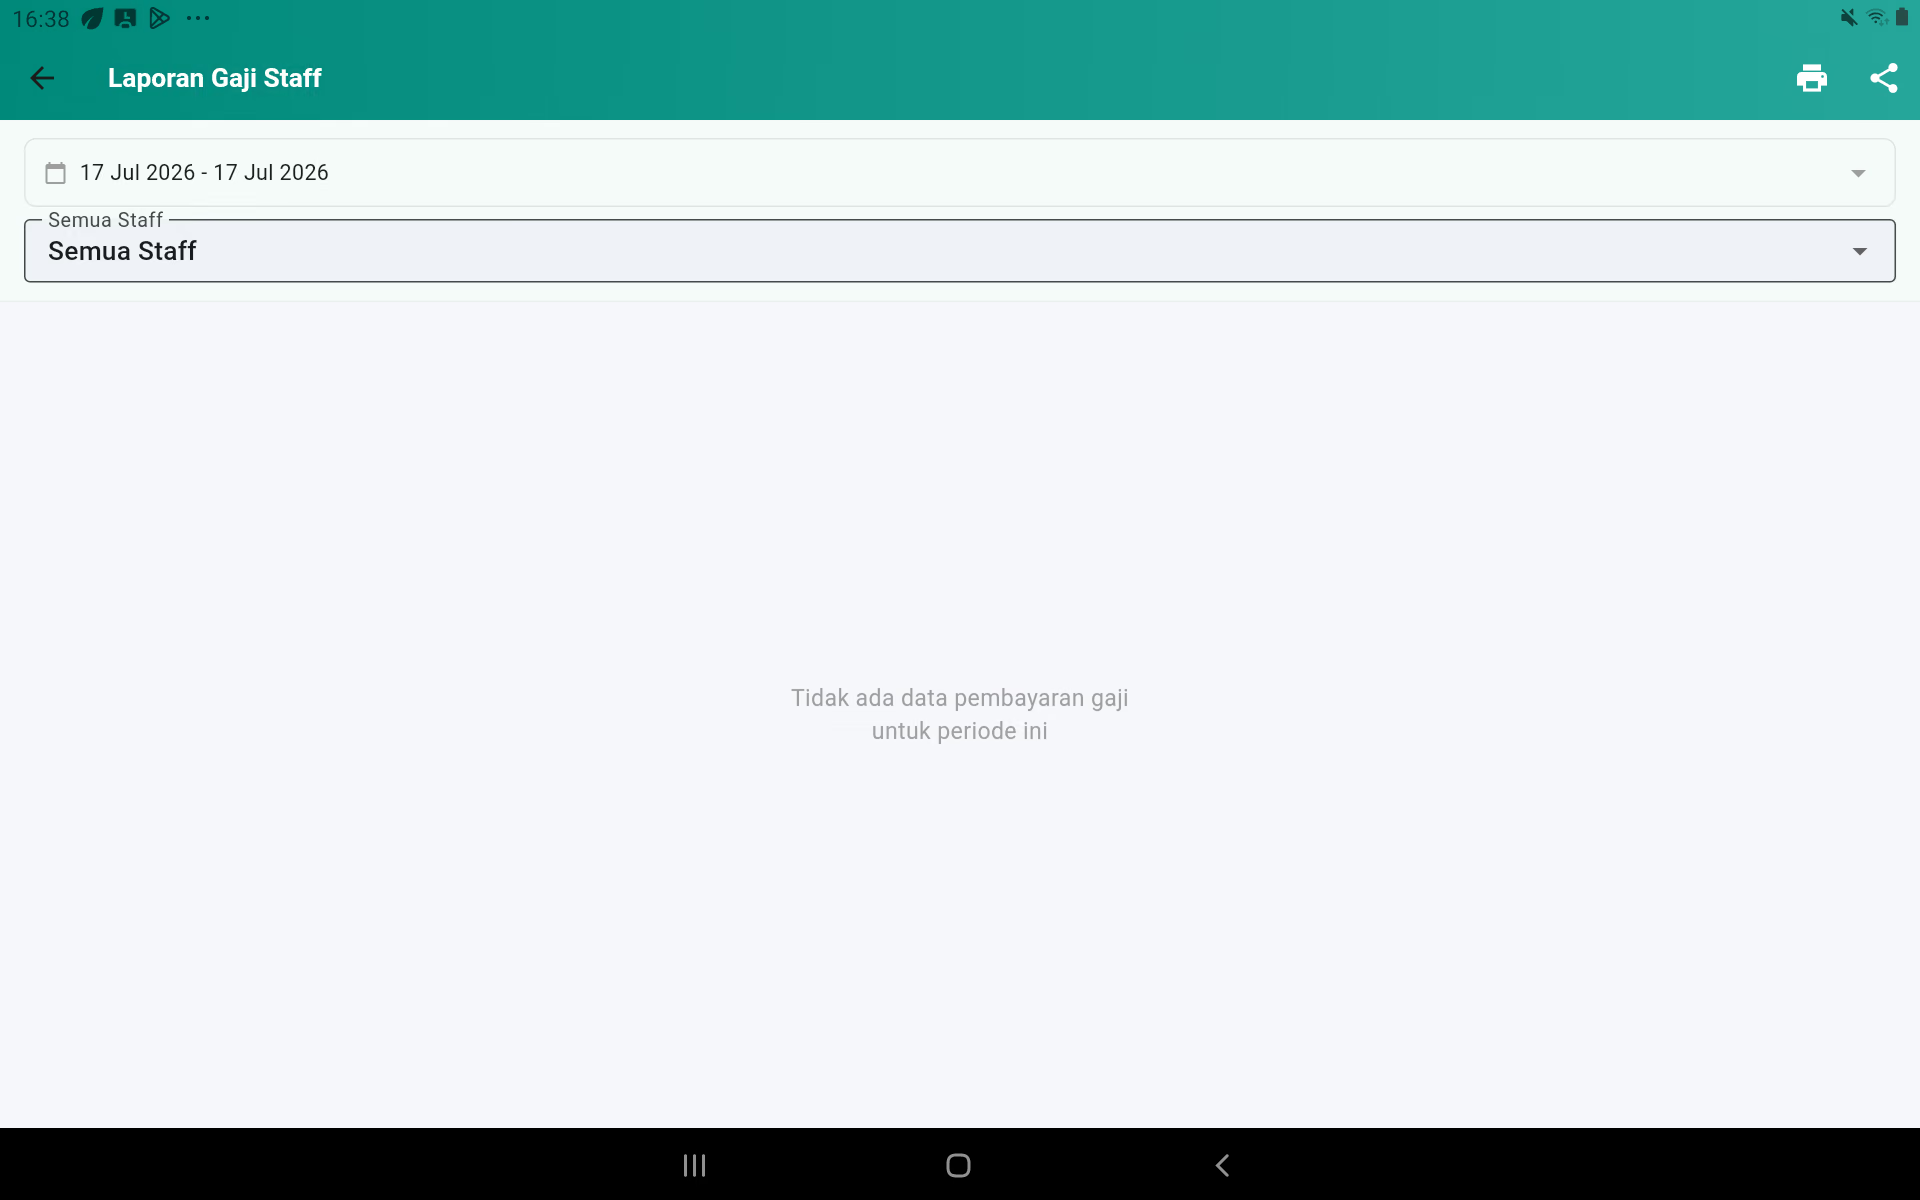
9C. Staff salaries
Displays the basic salary/time, deductions, fines, bonuses if any, and net worth. Check shifts, pay type, attendance, and deductible rules before making these numbers a basis for payment.
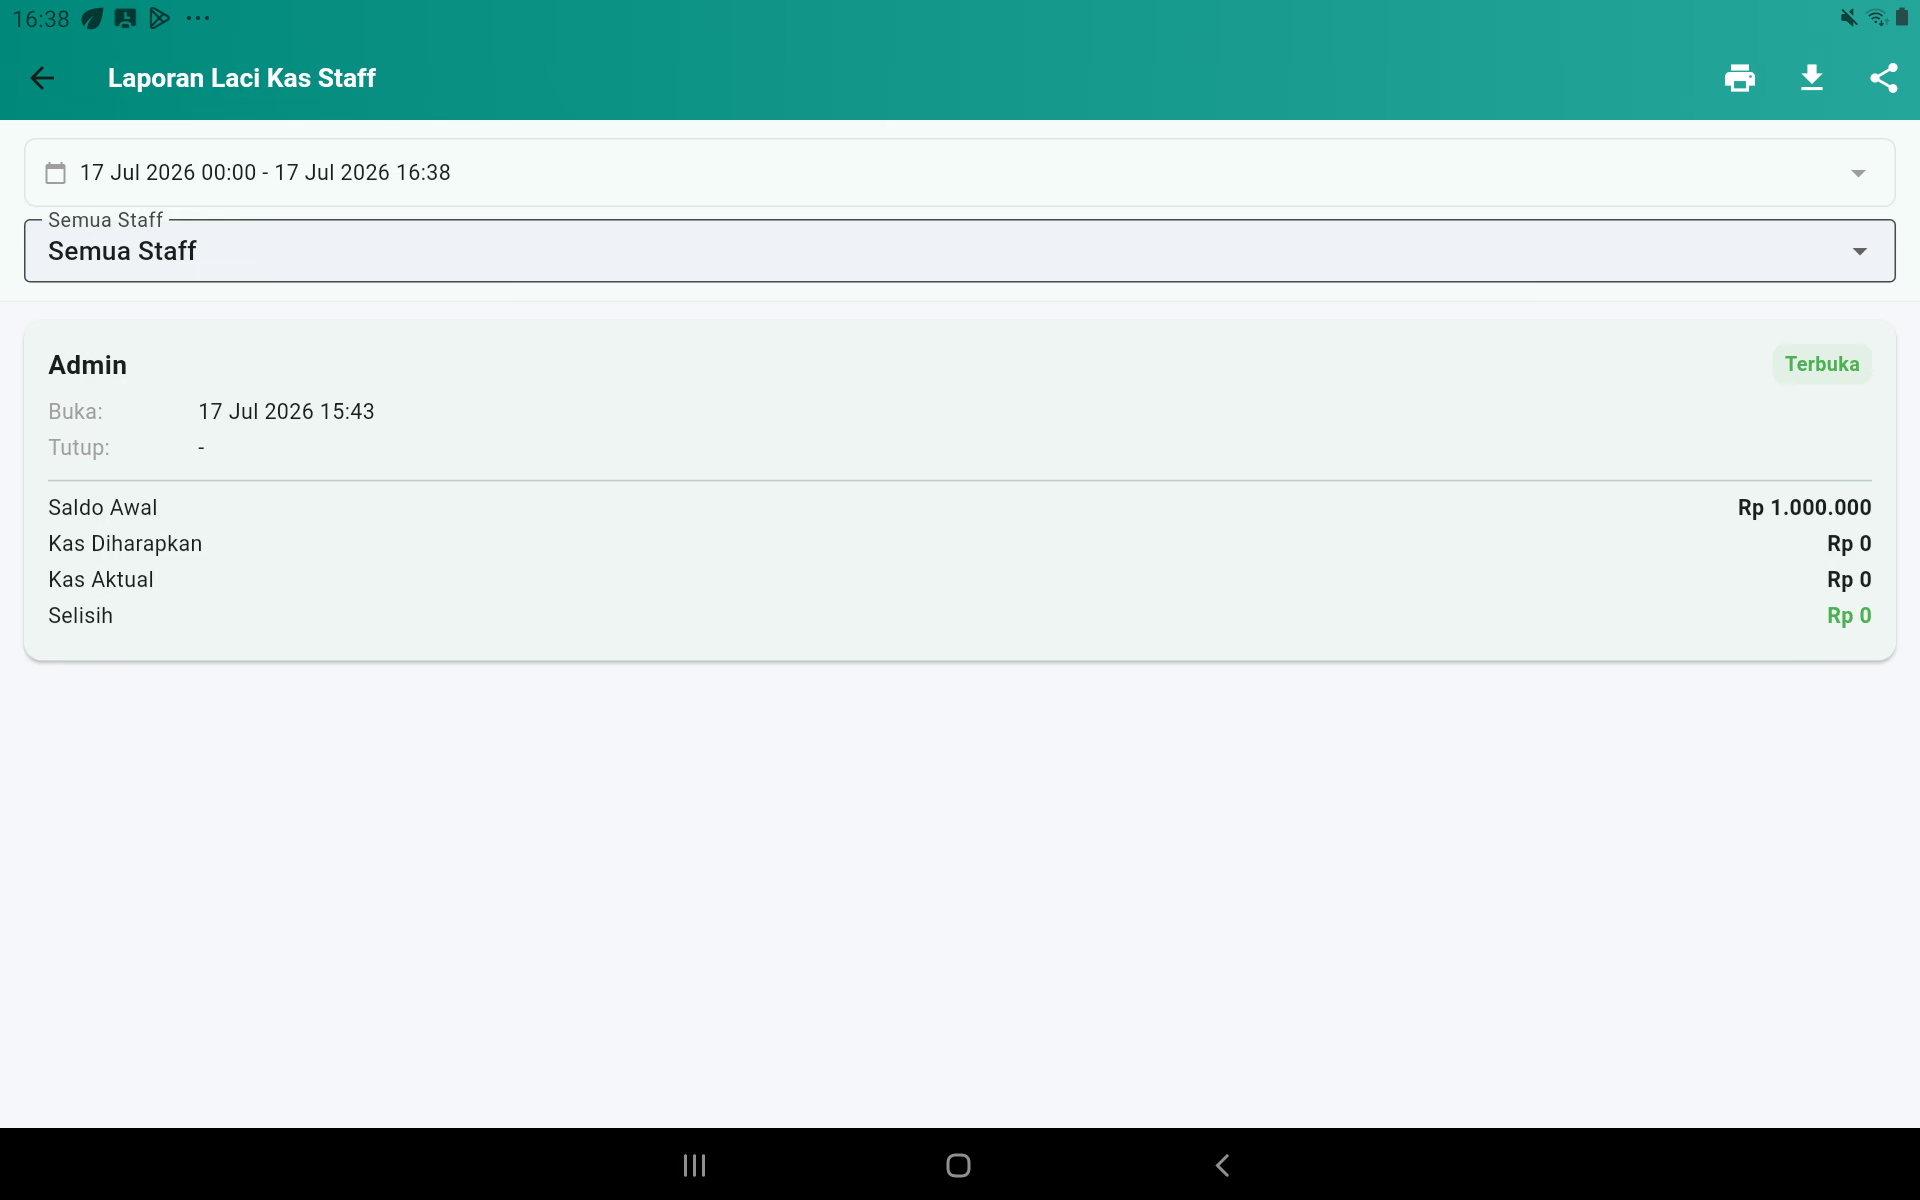
9D. Staff's safe
Displays each cash session per officer: opening/closing times, initial capital, balance of expectations, actual balance, and difference. Use it to trace the difference to the shift of responsibility.
9E. Staff performance
Combine sales, hourly productivity, transaction volume, and attendance. Compare staff to the same type of work and schedule for fair judgement.
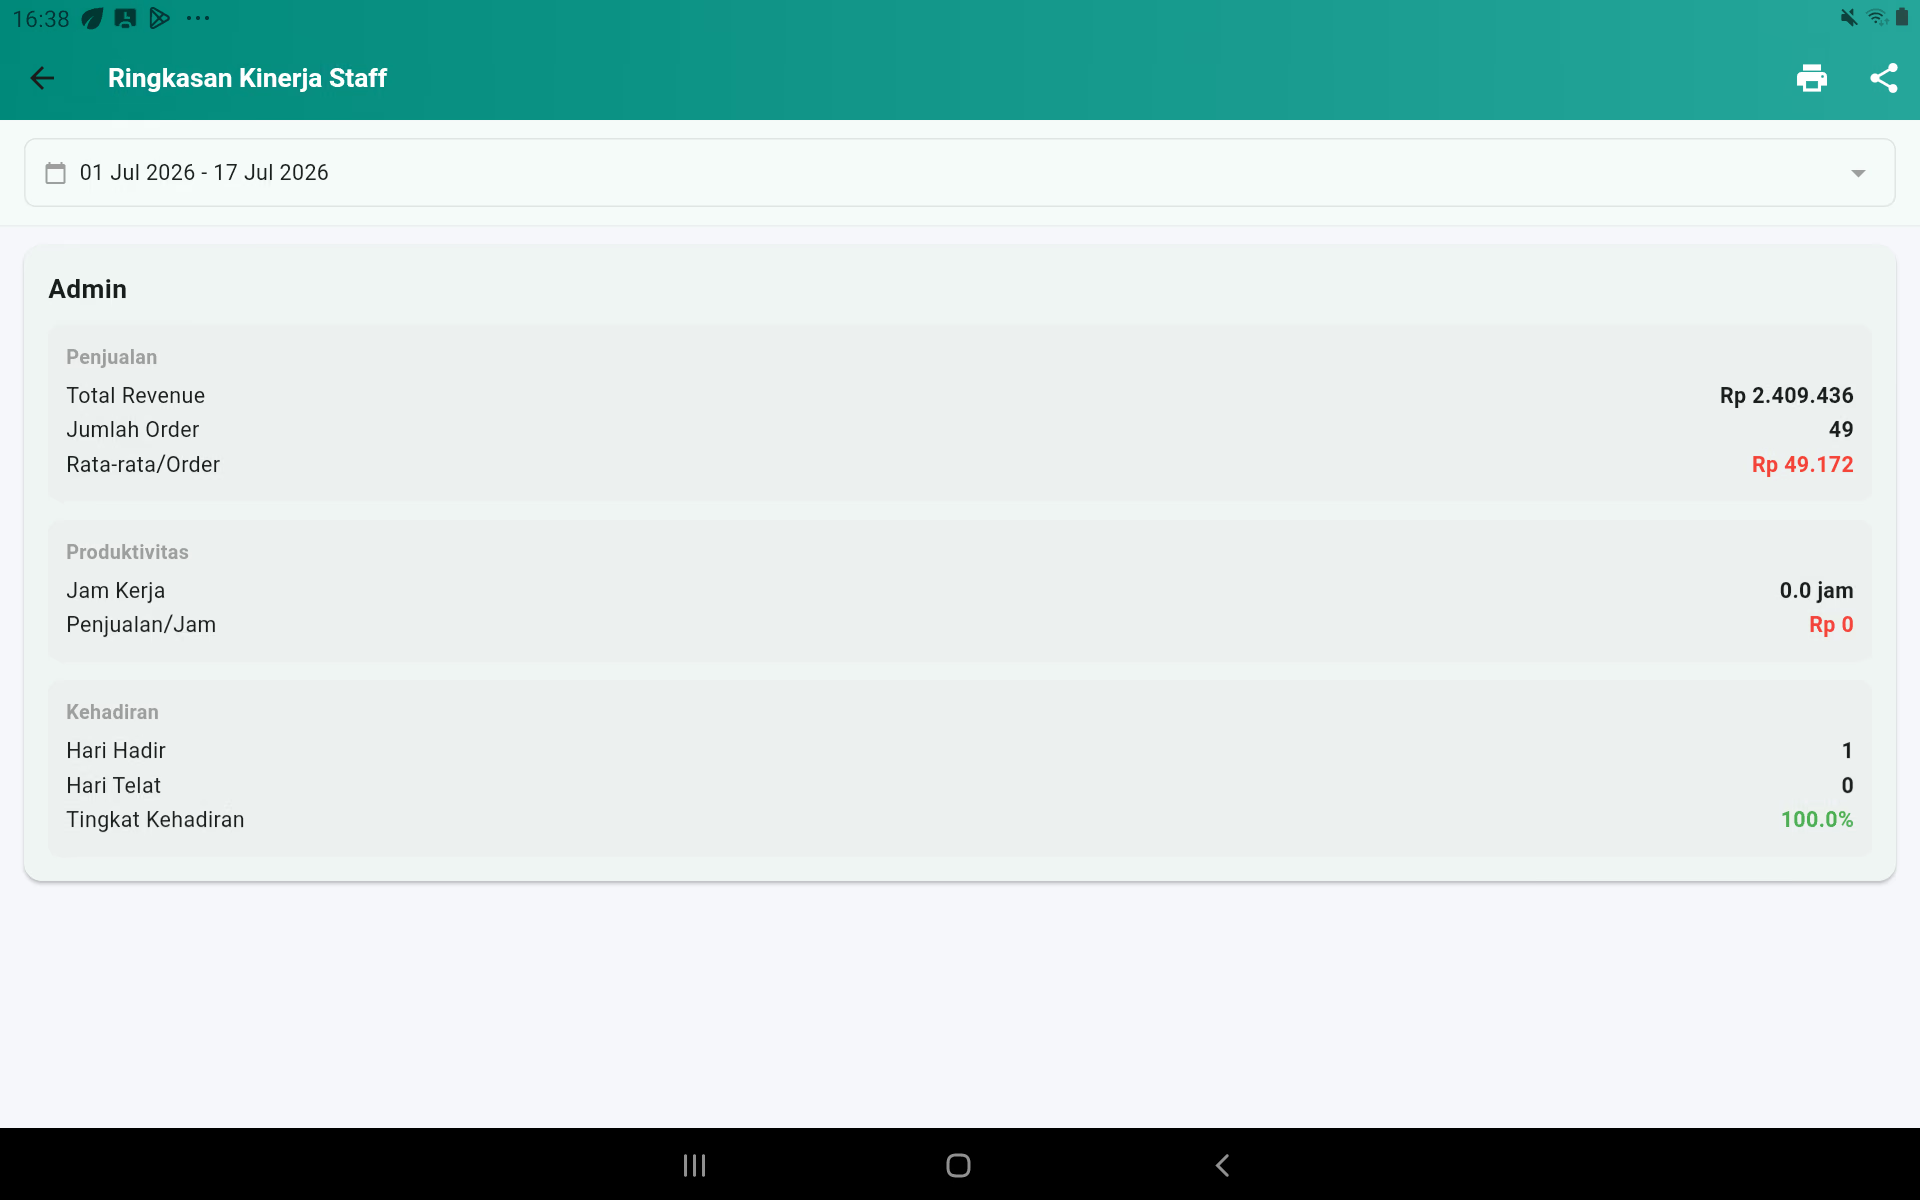
Daily reporting
- Total cash according to the cash reconciliation.
- Total follow-up according to the dashboard/payment machine.
- Void has a reason.
- Discount as agreed.
- The expense has proof.
- Minus or low stock is followed.
- The cash difference is explained.
21. Printers for the Stakes, Kitchen, Bar, and Tray
The following is a list of the main features of the software:
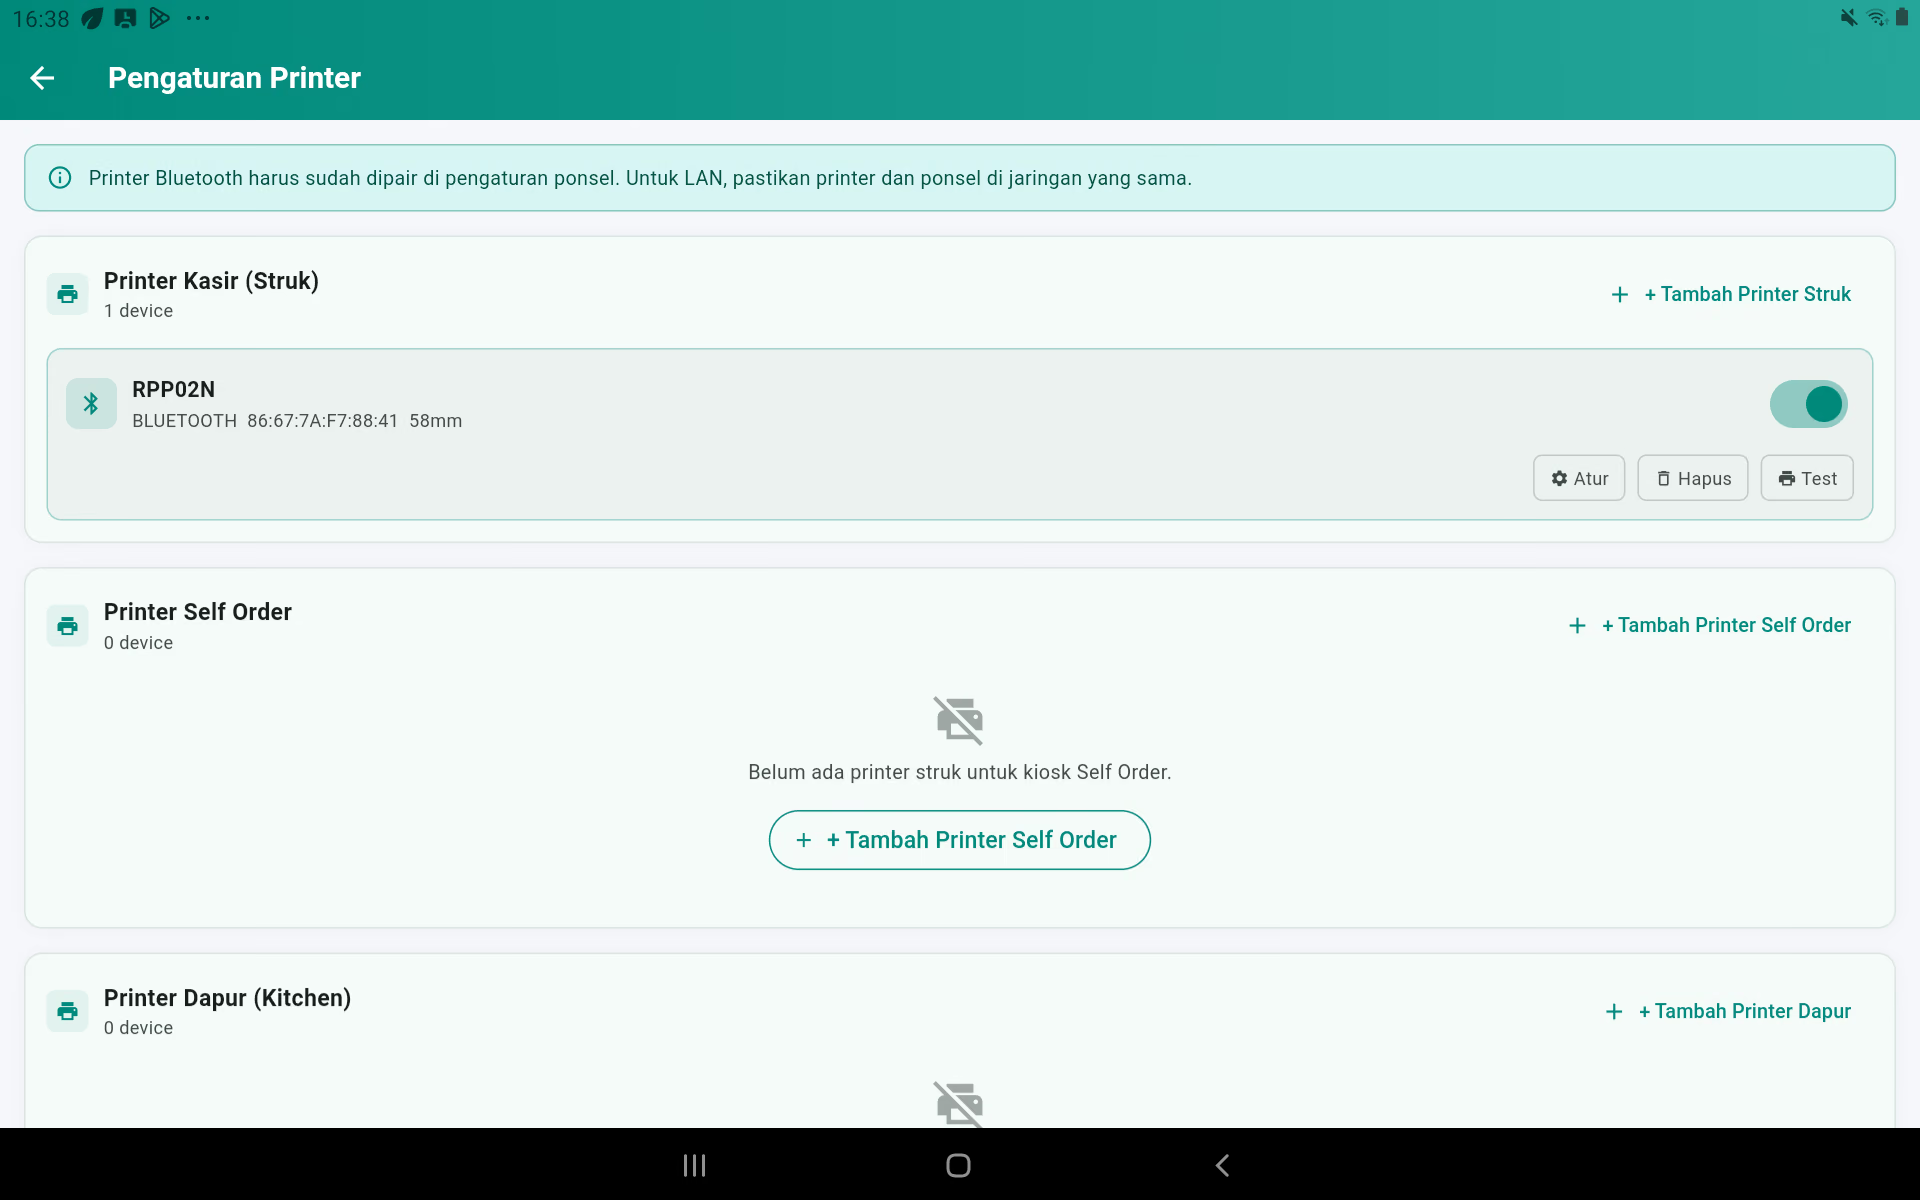
Type of printer that can be made
| The type | Function |
|---|---|
| Printing presses | Print out the proof of payment and open the drawer. |
| Self-ordered printer | Printing the hull from the self-booking device. |
| Kitchen printer | Printing food tickets for the kitchen. |
| The printer bar | Printing drinks for the bar. |
Install the Bluetooth printer. Android From the beginning
- Put the paper on, plug the power/battery, and then turn on the printer.
- Turn on the Bluetooth on your tablet/mobile.
- Open it up. The Bluetooth settings Android And find the name of the printer.
- Press the printer name for the matching. If you ask for a PIN, use the PIN of the printer book; the common PIN is 0000 or 1234.
- Wait for the device to be connected.
- Back to the drawing board. Kasirco RestoOpen it up. The following is a list of the main features of the software:.
- Select a target group, for example + Added a Struk printer.
- The content Printer name, like the cash register printer.
- Make sure The category fit and choose Connection: Bluetooth.
- Press the button. Scan the. Allow devices around, Bluetooth, and location whenever Android Ask for your permission.
- Tap the name of the printer that scans. If it's not paired, press Pairing to unlock the Bluetooth settings. AndroidThen we'll pair up, go back, and scan again.
- Choose the size of the paper and the print settings.
- Press the button. Save the configuration.
- Make sure the printer switch is on, then press Testing.
- If the test paper is printed correctly, do one practice transaction.
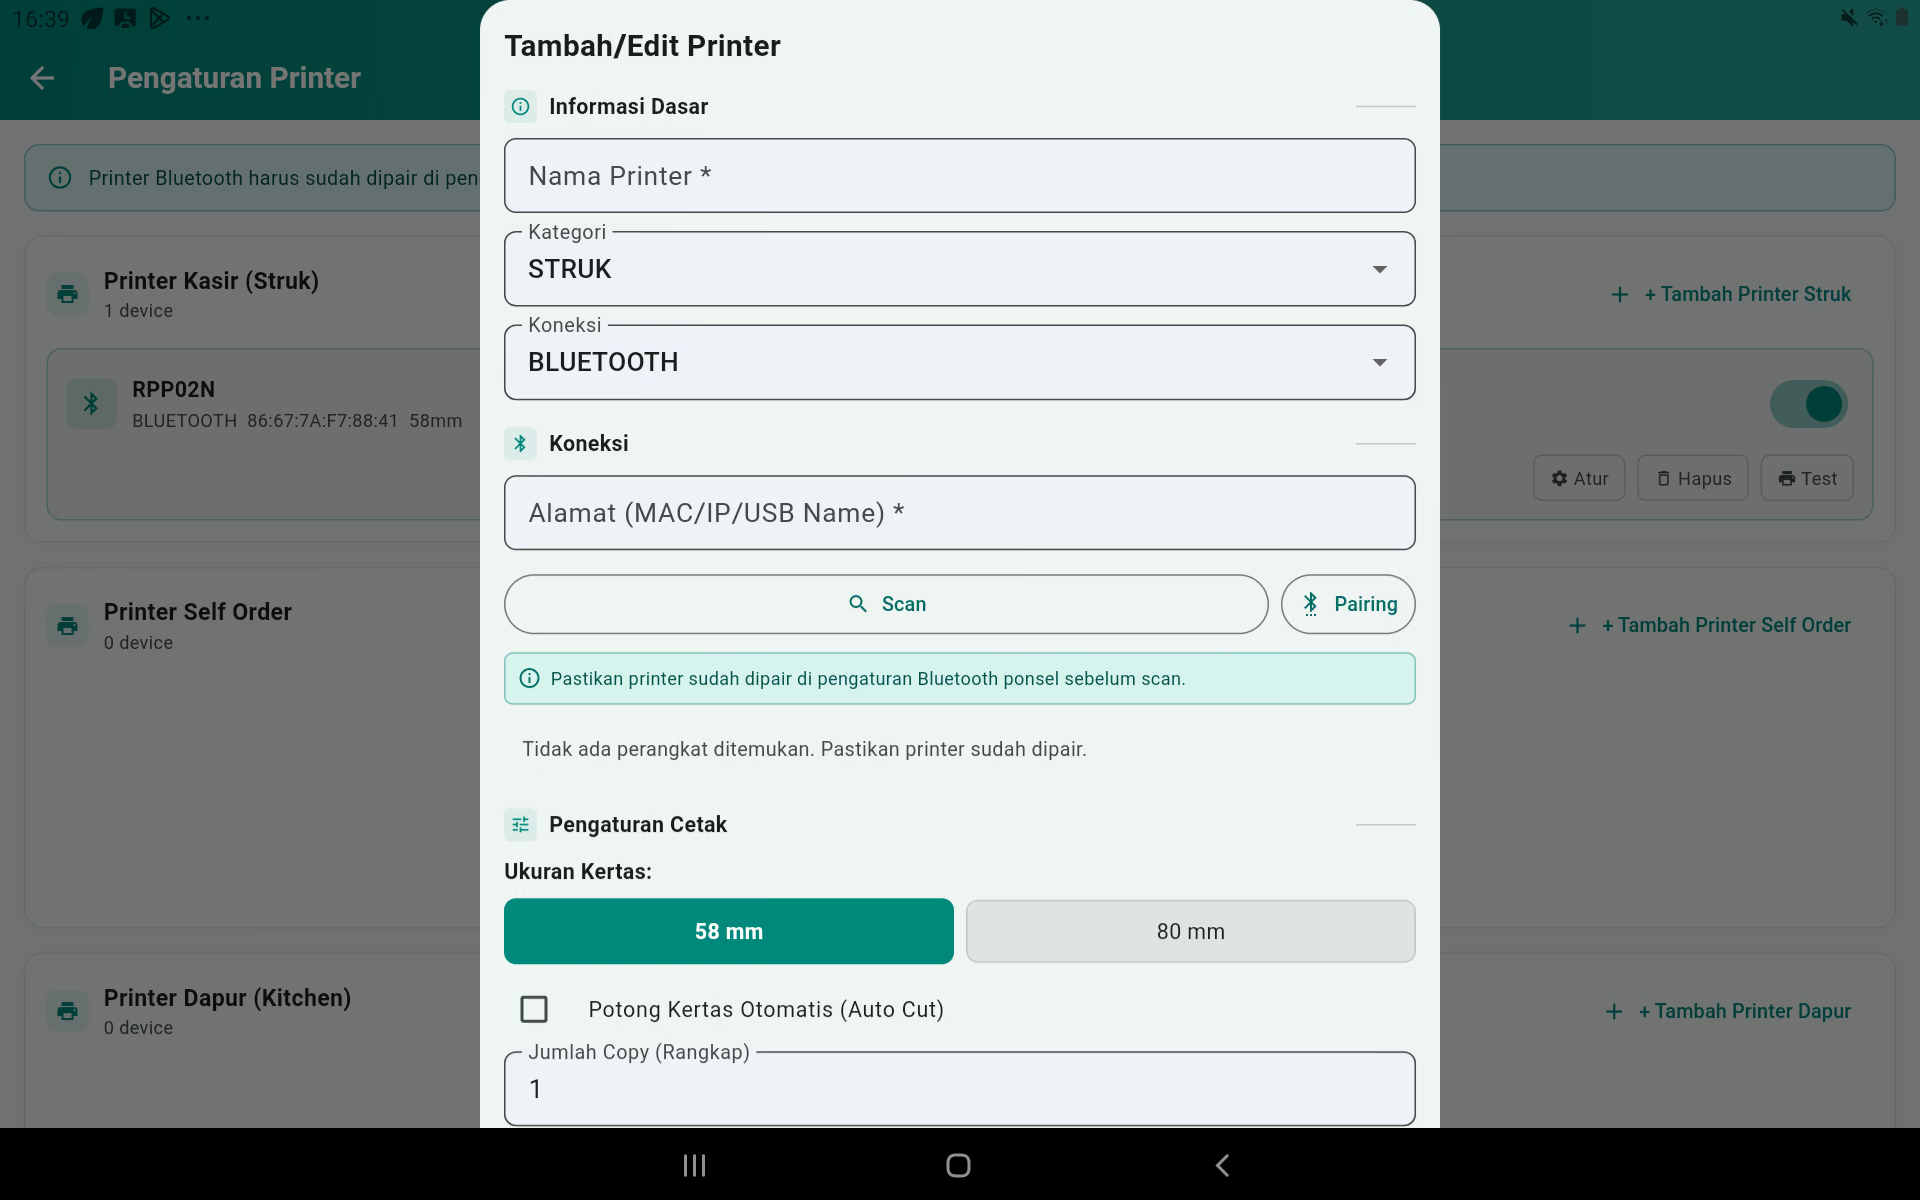
Meaning of printer setting
| The setting | Useful |
|---|---|
| 58 mm / 80 mm | It must be the same width as the printer's paper so the writing doesn't get cut. |
| Cutting paper automatically | Send cutting commands; only work on printers that have cutters. |
| Number of copies | How many bars are printed for one job. |
| Automated Printing After Payment | On immediately print; OFF displays confirmation after the transaction. |
| Open the automatic safe. | Send drawer commands through the stack printer. |
| Order to open the drawer | Standard, short pulse, or strong pulse. Test one by one if the drawer doesn't respond. |
| Keep the connection alive | Making the next Bluetooth print faster but more battery-efficient. |
| Logo printing mode | Raster, graphics, or legacy. Try Legacy if the logo isn't printed correctly. |
| The footer | The message was printed under the stake. |
| Buzzer/beep | Sound the kitchen/bar printer if the device supports. |
Adjusting the logo on the frame
- Open it up. Organization → Operations → Profile of the company.
- Press edit company and press the logo area.
- Pick a picture from the gallery, then save it.
- Go back to the printer settings, select the logo mode, save, and test.
LAN printer
Select the LAN connection, fill in the printer address given by the network installer, save, and test print. The device and printer must be on a network that can be connected.
Purpose of product printing
Open the product form and select the printed destination. Food can be directed to the Kitchen, drinks to the Bar, while the customer's stomach can be directed to the Struk printer.
The safe.
Activate the automatic drawer opener on the stack printer that's connected to the drawer. Test the drawer command. If it doesn't open, check the drawer cable to the printer and the power selection command.
Preview of the shape of the hull 58 mm
The following example follows the order of text that the application sends to the printer. The letterform, distance, and cutting may vary slightly depending on the printer, but the content and order are the same. The addon price is already included in the item price; the addon name is printed without a separate price.
1. Final payment strokes
KASIRCO RESTO Menteng Square Lt. 2 Telp: 08119788660 -------------------------------- No. Pesanan: ORD-20260717-1076 Tanggal : 17/07/2026 16:40 Kasir : Admin Pelanggan : Budi Santoso Dine In Meja : Meja 5 -------------------------------- NOMOR ANTRIAN: 0027 -------------------------------- Nasi Goreng Spesial ≈ $1.68 1 x ≈ $1.68 Catatan: Pedas, tanpa acar + Telur Es Kopi Susu ≈ $2.02 2 x ≈ $1.01 + Extra Shot -------------------------------- Subtotal ≈ $3.70 Diskon Member -≈ $0.34 Service Fee ≈ $0.17 PB1 (11%) (exclude) ≈ $0.39 ================================ TOTAL ≈ $3.92 Bayar (Tunai) ≈ $5.60 Kembali ≈ $1.68 -------------------------------- Terima Kasih! Silahkan Datang Kembali Powered by Kasirco
Load the identity of the store, orders, queues, items, discounts, fees, taxes, total, payments, and returns.
2. - Temporary bond. - Not paid yet.
KASIRCO RESTO Menteng Square Lt. 2 -------------------------------- ** BELUM BAYAR ** -------------------------------- No. Pesanan: ORD-20260717-1077 Tanggal : 17/07/2026 16:45 Pelanggan : Sinta Take Away: Sinta -------------------------------- NOMOR ANTRIAN: 0028 -------------------------------- Ayam Geprek ≈ $1.40 1 x ≈ $1.40 Catatan: Sambal pisah -------------------------------- Subtotal ≈ $1.40 ================================ TOTAL ≈ $1.40 -------------------------------- Terima Kasih! Silahkan Datang Kembali Powered by Kasirco
No loading of payments and no opening of drawers.
3. Kitchen ticket
DINE IN - MEJA 5 (#ORD-20260717-1076) NOMOR ANTRIAN: 0027 17/07/2026 16:40 - Admin ================================ 2 x Nasi Goreng Spesial Catatan: Pedas, tanpa acar + Telur -------------------------------- 1 x Ayam Bakar Madu + Sambal Matah -------------------------------- Total Items: 3
No price, taxes, discounts, service fees, or payment methods.
4. Label bars per glass
TAKE AWAY - #ORD-1078 (Rina) NOMOR ANTRIAN: 0029 17/07/2026 16:48 - Rina -------------------------------- Es Kopi Susu Catatan: Less ice Add: Extra Shot, Boba 1 / 2
One label per unit. Two glasses make a 1/2 and a 2/2.
5. The number of queues
-------------------------------- No. Pesanan: ORD-20260717-1079 Tanggal : 17/07/2026 16:50 Take Away: Pelanggan Umum -------------------------------- NOMOR ANTRIAN: 0030 -------------------------------- 1 x Es Teh Manis --------------------------------
Not a piece of paper. This section is inserted into the stucco, pending bill, kitchen, bar, and self-order.
6. Stroke void / cancellation
KASIRCO RESTO -------------------------------- *** VOID / BATAL *** -------------------------------- No. Pesanan: ORD-20260717-1069 Tanggal : 17/07/2026 15:50 Kasir : Admin Dine In Meja : Meja 3 -------------------------------- Nasi Goreng ≈ $1.40 1 x ≈ $1.40 -------------------------------- Subtotal ≈ $1.40 ================================ TOTAL ≈ $1.40 Bayar (Tunai) ≈ $1.68 Kembali ≈ $0.28 --------------------------------
The void reason is stored in the application, but not printed on this physical format.
7. Kitchen cancellation ticket
DINE IN - MEJA 3 (#ORD-20260717-1069) 17/07/2026 15:50 - Admin ================================ PESANAN INI JANGAN DI PROSES ================================ 1 x Nasi Goreng -------------------------------- Total Items: 1
Sent when a transaction is void or pending items are deducted/deleted.
8. Reprinted
KASIRCO RESTO -------------------------------- CETAK ULANG -------------------------------- No. Pesanan: ORD-20260717-1064 Tanggal : 17/07/2026 14:30 Kasir : Admin Take Away: Ratna -------------------------------- Air Mineral ≈ $0.22 1 x ≈ $0.22 -------------------------------- Subtotal ≈ $0.22 ================================ TOTAL ≈ $0.26 Metode Bayar: Non Tunai --------------------------------
Using old transaction data and given a Banner of the NEVER-REMONT.
9. Proof of reservation with DP
KASIRCO RESTO -------------------------------- No. Pesanan: RSV-42 Tanggal : 15/07/2026 10:15 Pelanggan : Budi Santoso -------------------------------- Paket Keluarga ≈ $28.00 1 x ≈ $28.00 -------------------------------- Subtotal ≈ $28.00 ================================ TOTAL ≈ $28.00 DP / Uang Muka ≈ $5.60 Status LUNAS (DP) Metode Bayar: DP --------------------------------
Use a regular struct format with RSV, customer, pre-order, total, and DP numbers.
10. Self Order cash at the cashier
KASIRCO RESTO -------------------------------- ** BELUM BAYAR ** -------------------------------- No. Pesanan: SO-20260717-0081 Tanggal : 17/07/2026 17:00 Take Away -------------------------------- NOMOR ANTRIAN: 0031 -------------------------------- Paket Hemat ≈ $1.96 1 x ≈ $1.96 -------------------------------- Subtotal ≈ $1.96 ================================ TOTAL ≈ $1.96 Metode Bayar: Tunai di Kasir --------------------------------
The cash in the safe is still unpaid. QRIS It was successful using the final structure.
When do you get each print out?
| Printed | The trigger |
|---|---|
| The final stroke | Transactions are paid in full; automatic or after confirmation. |
| Temporary bonuses | The Bill button, or later when the queue is active and the cashier selects Print. |
| Kitchen and bar tickets | Orders are saved with a later order or processed immediately. |
| Additional tickets | There are new products or quantities on the pending order. |
| Cancellation ticket | The outstanding items are deducted or the transaction is void. |
| Stroke is void | Void transaction worked. |
| Reprinted | Reprint the key from the transaction details. |
| Reservation | Printed menu on the reservation. |
| Self Order | The order was made from the Self Order device. |
| Report | The printer icon on the report page. |
If the printer fails
- Make sure the printer is on and not actively connected to the other cell phones.
- Check the paper and the printer cover.
- Turn it off and turn on Bluetooth.
- Turn off the printer, turn it back on, then press Test.
- If it still fails, remove the pairing. Android, repair, scan, select the device, and save it back.
- If the transaction is already stored but the print fails, use Reprinted Or reprint from the history of the transaction. Don't make a second deal.
22. All the App Settings
Language and currency
Select the language of the application, the main currency, and the number of decimal places. Use decimal zero for Rupiah when the store policy does not use fractions.
Operational
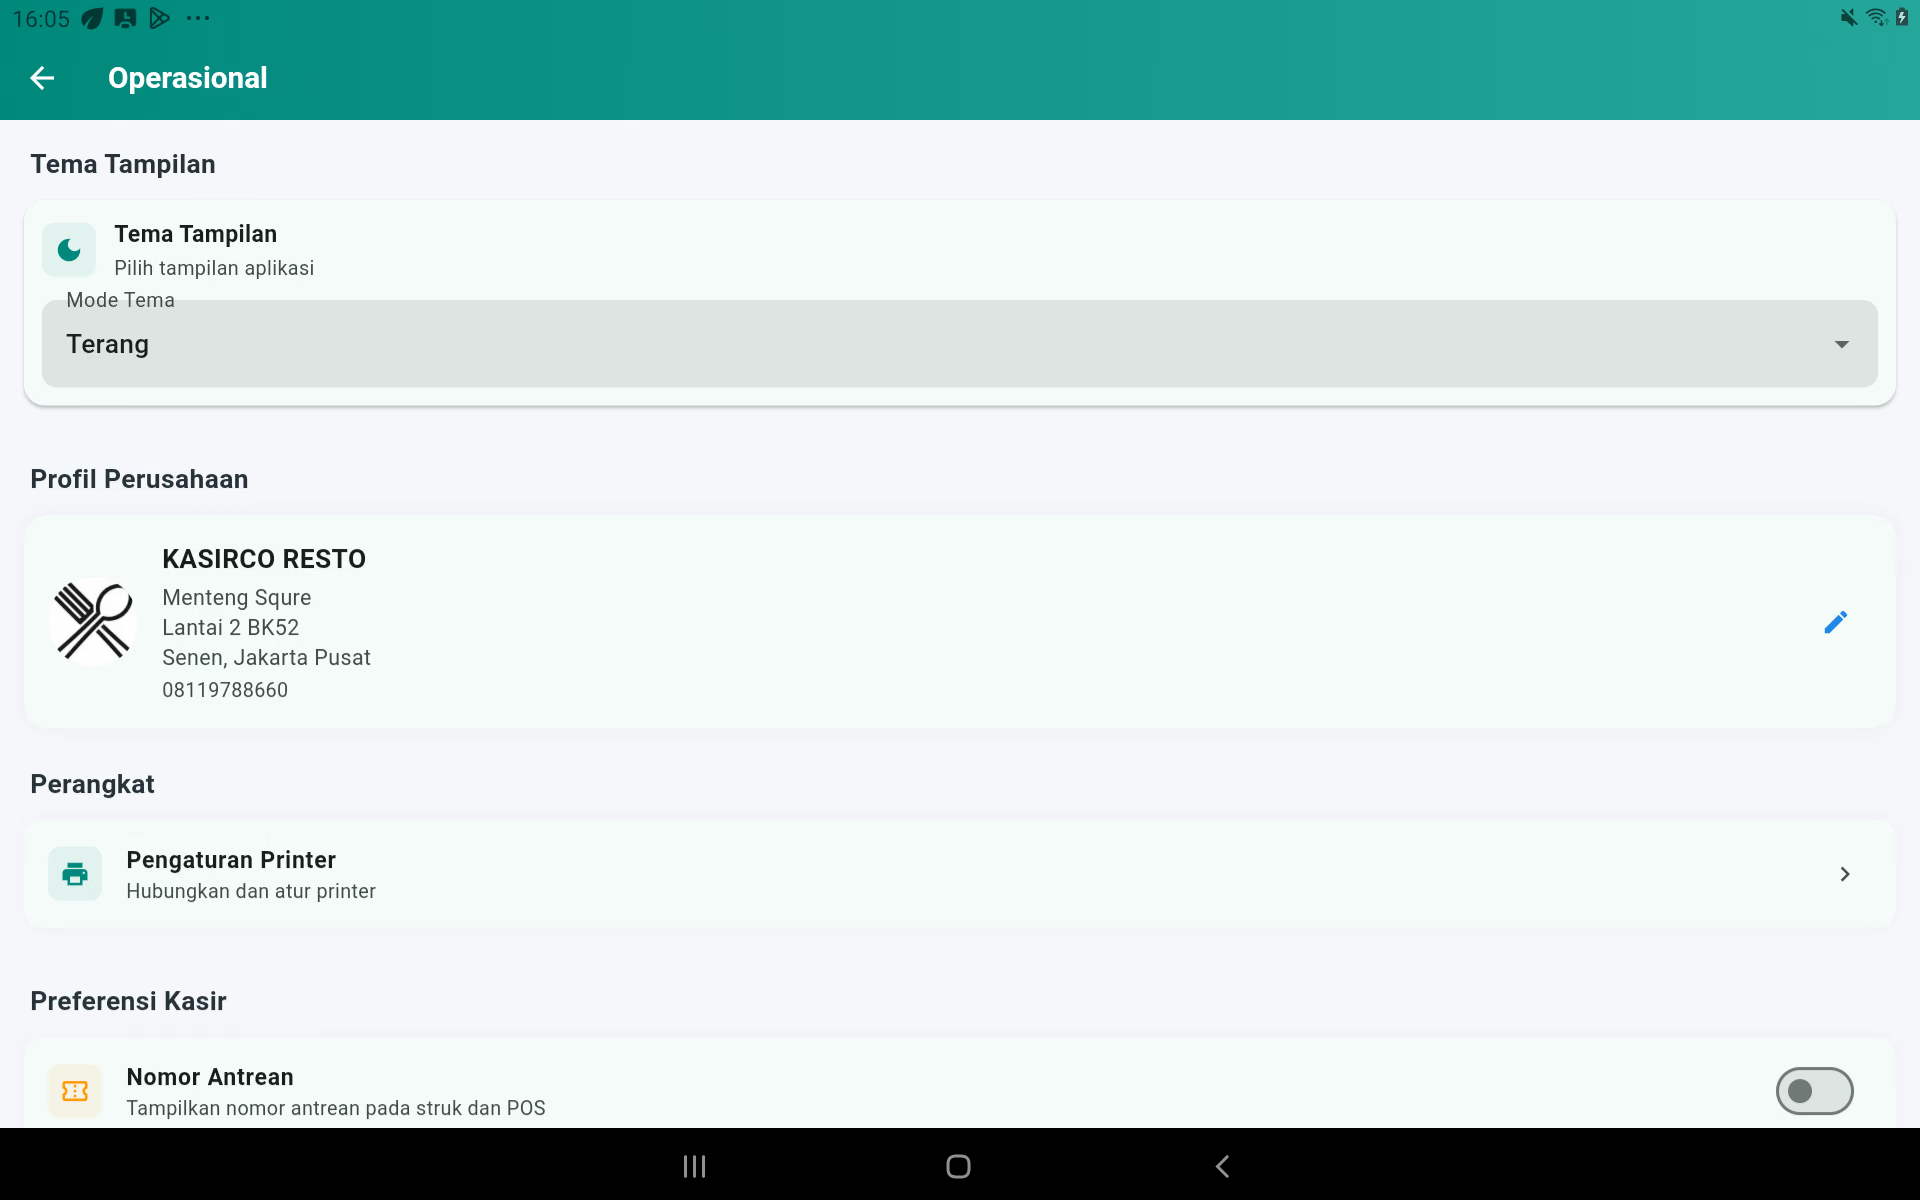
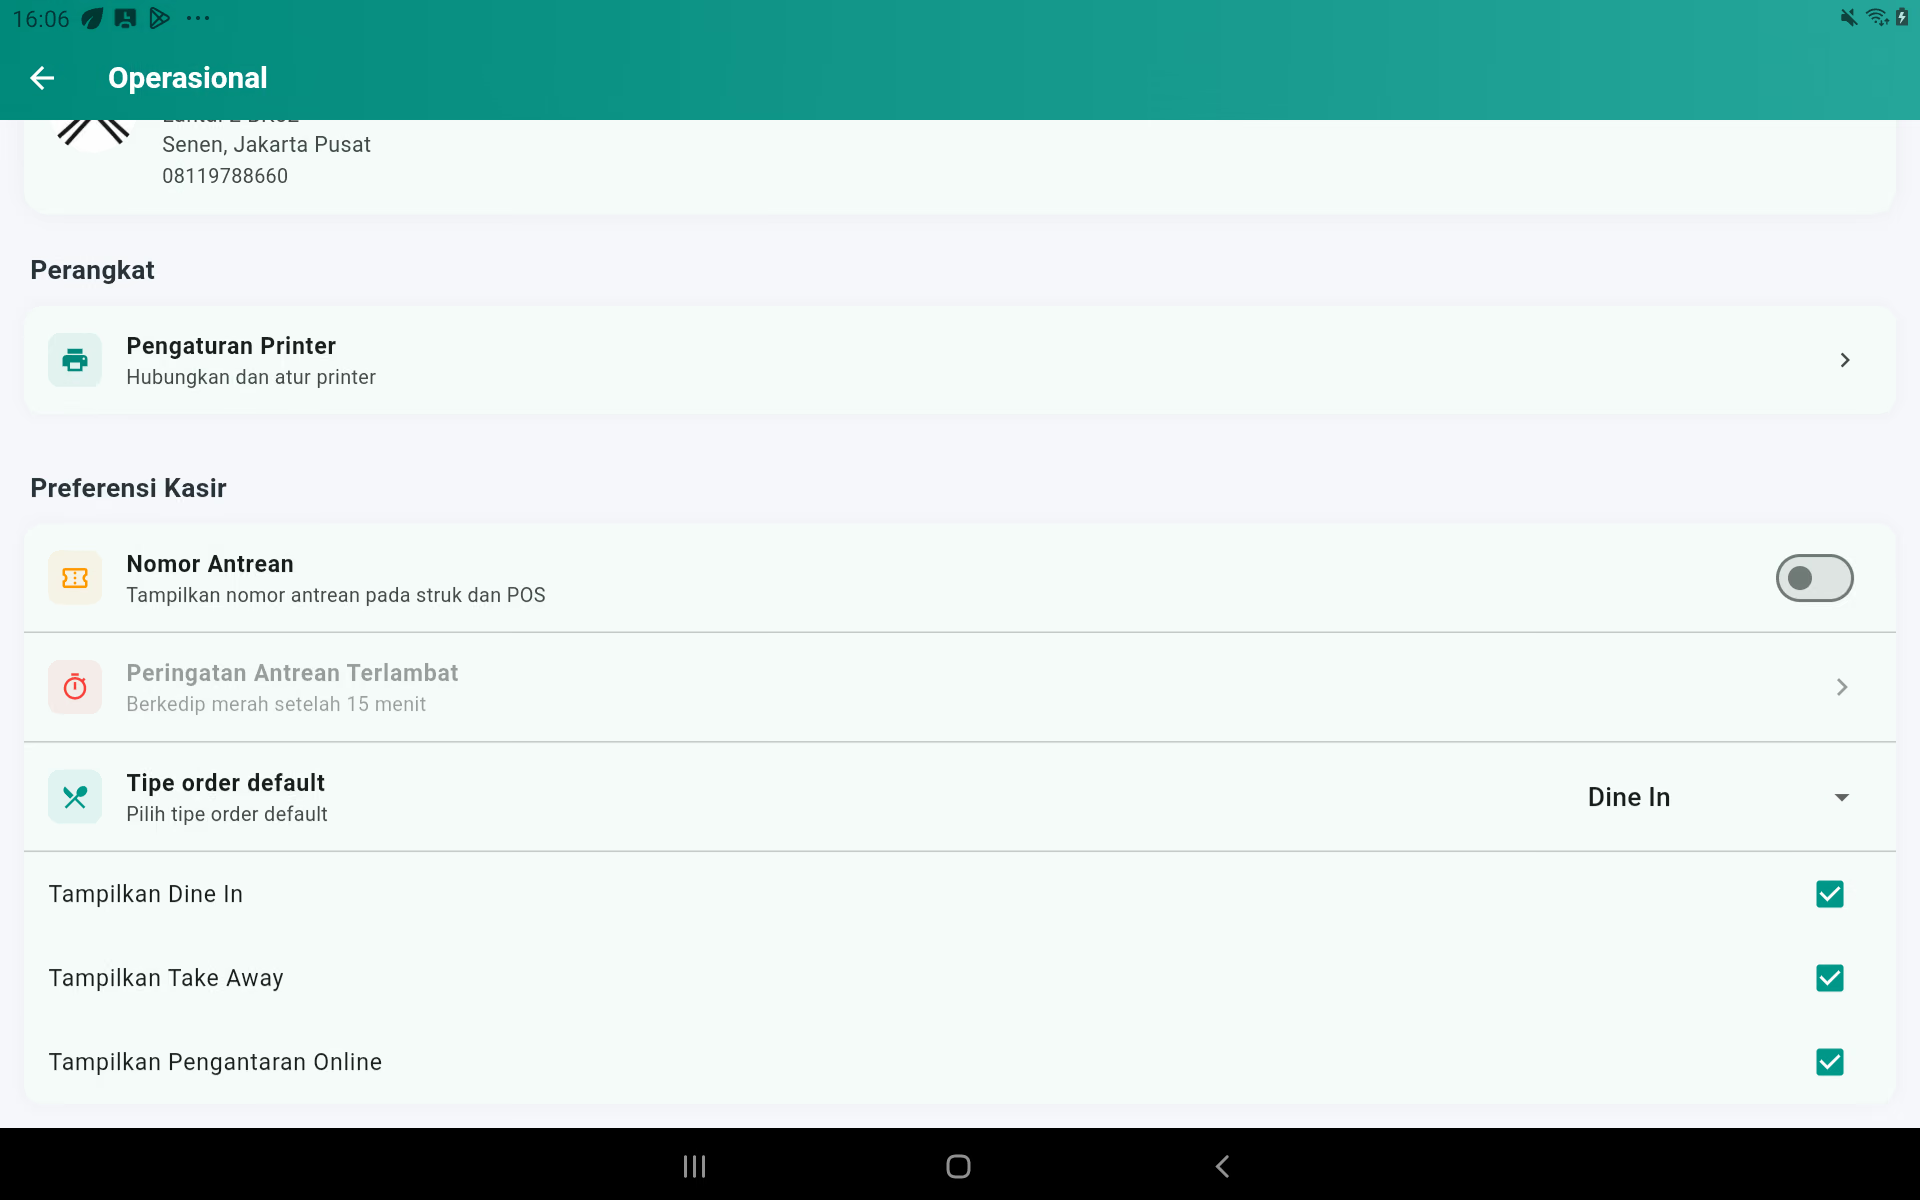
- Light, dark, or tracking device themes.
- Name, address, phone, and company logo.
- The printer and the device.
- The queue number and queue limit are late.
- It's a built-in order.
- Show/hide Dine In, Take Away, and Delivery Online.
Activating the queue number
Settlement → Operational → Preference of the cashier
- Roll to the section The preference of the cashier.
- Turn on the switch. The Antrean number with the description Display the queue number on the post and POS.
- Adjust the Antrean Warning is Late- Like, 15 minutes. Antrean will flash red once it crosses that line.
- Back to the post office. The queue icon appears at the top.
- Make one practice order and press Later or Pay to make sure the queue number is made.
How the queue number works
- The first order of the day got a number. 0001, then 0002, 0003, and so on.
- The number goes back to 0001 when the date changes.
- The old number remains in use when pending orders are opened, changed, or paid.
- The numbers appear on the final draft, the temporary vouchers printed after Later, the kitchen tickets, the bar label, the queue list, and the KDS in the main application.
- The number does not appear on the cart and does not appear in the Unpaid Order List dialog.
Calling orders from the queue list
- Press the queue icon on the top of the POS.
- The list shows four digits, status Payment/Not Payment, waiting time, and items.
- When the order is completed, press It's served.
- If the order has not been paid, the app loads the order and immediately opens the payment page.
- Once paid, the order is only marked as completed.
The payment gate is open.
Enter the Midtrans or DOKU account details provided by the provider. Keep secrets only on the store's devices. Make small value transactions for testing before use by customers.
User and role
Manage accounts, positions, active status, and permissions. See Chapter 18.
Remote access / multi device
Choose Solo, Master, Client, KDS, or Self Order modes and set up the interdevice connection.
The data
Backup, restore, export/import locally, import old, CSV template, import catalog, demo data, delete history, and delete all the data.
The account
Change the current user profile, change the password, and log out.
The information
See the app version, license status, help, customer service contacts, and the cashier's equipment link.
23. Solo, Master, Client, KDS, and Self Order
Settings → Remote Access / Multi Device
| Fashion | Used for |
|---|---|
| The solo | One device works on its own. |
| Master | The primary device that stores and shares data with other devices. |
| The client | Additional safe that's connected to the Master. |
| KDS | Kitchen screen to receive and update order status. |
| Self Order | Customer's device to select their own menu according to store settings. |
Prepare the Master and Client
- Connect all the devices to the same store network.
- On the main device, select mode Master.
- Write down the address shown.
- On the add-on, select The client.
- Enter the address of the Master.
- Press the connection test and wait for the connection status.
- Make a training order from the Client and check in at the Master.
KDS
- Make sure the Master is active.
- Choose KDS mode on your kitchen appliance or use the KDS app provided.
- Enter the address of the Master.
- Make sure the product to be cooked has a choice Send it to the Kitchen Display.
- Test order: Pending → Cooking → Ready → Served.
Self Order
- Select Self Order mode on the customer's device.
- Connect with Master.
- Check the categories, the products, the prices, the images, the stock, and the addons.
- Make a practice order and make sure the order goes to the cash register according to the store's schedule.
24. Backup, Restore, and Import the Data
The setting → Data
Backup to the Google Drive
- Login to the Google account belongs to the business.
- Press backup to the drive.
- Wait for the message to work.
- Keep a backup date and don't delete the latest files.
Local exports
- Press the local data export.
- Choose a safe location or share it with the business storage.
- Name the file with the date.
- Make sure the files are fully stored.
Restore
- Close operations and make sure no transactions are running.
- Get a backup condition now.
- Choose restore from Drive or local import.
- Pick the right file based on the date.
- Read the warnings and confirmations.
- Reopen the application when requested.
- Check the users, products, stocks, cash, and last transactions.
Import of CSV catalogs
- Download the CSV template from the app.
- Fill in the data without changing the column title.
- Use a consistent number format.
- Save it as CSV.
- Select Import CSV Catalog and select the file.
- Read the import results and the list of failed lines.
- Check the product listings and the POS.
Demo data and hazardous zones
The demo data is used for practice, not for a store that's already in operation. Delete all data and delete transaction history is permanent and must be protected by an admin password.
25. License of the Application
POS → point three → Buy a License, or Settlement → Information
Check the status
- Open the license page.
- Check the package, the expiration date, and the device ID.
- Make sure the status is active before the day of operation.
Purchases and recovery
- Select the package the application provides.
- Complete the payment through the Google Play account used for the business.
- Wait for the activation to work.
- If you've ever bought one, use it. Recovering the Purchases When it's available.
When the license is unread
- Make sure the internet is on and the device timing is correct.
- Close it and open the app.
- Use the Google Play account that makes the purchase.
- Try to recover the purchase.
- Prepare proof of purchase and device identity when contacting customer service.
26. Solving Problems
| The Trouble | What the user does |
|---|---|
| Can't log in to the site. | Check the username/password, account status, and permissions. Wait till the account is locked. |
| The menu is not visible. | Log in as an admin and check your account permissions. |
| The product doesn't show up | Check the categories, active status, search filters, and product order. |
| The product cannot be sold | Check out the stock run, the composition, the compulsory addons, and the stock blocker options. |
| Stocks are not declining | Check if the product is using live stock or composition, then check the stock logs after the transaction is completed. |
| Taxes are not shown | Make sure the tax is active and selected on the product. |
| Discount is not usable | Check the dates, hours, days, minimum shopping, membership, code, and eligible products. |
| The printer was not found. | Turn on the printer/Bluetooth, pair of AndroidGive me your permission, then scan again. |
| The Stroke is cut | Same size of 58/80 mm paper and check the roll. |
| The drawer is not open. | Check the drawer cable to the printer, turn on the automatic unlock, and run a test. |
| Client/KDS is disconnected | Make sure the master is on, the network is the same, the master's address is correct, then test the connection. |
| Cash of dispute | Recount the physical, check the void, cash in/out, cash out, and then write the reason. |
| The report is empty. | Check the period, filters, transaction status, and reporting permissions. |
| Digital payments delayed | Don't pay me back. Check the provider's status and transaction history first. |
| Data is incorrect after restoration | Stop the transaction, don't create new data, and contact the administrator with the last backup file. |
Before calling for help
- Write down the time of the incident.
- Write down the account name and order number.
- Take screenshots of the error message.
- Write down the version of the app.
- Don't delete the app or data.
- Get the last backup.
27. Recommended Daily Procedures
Before it opens
- Turn on the master, the printer, the KDS, and the cash register.
- Check the internet.
- Log in with each account.
- Do the Clock In.
- Open the safe and put in the initial capital.
- Check the stock low.
- Do a print test if you need to.
During operation
- Choose the order type and the table correctly.
- Use the member if the subscriber is registered.
- Write down the specific request for the item.
- Check the total before you pay.
- Keep the evidence of the expenses and the grounds for void.
- Don't share accounts.
When it's closed
- Finish all the unpaid orders.
- Check the digital transactions.
- Physical inventory is important when scheduled.
- Count the physical money and close the cash.
- Check the sales, cash, discounts, voids, and stock reports.
- Clock out.
- Get some backup.
- Turn off the client/kds first, then the master.
28. Frequently Appearing Terms
- The POS
- The cashier's page to make and pay for orders.
- Dine in
- Eat at the place.
- Take it away
- They're taking him home.
- Online delivery
- Order from the delivery platform.
- - What?
- Additional options on the product.
- The composition
- List of ingredients and quantities used for a single product.
- HPP / Capital price
- Cost of goods or materials used to produce products.
- FIFO
- The first-in stock is used first.
- Service Fee
- Service charges added to the transaction.
- Void
- Cancellation of a transaction that has been completed for a reason stated.
- Split Bill
- Splitting one order into multiple payments.
- Early capital
- The physical money in the drawer when the shift starts.
- KDS
- Kitchen screen showing order and status of workmanship.
- Master
- The main device for other devices.
- The client
- An additional device connected to the Master.
- Back up
- Copy the data for recovery.
- Restore
- Retrieving data from backup copies.